Make Life Lovely

Your DIY Guide to a Lovelier Life

  • Home
  • About
    • My Story
    • Contact
    • PR/Press
    • Terms
  • DIY / Crafts
    • Crafts
    • Gifts
    • For the Home
    • Kids
    • Memories
    • Paper
    • Parties
    • Printable
  • Holidays
    • Valentine’s Day
    • St. Patrick’s Day
    • Easter
    • Mother’s Day
    • Father’s Day
    • Fourth of July
    • Halloween
    • Thanksgiving
    • Christmas
    • New Year’s Eve
  • Food
    • Bread
    • Dessert
    • Drink
    • Main Dish
    • Side Dish
    • Soup
  • Fashion
    • Accessories
    • Beauty
    • Clothes
  • Travel

DIY Anchor Pillow + Free Printable

July 10, 2013 By Laura 10 Comments

4542shares
  • Share
  • Tweet

Please tell me that I’m not the only person who absolutely loves the sight of an anchor?!

I’ve already professed my love of anchors to you in other posts, so you probably won’t be surprised to know that I made my new favorite pillow this week, featuring a big white anchor stenciled onto navy blue duck cloth.

This anchor pillow is a great way to bring the summer into your living room, or any other room in your house (or even outdoors!).  Because I used duck canvas, it is very sturdy and durable.  I made an easy freezer paper stencil to use as my template to paint the anchor directly onto the fabric.  This is also a slipcover, so you can remove and wash as needed.

And this pillow only cost me $2.50 to make!  Duck cloth was on sale for $5 a yard at JoAnn, and I only had to get 1/2 a yard to make a pillow.  The rest of the supplies I already had.

Want to make your own lovely anchor pillow?  Here’s how!

DIY Anchor Pillow:

  • Fabric the same width as your pillow (I used navy duck cloth- my pillow was 18×18,” so I bought 1/2 yard, 18,” of fabric)
  • Fabric paint, or  paint that is safe to use on fabric (I used Martha Stewart Craft Paint)
  • Paintbrush (I used a Martha Stewart stencil brush)
  • Freezer paper (I bought mine at Walmart)
  • Cutting knife
  • Iron
  • Cutting mat
  • Pins
  • Sewing machine
  • Anchor Printable
1.  Cut out a piece of fabric the same size as your pillow insert.  My insert was 18″ x 18″, so my navy duck cloth piece was also 18″x18″.   Now cut out two pieces of navy fabric that are the same height as your pillow, but about 2/3 the width- in my case each piece was about 12.”  These two pieces should overlap each other by a few inches, and will be the back of the pillow cover.  Fold over the edge of one of the 12″ pieces, and sew along the edge, so that there is a nice hem on it.
 2.  Download and print the free anchor printable onto freezer paper.  You can print directly onto freezer paper with an ink jet printer- just cut the freezer paper to 8 1/2 x 11,” and print on the paper side (not the shiny side).
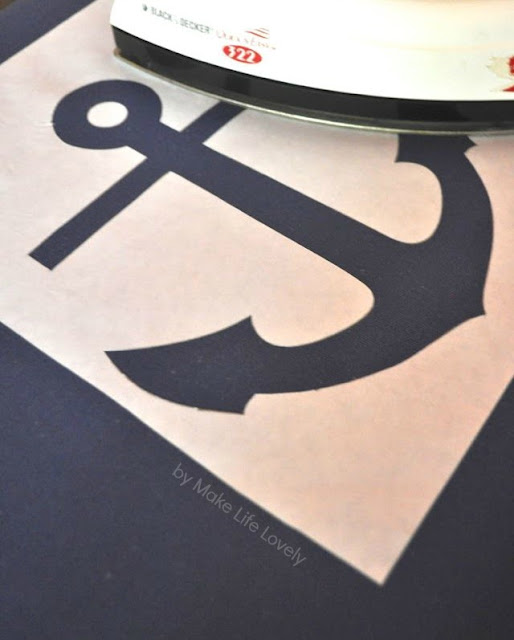
3.  Cut out the anchor design with a craft cutting knife on a cutting mat.  Iron the freezer paper onto the 18″ (or whatever size your pillow insert is) piece where you would like it.  Make sure that you iron on medium heat without steam, with the SHINY side down.  Iron until the freezer paper stencil is stuck to the fabric.  Don’t forget to add the little circle at the top of the anchor!  And don’t worry, the freezer paper will peel right off once the paint is dry, I promise!


4.  Using your paintbrush and fabric paint, paint inside the stencil so that there is a nice, even coverage. Let the paint dry, and then carefully peel up the freezer paper.  It comes up very easily.  Voila! You should now have a beautiful anchor staring back at you!!
5.  Time to sew!  Place your anchor fabric anchor-side up, and place the hemmed piece of 12 x 18″ fabric along the left edge of the pillow, on top of the anchor.  Next place the other 12 x 18″ piece of fabric on the right edge of the pillow on top of the anchor.  Pin all of the layers together, and sew around all four sides using a 1/4″ seam allowance.


Now make a small diagonal cut on each edge of the pillow, making sure that you don’t cut any of the stitching.  Turn the pillow right side out, and use your scissors or pencil to push out the corners.  Place your pillow insert into your cover.Done!  Isn’t it pretty?! I think I’m in love 😉  Now I’m off to make another matching one!

xo, Laura

4542shares
  • Share
  • Tweet

About Laura

Hi! I'm Laura, owner and creator of Make Life Lovely, a creative blog filled with creative craft tutorials, DIY projects, party tips, holiday ideas, home decor, and so much more! Make Life Lovely is dedicated to making everyday life more lovely, and I hope to inspire you and show you how!

Let's Be Friends!


Comments

  1. sew sweet vintage says

    July 11, 2013 at 2:44 am

    I love anchors and nautical too!! Pinning your beautiful beachy pillow:) Never used freezer paper. I have several questions:
    Where can I find freezer paper?
    Does it stick to the fabric?
    Do you iron a specific side?
    http://www.sewsweetvintage.com/2013/07/vintage-swimwear.html

    Reply
    • Laura @ Make Life Lovely says

      July 11, 2013 at 6:39 am

      Thank you for commenting, and thanks so much for the pin! You can find freezer paper at Walmart, of all places! It should be with the wax paper- it look very similar to wax paper, but is just in a bigger box. Yes, after you iron it SHINY side down, it will stick perfectly to the fabric. It’s pretty cool stuff. When the paint is dry, all you do is lift up one corner and peel up the freezer paper- it comes off very easily. I’ll update the post with that info. Thanks so much for visiting- I hope you give this a try!

      Reply
  2. Lisa @ Texas Decor says

    July 11, 2013 at 1:40 am

    Hi Laura! I love anything with anchors on it too. 🙂 Such a pretty pillow! I just found your blog through Instagram. I follow World Market and I saw your comment and that brought me to your blog! Gotta love technology. 🙂 Anyway, you have a great blog. I think I need to go read some of your older posts now. 🙂 Have a great week!

    Reply
    • Laura @ Make Life Lovely says

      July 11, 2013 at 6:34 am

      Thanks so much, Lisa! I hope you enjoy my blog, I’m so glad that you found me! I love that you found me on Instagram, too- yay for technology! Aren’t anchors the best?

      Reply
  3. Jenna LaFevor says

    July 11, 2013 at 11:25 am

    So cute!! Love anchors! Sharing on Facebook later today! Jenna @ Rain on a Tin Roof

    Reply
  4. Carissa Rasmussen says

    July 12, 2013 at 5:14 pm

    so fun! we all could use an anchor pillow in our homes!

    Reply
  5. My name is Rita says

    July 20, 2013 at 6:28 pm

    What a fun and pretty pillow. Will be trying this. If you get a chance, please link up to my Linky Party: http://suburbsmama.blogspot.com/2013/07/sunday-linky-17.html

    Reply
  6. Felecia Cofield says

    July 22, 2013 at 9:13 pm

    Hi Laura! What a nice pillow! Thanks for the tutorial and the download! I hope to use this before summer is over! Blessings from Bama!

    Reply
  7. Sabine Büttner (Germany) says

    February 21, 2015 at 11:25 pm

    Hi Laura, I’ll follow your pages from today on. I want to thank you for the cute anchor pillow. I’m sewing pillows for my four grandchilds since Xmas. I’m also interrested in stiches. Have a nice weekend. yours Sabine

    Reply
  8. Sabine Büttner (Germany) says

    February 22, 2015 at 9:08 am

    Hi Laura, it would be nice to hear from you soon. I prefere every nautical assecoiresl, pictures from tal ships and lighthouses. I love the sea and I’m living near Black Forrest. It’s such a long distance to get there. And I’ reay happy to find s. o. writing in English.

    Reply

Leave a Reply Cancel reply

Your email address will not be published. Required fields are marked *


[footer_backtotop]

Copyright © 2021 · Genesis Framework · Design by Key Lime Digital Designs · Log in

Privacy Policy