This is a sponsored post written by me on behalf of The Hershey Company. All opinions are 100% mine.
I’m SO excited to share today’s tutorial with you! It’s a spooky DIY Halloween Candy Bowl tutorial that is really fun to make, and even more fun to grab candy from. 😉

Every year we go to a Trunk or Treat for my church, as well as have trick-or-treaters, friends, and family over that we give candy to.
Instead of using a plain old plastic or metal bowl to pass out candy in, I wanted to create my own unique Halloween candy bowl that would be fun and a little bit spooky for the kids to reach into and grab their candy, but not too terrifying that I scare them.
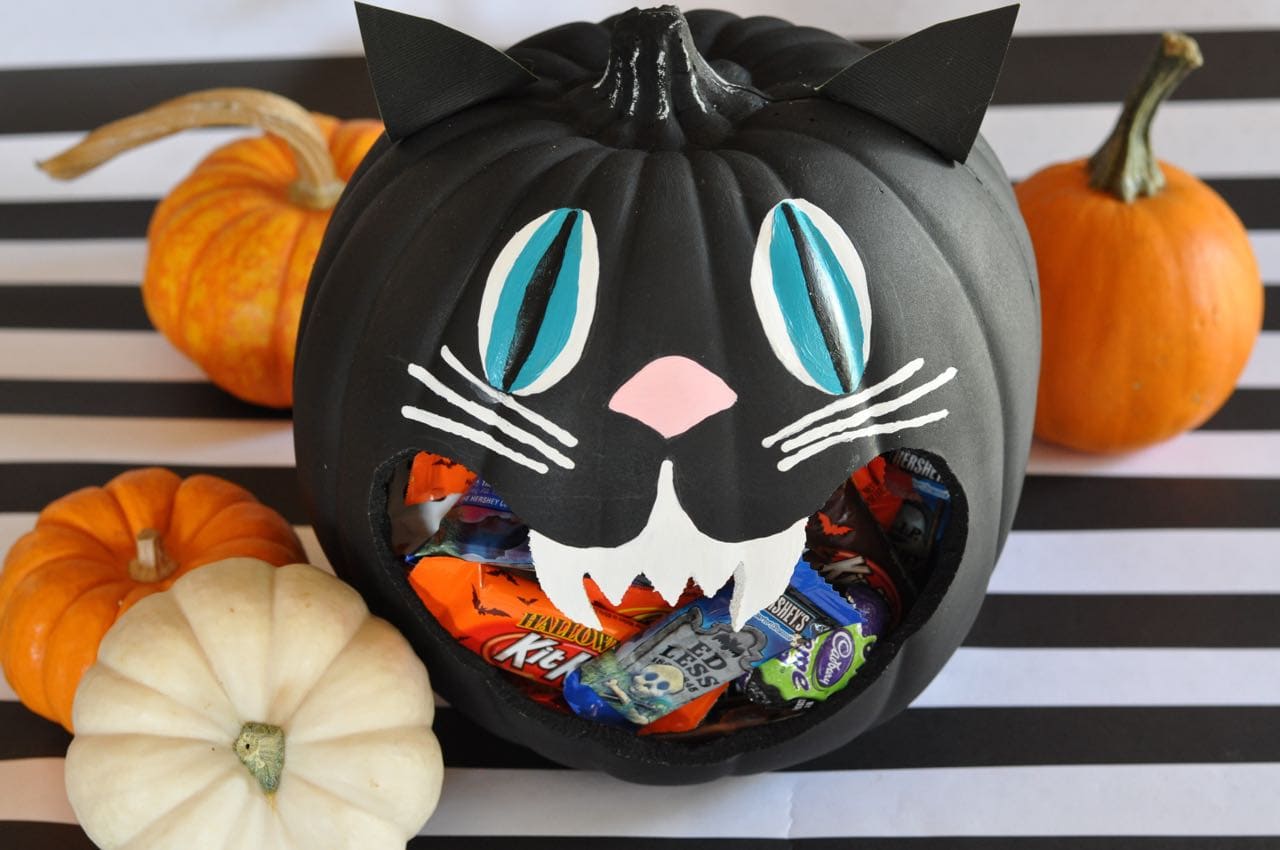
I think this black cat candy bowl does a perfect job at this! I started with a black hollow styrofoam pumpkin from the craft store. A few cuts, some paint, and some delicious candy later, this black cat candy bowl is ready for its’ debut at our next Halloween party!
Here’s the easy directions if you’d like to make your own…

DIY Halloween Candy Bowl Tutorial
Supplies:
- Black craft pumpkin (if you can’t find black, you can always spray paint an orange one black)
- Styrofoam cutter or craft knife
- Craft paint (in desired colors)
- Small paintbrush
- Pencil

Step 1. Draw a cat face onto your black pumpkin with a pencil. I googled vintage Halloween cat for ideas on how I wanted my face to look. Start with the mouth and make it very large, since that is where the kids will reach their hands in to get the candy. I drew teeth in for an added effect.
If you make a mistake, simply erase it and try again!

Step 2. Using a styrofoam cutter or craft knife, carefully cut around the large mouth of the cat, being especially careful around the teeth so that you don’t cut into them.

Step 3. With a small paintbrush, paint in the details of the eyes, nose, whiskers, and teeth in your desired colors.

Step 4. Cut two cat ears out of black card stock. Hot glue them onto the top of the pumpkin by folding down the bottom of each ear slightly, placing the hot glue on the folded portion, and carefully pressing down.
Voila! Isn’t it adorable!?
Now that your cute Halloween candy bowl is complete, it’s time for the fun part- adding the candy!!
I filled our cat with lots of yummy Halloween candy from Hershey. Hershey has all of the classic chocolate and candy bars we love, as well as lots of new takes on those tasty classics that are perfect for trick-or-treaters, for serving at a party, and for baking.
Did you know that Hershey’s makes Reese’s Peanut Butter Pumpkins, Cadbury Screme Eggs, Hershey’s Candy Corn bars and more, just for Halloween?! With 34% of people either attending or throwing Halloween parties, Hershey’s candy is a great way to turn any Halloween party from normal to paranormal.
I couldn’t resist making my favorite fall treat- caramel apples! This time I decided to mix up the plain caramel apple and add some cut up candy pieces to the bottom half. Best decision ever! These candy caramel apples are fun to customize with your favorite Hershey’s candy. The hardest part is deciding which candy to use!

I chopped up some fun size Almond Joy Bars, Reese’s Peanut Butter Pumpkins, Kit Kat Bars, and Reese’s Pieces. The chopped candy pieces went inside small bowls.
Try removing as much of the wax as possible from the apples by washing and drying them well, and using fine grit sandpaper to remove excess wax. It’s worth it to not have all the caramel drip off.
Candy Caramel Apples
- apples (We used Granny Smith) with sticks inserted
- 2 cups brown sugar
- 1 cup light corn syrup
- 1 can sweetened condensed milk
- 1/2 cup butter
- 1 tsp. vanilla
- Your choice of candy bars, cut in small chunks
Combine the brown sugar, corn syrup, and butter in a medium pot. Cook over the stove on medium heat until the butter is melted. Add the sweetened condensed milk.
Keep boiling and stirring until a candy thermometer reaches 245 degrees. Remove from heat and add the vanilla. Let the caramel sit for a few minutes before dipping the apples inside the caramel.
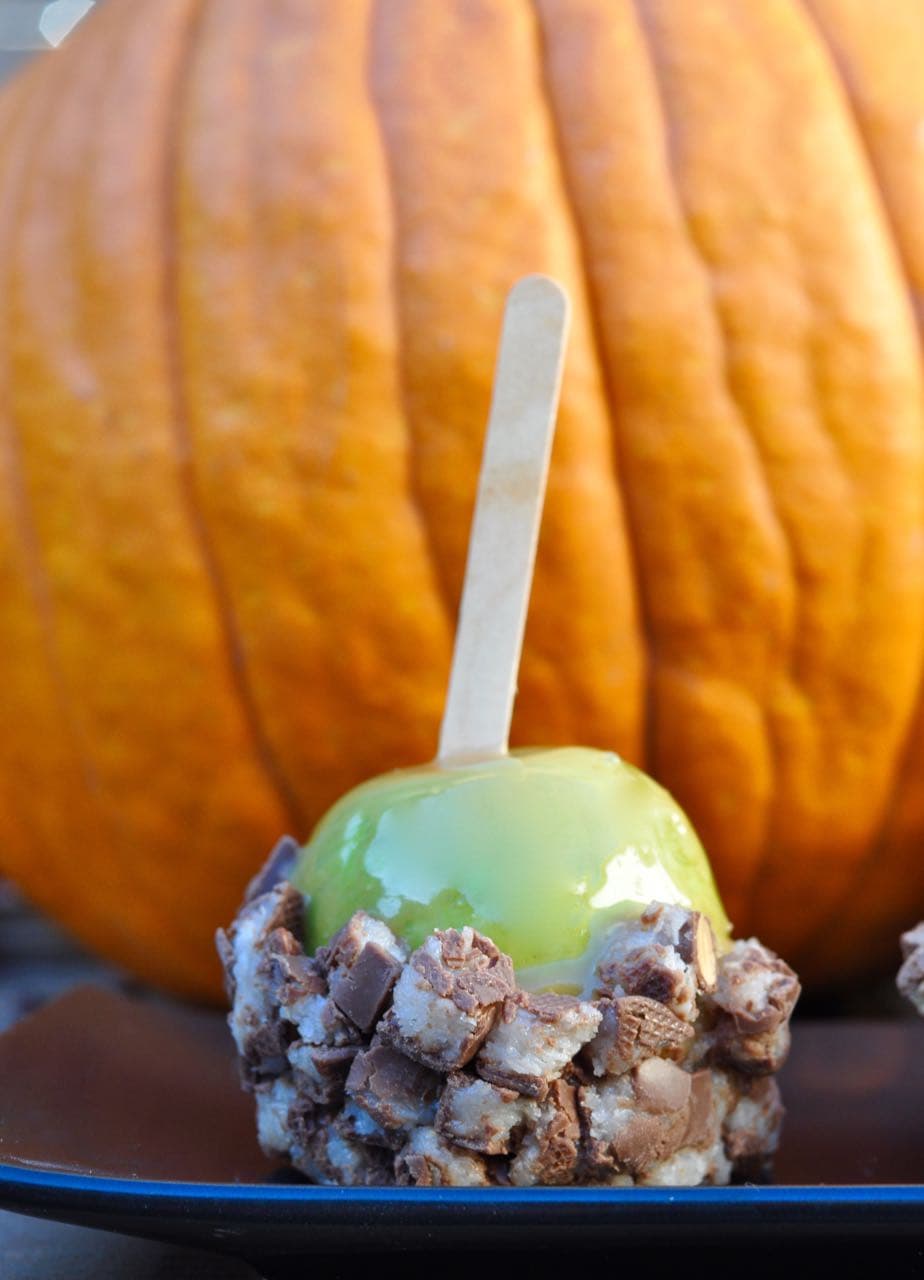

Once the apples are dipped, let the excess caramel drip off the apple back into the pot. Place on parchment paper so that the caramel doesn’t stick. Let cool a few minutes, then place the caramel apple into the candy bowl of your choice.
Press the candy up against the sides of the apple to help it stick better. Immediately place the caramel apples in the refrigerator for a bit to help the caramel and candy set.
Remove from the fridge and enjoy! Recipe adapted from here.
These Reese’s Pieces caramel have such a satisfying crunch with the candies stuck to the caramel. Yum!

If you haven’t made caramel apples yet this season, then you’ll want to give these ones a try! I’ve yet to make a caramel apple that I didn’t like. 😉
I hoped you liked this cat Halloween candy bowl tutorial! I’ve got plenty more Halloween ideas that I’ll be sharing with you in the next few weeks leading up to Halloween, so stay tuned for more crafty goodness.
Happy haunting!!
![]()
Leave a Reply