I told you yesterday that I had a few Easter burlap projects I’ve been working on. So far I showed you how to make Easter bunny burlap place mats, and today I want to share with you how to make a pretty Easter burlap bunny hanging, perfect for hanging on a wall or door in your home. My hanging is similar to the Pottery Barn version, except that I kinda’ like mine better 😉

This spring burlap Easter Bunny banner was really easy to make, and I love how it looks hanging in my house! The Pottery Barn version costs a TON more than my version, which only cost me about $3-$4 (after my 40% coupon)! Don’t get me wrong, Pottery Barn is, and always will be, my favorite furniture store, but when I can DIY for significantly less, and it still looks just as good, count me in!
- Burlap
- White felt
- Cardboard of poster board (for your rabbit template)
- Fabric scissors
- Dowel (Home Depot, Joanns, Walmart, etc.)
- Jute, twine, string, etc. (to hang the banner)
- Drill
- Cut the burlap into the size that you would like your hanging to be. You will need to cut two pieces of this size. Be sure to measure the area where you would like to hang this, and then measure and cut accordingly.

Here’s an easy way to cut burlap that I learned from the nice lady at Joanns. Figure out where you want to cut the burlap, and then pull on a single thread in that spot. Pull the thread gently, and keep pulling until it is all the way out. If it breaks, then just pick up the rest of the string and keep pulling until it’s all the way out. Now you have an easy line for you to cut the burlap nice and straight! Cool, huh?
Now sew the two banners together by placing the front sides together, and doing a straight stitch along the top. Now you have one continuous long piece.
- Draw out a simple rabbit silhouette onto a piece of cardboard or poster board. I used my little Martha Stewart bunny stencil as a guide to look at to draw out a big rabbit shape. Don’t let this part scare you! I did a little erasing here and there, but this really wasn’t hard to do. I just decided how big I wanted my bunny to be, and went for it. Once your rabbit template is drawn, cut it out, and trace it onto the BACK of your white felt piece.
If you want your bunny facing the left, make sure when you trace it onto the back of the felt that it is facing the right! (Or vice versa)
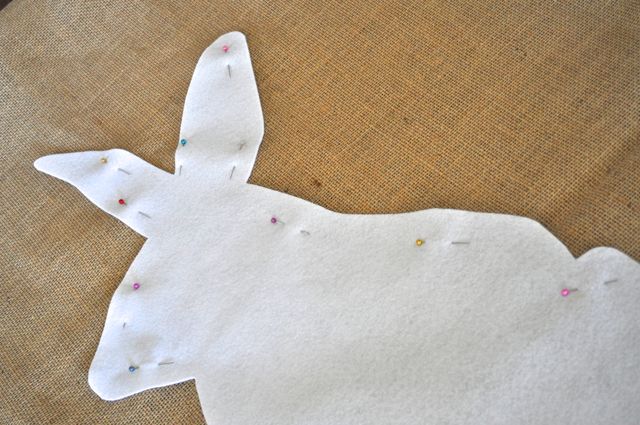
- Pin the rabbit onto the front piece of burlap, and sew using any stitch that you like. I used the pin stitch that I used for my heart pillows, which is a good applique stitch, and makes the banner look really professional.

- Once the bunny is sewn, then you will need to pin the front and the back of the burlap hanging together. You will need to sew a large rectangle around the perimeter of the hanging, with just a little bit of a seam allowance. This will allow the banner to fray just a little bit and give it a soft edge, but not enough that it looks messy. The stitches from the sewing machine will stop the fraying.
** Be sure to leave enough space at the top for the dowel to fit into! **
Once the banner is sewn, all you have to do is attach the jute, twine, or whatever you would like to hang it. We chose to drill a hole in each end of our dowel, pull the cord that I used through, and tie a know in each end. Easy. If you want to skip the drilling step, just tie your cord, jute, etc. to each end.
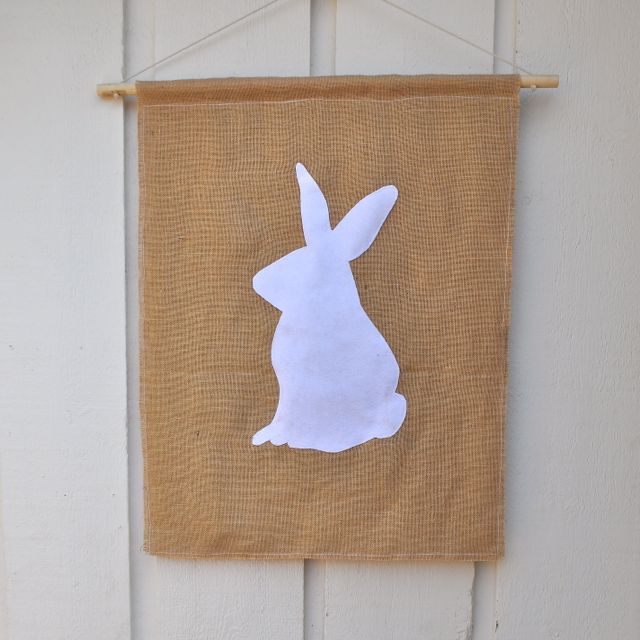
Isn’t it lovely? And for under $5?! And while I’ll always be in love with anything from Pottery Barn, I think I gave them a little competition with this one 😉

If you’d like matching placemats to go with your hanging, you can find the directionshere for these Easter bunny burlap placemats.
Happy crafting!!
xo, Laura