Make Life Lovely

Your DIY Guide to a Lovelier Life

  • Home
  • About
    • My Story
    • Contact
    • PR/Press
    • Terms
  • DIY / Crafts
    • Crafts
    • Gifts
    • For the Home
    • Kids
    • Memories
    • Paper
    • Parties
    • Printable
  • Holidays
    • Valentine’s Day
    • St. Patrick’s Day
    • Easter
    • Mother’s Day
    • Father’s Day
    • Fourth of July
    • Halloween
    • Thanksgiving
    • Christmas
    • New Year’s Eve
  • Food
    • Bread
    • Dessert
    • Drink
    • Main Dish
    • Side Dish
    • Soup
  • Fashion
    • Accessories
    • Beauty
    • Clothes
  • Travel

Tuxedo Chocolate Covered Almonds

February 18, 2014 By Laura 3 Comments

111shares
  • Share
  • Tweet

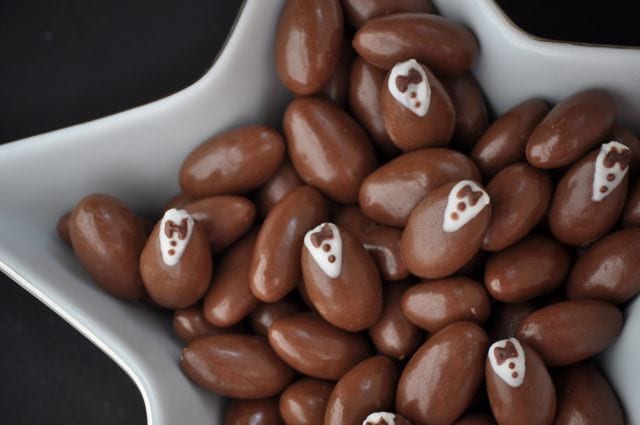
Oscars week continues on the blog this week, and I am so excited to share these cute treats that I came up with that are perfect for the occasion!  They were pretty easy and fun to make, and I fooled my husband and kids that I had spent hours making them… tuxedo chocolate covered almonds!

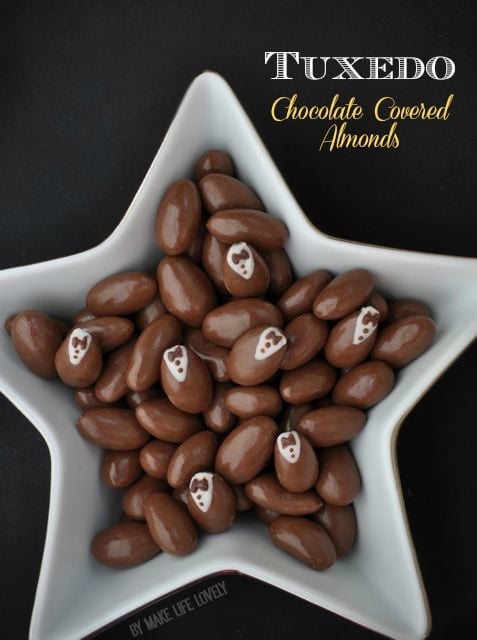
My husband bought me a HUGE container of chocolate covered almonds for Valentine’s Day, so I decided to get creative with them and make these tasty treats.

Chocolate covered almonds wearing little tuxedos would be great to serve at an Oscar’s party, a Hollywood party, prom, a wedding, or any black tie affair.  I mean, who can resist chocolate in a tux?

I made a small handful of these, and then mixed them in with the rest of the regular chocolate covered almonds.  Unless you have a ton of free time on your hands, I think this is the best option for serving these little cuties.

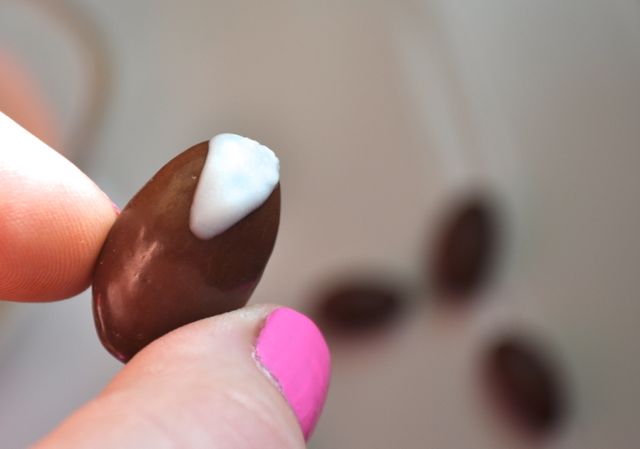
Tuxedo Chocolate Covered Almonds:

  • Chocolate covered almonds
  • White chocolate melts or bark
  • Dark chocolate melts or bark
  • Toothpick
First, melt a few of the white chocolate melts or bark according to the directions.  
Use a toothpick to add the white chocolate to the almond and create a V shape coming down from the top.  Repeat with as many almonds as you’d like to use.  
Melt the dark chocolate, and then use another toothpick to make a tiny bow tie shape, along with two or three buttons.  I found that it was easiest to make the sides of the bow first, and then connect them in the middle with a small dot.
I think I’m in love.  These little guys are just so easy and adorable, don’t you think?
Here’s a quick recap in case you missed the rest of my Oscars posts this week.  So far I’ve shared free printable Oscars party invitations and printable Oscars ballots.  

Make sure to visit tomorrow to see an Oscars party I put together using amazing finds from one of my favorite stores on the planet- World Market!

xo, Laura

Sharing here:  Show and Tell

111shares
  • Share
  • Tweet

About Laura

Hi! I'm Laura, owner and creator of Make Life Lovely, a creative blog filled with creative craft tutorials, DIY projects, party tips, holiday ideas, home decor, and so much more! Make Life Lovely is dedicated to making everyday life more lovely, and I hope to inspire you and show you how!

Let's Be Friends!


Comments

  1. thislifeandtimes says

    February 19, 2014 at 9:10 am

    This is so cute! What a lovely idea 🙂

    Reply
    • Laura @ Make Life Lovely says

      February 26, 2014 at 6:32 am

      Thanks so much! It was really fun painting those tiny little bow ties!

      Reply
  2. health_news says

    February 21, 2014 at 5:27 am

    Great post! i like this idea.

    Reply

Leave a Reply Cancel reply

Your email address will not be published. Required fields are marked *


[footer_backtotop]

Copyright © 2021 · Genesis Framework · Design by Key Lime Digital Designs · Log in

Privacy Policy