

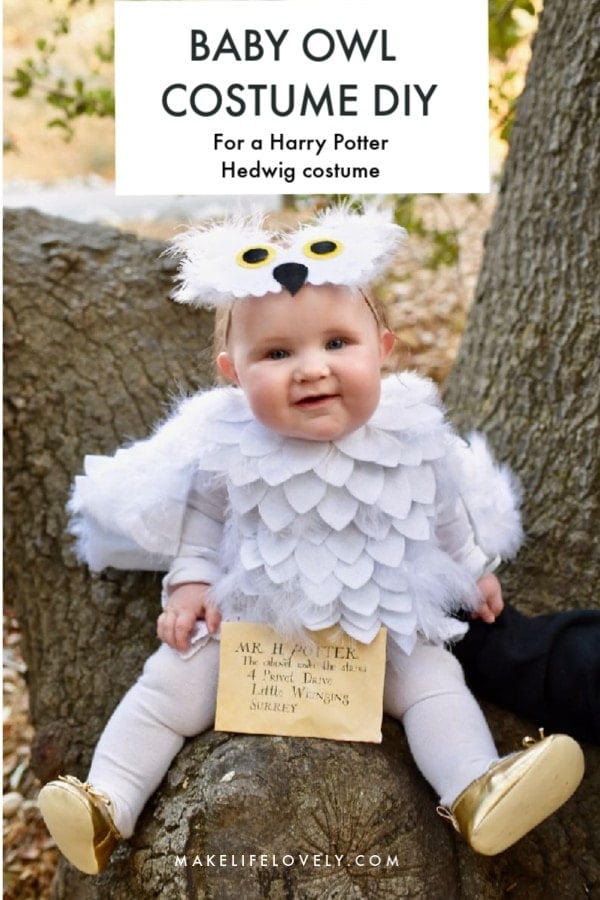
Make a darling baby owl costume that’s looks like Harry Potter’s snowy owl Hedwig! This DIY Halloween costume is perfect for a Harry Potter group costume, is no-sew, and is so simple to make.
Accio, adorable Hedwig baby owl costume! My dream of having the family dress up as Harry Potter characters is finally coming true this year!
My daughter begged me to be Hermione this year, which led my son to want to dress up as Harry, which led me to the question- what about the baby?
While there are lots of Harry Potter costume ideas for adults, there weren’t a whole lot of Harry Potter baby costume ideas.
Then it hit me- what about a Hedwig costume? Visions of a fluffy white baby Hedwig costume consumed my thoughts until I finally sat down and came up with a plan.

The result is this darling owl costume that was actually very easy to put together.
If you have a Cricut Maker machine this costume is even easier- it will do all the cutting for you!
You can learn more about why I LOVE my Cricut Maker.
Did I mention that this baby Hedwig costume is NO SEW?!
I’m very crafty, but sewing machines just scare me. You can make this baby owl costume without ever going near a sewing machine.
You’re welcome.
This post contains affiliate links, which means if you make a purchase, I receive a very small commission at no extra cost to you.
Baby Owl Costume Tutorial
Supplies:
- Long sleeve onesie
- White diaper cover, bloomers, leggings, or ruffle tights
- White felt (I buy mine at Joann with a 50% off coupon for super cheap!)
- Fabric scissors or Cricut Maker (optional)
- Hot glue
- White craft feathers (Mine came from Michaels but these ones on Amazon look just like what I bought)
- Nylon headband (or a pair or old nylons you don’t mind cutting would work too)

Cutting the owl costume feathers
You are going to be cutting a lot of feathers out of white felt.
If you have a Cricut Maker or Cricut Explore Air 2, then you’re in luck!!
Your machine can cut all the felt pieces for you and all you have to do is glue them down.

Get the cut file for feathers I created, then cut with your Cricut machine.
Helpful Hint: When you go to cut the feathers with your Cricut machine and it says “Project Copies,” change the number from 1 to 41, so it fills a whole 12 x 12″ mat with feathers without wasting any felt.
UPDATE: Please Read!
Cricut Design Space recently changed from being web based to app based. You need to download the Cricut Design Space app now in order for my cut file links to work. When you press a cut file link you’ll see this page…

- Press “download,” open up the app-based Design Space, then come back and press on my cut file links and they should open right up for you.
- If you previously downloaded the Cricut Design Space app, then press on a cut file link and then press “Open.” The cut file should open right up for you.
- If you go to the old Design Space for web, the cut files will NOT open. You need to download the new Design Space to access them.
If you don’t have a Cricut machine, don’t worry! You can still make this baby owl costume.
You will need to cut out one feather that you like from felt and use it as a template for cutting more feathers.
Keep cutting until you have a LOT of feathers.
Gluing the feathers on the Hedwig costume
Place a piece of cardboard inside the onesie to the hot glue doesn’t go through to the other side.

Starting at the bottom center of the white onesie, add a strip of hot glue to the top of the feather, then carefully press down to adhere to the onesie.

Glue another feather a bit higher, overlapping slightly and to one side of the first feather.
Repeat to create a bottom row of feathers on the owl costume that goes up on the sides.

Keep repeating until the center portion of the onesie is filled with feathers. I left the arms plain.

Around the top, I glued a little “collar” of feathers to finish it off.
Making the baby owl costume wings
This part is optional, but if you want your Hedwig costume to have wings, then measure your child’s wingspan (okay, arm span), then cut a piece of white felt to that length.
Cut a semi-circle from end to end to create wings.

Add felt circles to the owl wings just like you did for the owl costume, starting at the bottom.
Adding feathers to the baby Hedwig costume
This is my favorite part of the owl costume DIY because it’s where you will really start to see this owl Halloween costume come to life and look more realistic.

You will need white craft feathers.
I cut off some of the end of the feathers and used more of the smaller and medium feathers.
Lift up a section of feathers, add a dab of hot glue, then carefully press the top of the feather onto the hot glue, being careful not to burn yourself.
Repeat to add texture and softness to the baby Hedwig costume.
You can add as little or as many feathers as you like- you’re done when you say you’re done and when the costume looks just the way you want it.
Repeat to add feathers to the wings.
Creating the owl costume mask
The final touch on this baby owl costume is the mask. The mask is what will really make your child look like an owl.
The owl mask isn’t meant to go over your child’s face, but should go on their forehead, well above their eyes.

I created a darling mask in Cricut Design Space, then cut it out of white felt with my Cricut Maker.
I used yellow and black felt to cut the eyes and black felt to cut the beak.
You can find the mask cut file HERE.
If you don’t have a Cricut machine, you can hand cut a simple mask shape and use a bottle cap or other round object to make the eyes, then cut the beak.
Glue them onto the mask.

I also glued more white craft feathers onto the back of the mask to make it appear softer.
I glued a nylon baby headband that I had to the back of the mask with a little strip of hot glue.
You can also use a piece of elastic measured to fit your baby’s head.
I cut a small circle of felt and glue it over the spot where the headband was glued onto the mask to make it nice and soft.

I also added a small ring of elastic to both ends of the wings to hold the ends of the wings onto my daughter’s arms.
To attach the wings to the costume, I just used a couple of safety pins.
wanted to be able to remove the wings and not have them attached permanently, and this worked great.

So what do you think?! I’m absolutely in love with how this owl costume DIY turned out!


I dressed my baby girl up in her baby owl costume, then took her and her Harry and Hermione siblings out to get a few photographs.
I printed out an envelope addressed to Harry Potter that I found online, then gave it to my little snowy owl to “deliver.”

Well, come to find out, owls get hungry too, and before lunch she had snacked on poor Harry’s letter.
Good thing Harry loves his little Hedwig to pieces and didn’t mind one bit!


Check out our favorite things we did at The Wizarding World of Harry Potter at Universal Studios this past summer!
I literally still dream of drinking pumpkin juice from the amazing Three Broomsticks, but my Harry Potter pumpkin juice recipe tastes almost exactly like the original.

For Christmas I put together a Harry Potter Christmas tree with lots of DIY ornaments that was pretty incredible. You definitely don’t want to miss all the fun details!

In the meantime, have you seen our Fantastic Beasts party? My daughter and I made the niffler ourselves!

If you love Harry Potter, you really need to check it out.
The Fantastic Beasts cookies are absolutely incredible.
Accio cookies and a big glass of milk!
![]()
Heather says
This is great! I cant wait to make one for my daughter! Do you have a picture of her from the back with the wings on by chance?
Laura says
I wish! I remember my daughter was really wiggly during this photo shoot so I was happy to get the photos I did, haha. I wish I had gotten a shot of it though! It basically looked just like the front of the onesie, except with a different shape. Hope that helps!
Pattie says
Did you felt and feather the back of the onsie
Laura says
Hi Pattie, I left the back of the onesie plain as is, but I added feathers to a little cape that covered the back of the onesie.
Erika says
I am trying to access your files on Cricut, but the website won’t let me. When I click on them I only get a window that forces me to update my program (I already have) but won’t allow me to view your files at all. Is there anyway you could help? Thank you so so much for all your hard work and for sharing that with us! Your little owl is absolutely darling.
Laura says
Thanks so much Erika! I just updated the post with instructions on how you can still access the cut files. Please read where it says “Update” and you should be able to access them. Let me know if you have any trouble. Thanks!
Kiera M Jones says
Hi, I don’t have a cricut machine but want to cut out the files for the mask and feathers. Do you have them in a document instead?
Laura says
Hi Kiera, I’m sorry but I don’t have them in a document. You could either use the shape of my feather as inspiration and draw one to use a template, or find a friend who has a Cricut machine and ask them if they would let you cut some feathers with it. Good luck!
Yvonne says
Thank you! How does the cape stay on the shoulders?
Laura says
I used safety pins at the top of the cape and then hot glued on some elastic to the top ends of the wings so the elastic could go around my daughter’s wrists like bracelets to hold the ends of the wings up.
Caroline says
Thank you for this beautiful costume idea! I would love to make this with my Cricut, but now that they have moved Design Space offline, the link to your cut files does not work. I’m trying to search for them. Do you have any ideas how I could find them?
Laura says
Hi Caroline! Yes, I do. I’ve updated the post with instructions on how you can still access the cut files. Just scroll back up the post under “Update” and I share how to access the cut files. Good luck on the costume!
Nicole says
I can’t get the cut files to load bc the web version of cricut design space is no longer supported. could you share the name of the project or maybe just the images?
Laura says
Hi Nicole, thanks for letting me know! I just added instructions towards the top of the post where it says “Update.” This explains how to get the cut files to open for you with the new app version of Design Space. Happy crafting!
DenIse says
I love this costume! Do you remember how much felt you used? This will be my first attempt at making a costume!
Laura says
I wish I could remember Denise! It’s been a couple years and I’m not sure. Luckily felt is pretty inexpensive, especially if you pair a sale with a coupon at Joann! 😉
Ashley Sands says
Looking forward to starting this costume! I’m struggling to get access to the mask design. My cricut app is saying it is “private” Any chance you can lead me in the right direction?
Thanks
Laura says
Sorry about that Ashley, the settings must have changed when Cricut Design Space was updated. I just went in and made sure it was available to everyone, so it should work now!
Jen says
Is there a special way you cut your felt? because I am having a lot of trouble cutting clean feathers. I was hoping that buying your file would help save time but they are just coming out janky? any tips?
Laura says
Hi Jen, I used the Cricut felt because it it thinner than regular felt and it worked just perfectly! My guess is that it’s the felt you’re using. I would use the thinnest felt you can find and apply more pressure in the settings when you go to cut your feathers. Hope that helps!
Denise says
Cricut is saying that the headband project is saved as private. Is there any way to correct that?
Thanks!
Laura says
Hi Denise, it should be fixed now. I’m guessing the settings changed when Cricut updated Design Space. Let me know if it works now for you!
Rachel says
Hi! I am definitely making this for my two year old! Can you tell me how much felt you used? Thank you!
Laura says
Hi Rachel, I really should have written that in there, huh? Unfortunately it’s been a couple years and I don’t remember exactly how much I used. Sorry about that! I used the Cricut felt for the white feathers then just bought some white felt with a coupon at Joann for the wings. Luckily felt is pretty inexpensive, especially with a coupon, so I would buy a little more than you think you need just to save a trip to get more. Good luck!
NaTal says
Hi Laura!! Super inspired by this and can’t wait to make it for my daughter.
I’m having a little trouble understanding how you made the wings though… did you use one long piece of felt or two smaller ones? I don’t understand the cutting a semi circle part either. Do you cut that on the outside? Sorry… this is one of my first DIY crafts and this part is confusing to me!
Laura says
Hi NaTal, No worries! I used one long piece of felt. I used one straight edge of the felt for the top of the wings, then created a long half circle shape to make the wings part. Think of it as an upside down rainbow shape that you’re cutting and maybe that will help you visualize it better. Hope that helps! It doesn’t have to be perfect, I just drew the shape with a pencil then cut it with my fabric scissors. Good luck!
nikki says
Did you add a fusible fabric to the felt before you cut it? My cricut is just shredding the felt.
Laura says
I didn’t, I just cut the felt as usual with my Cricut machine. You have two options- the first is to use white Cricut felt, which worked perfectly for me. The felt is thinner and my machine cut it really cleanly, since the felt is specifically designed for use in a Cricut machine. If you don’t want to have to worry about buying more material, you could always just cut each feather out with sharp fabric scissors. This works well too, but is definitely more time consuming. Maybe turn on a couple Halloween movies to keep you occupied while you cut! 😉
Lauren Rogers says
May I ask what kind of felt you used? I got the cheap 33 cent felt at hobby lobby and the felt is fuzzing a lot after it’s been cut with my Cricut. I’m not sure if maybe there is a more durable felt that I should be using!
Laura says
I used the Cricut felt, which is specifically designed to be cut in a Cricut machine. If you don’t want to get the Cricut felt and would rather stick with the more inexpensive felt, you’re probably better off cutting the feathers with fabric scissors. I highly recommend the Cricut felt though if you want to save some time!
Elizabeth Baker says
Hi! I’m the Managing Editor of Houston Moms and we are doing a roundup of the best DIY costumes and would love to include this one! Would you allow us to link your blog and use one of the pictures in this post in our article, crediting and linking you of course. Thanks for your consideration!
Laura says
Hi Elizabeth, Sure, that’s fine! Thanks for asking. 🙂