Make Life Lovely

Your DIY Guide to a Lovelier Life

  • Home
  • About
    • My Story
    • Contact
    • PR/Press
    • Terms
  • DIY / Crafts
    • Crafts
    • Gifts
    • For the Home
    • Kids
    • Memories
    • Paper
    • Parties
    • Printable
  • Holidays
    • Valentine’s Day
    • St. Patrick’s Day
    • Easter
    • Mother’s Day
    • Father’s Day
    • Fourth of July
    • Halloween
    • Thanksgiving
    • Christmas
    • New Year’s Eve
  • Food
    • Bread
    • Dessert
    • Drink
    • Main Dish
    • Side Dish
    • Soup
  • Fashion
    • Accessories
    • Beauty
    • Clothes
  • Travel

Burlap Bunny Garland

March 19, 2013 By Laura 5 Comments

2254shares
  • Share
  • Tweet

I’ve had a lot of fun creating with burlap this Spring, and today I’m bringing burlap back to show you how to make an adorable burlap bunny garland.  I know I always say this, but this project is really cheap and easy to make.

Anyone can do this!!

And if you missed my previous burlap tutorials, be sure to check out my burlap bunny place mats and my burlap bunny hanging.  All of these projects look perfect together, and all have a similar look that will visually tie your decor together.
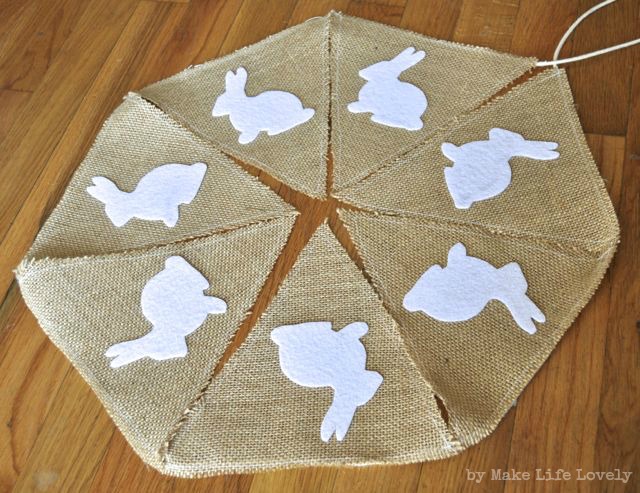
This easy rabbit bunting banner looks great hanging on my mantle, but would look great anywhere you want to hang it in your home to add a little spring.  It was made with a leftover piece of burlap that I had from my previous projects.  Burlap is ridiculously cheap (especially if you have a coupon!), and so is the white felt that I used for the rabbits.  And there is VERY minimal sewing involved, but you can also go the no-sew route if you’d like.  I’ll explain how later.  Wanna’ make your own?

Supplies:  
  • burlap
  • white felt
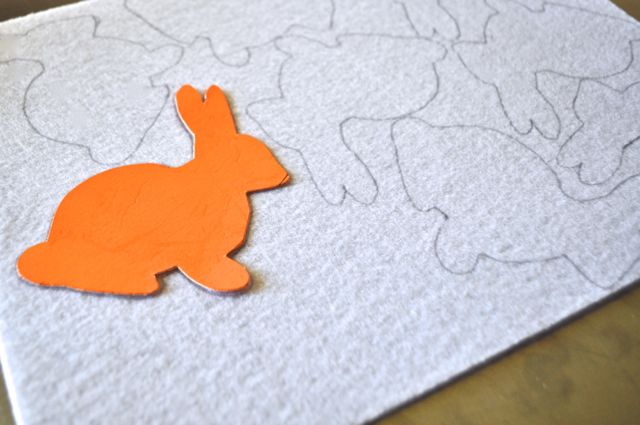
  • cardboard, card stock, or poster board (for bunny template)
  • scissors
  • jute, twine, etc. to hang the garland (I used macrame cord I found in the jewelery aisle at Joanns)
  • sewing machine (optional)
  • glue gun
Directions:
1.  Cut a triangle bunting template out of your cardboard, poster board, or whatever you have on hand- you could even use a cereal box!  Then print out any bunny silhouette that you would like to use.  I found a cute one here that I liked.  Make sure to resize the bunny to the right size to fit on your burlap triangles!  Print and cut out the silhouette, trace it onto your cardboard, then cut it out.
2.  Now that you have your templates, use the triangle template to cut out as many burlap triangles that you need for your bunting.  I used 7 triangles, and I made each triangle 8 1/2″ wide and 8 1/2″ long (down to the longest point).  Trace and cut out your bunnies, one bunny per triangle.  I used one sheet of the stiff white felt that I had on hand, but regular white felt is fine, too.


3.  Sew a simple straight stitch around the edges of each bunting.  It may sound like a pain, but it literally took less than a minute per triangle.  Burlap frays easily, and stitching around the edges prevents too much fraying.  You could skip this step, but I don’t recommend it, especially if you would like to use this year after year.
4.  Using your glue gun, add thin strips of hot glue on the back of the bunnies, and glue one bunny onto each triangle.  Be sure not to use too much glue!  If you keep it light, it will still stick, and you won’t be able to see the glue through the felt.

Glue the bunting onto the macrame cord.  Laying the macrame cord (you could use anything you like) straight, I carefully applied hot glue to the top of the cord in a straight line that was the width of one bunting triangle.  Carefully lay the bunting down over the hot glue, and press it down gently.  Repeat, until you have reached the desired length of garland.  Cut the cord, and you are finished!!

That wasn’t too bad, right?!  And look how cute the finished product is!  This bunting is so festive and springy, and just walking into my living room and seeing it makes me happy.  I also love that it matches my burlap bunny place mats and my burlap bunny hanging.  It all goes together really well.
Is this something you would make for your home?  How do you decorate for Easter?  And are you loving burlap as much as I am?!
xo, Laura
2254shares
  • Share
  • Tweet

About Laura

Hi! I'm Laura, owner and creator of Make Life Lovely, a creative blog filled with creative craft tutorials, DIY projects, party tips, holiday ideas, home decor, and so much more! Make Life Lovely is dedicated to making everyday life more lovely, and I hope to inspire you and show you how!

Let's Be Friends!


Comments

  1. Krista says

    March 19, 2013 at 2:14 pm

    This is adorable! I love it! Great idea, thanks for sharing. I love your blog! I’m going to follow:)
    Krista @thehappyhousie.com

    Reply
    • Laura @ Make Life Lovely says

      March 19, 2013 at 7:00 pm

      Thanks Krista! So glad you like it, thanks for following!!

      Reply
  2. Lisa Louise says

    March 20, 2013 at 2:19 am

    I absolutely want a try!!The rabbit bunting banner are so damn cute! 🙂
    http://www.louisvuittondeutsche.com

    Reply
    • Laura @ Make Life Lovely says

      March 23, 2013 at 5:44 pm

      Ha, thanks Lisa! Give it a try!! Thanks for reading 🙂

      Reply
  3. nicole says

    January 18, 2017 at 3:24 pm

    Is there anyway to purchase this?

    Reply

Leave a Reply Cancel reply

Your email address will not be published. Required fields are marked *


[footer_backtotop]

Copyright © 2021 · Genesis Framework · Design by Key Lime Digital Designs · Log in

Privacy Policy