
Learn how to make easy burlap placemats for cheap with this simple and fun tutorial!
I have had a slight crush on burlap lately.

Burlap is sooo easy to work with, is cheap, and has such a great texture!
How to Make Burlap Placemats
These pretty Easter placemats are perfect for spring, but you can easily adapt them and use them any time of the year.
They really are quite easy to make.
I even made a matching burlap Easter garland and Pottery Barn inspired bunny hanging!

Give them a try!
DIY Placemat Supplies
- Burlap
- White paint
- Stencil brush or foam pouncer brush
- Bunny stencil (or a Cricut, Silhouette, etc.)
- Sewing machine (optional)
How to Cut Burlap
First, you will cut your burlap to the placemat size that you would like.
I have an easy trick for cutting burlap that the nice lady at Joanns showed me.
Pull one of the single strings of burlap all the way out where you would like your cut to be.
Be sure to pull slowly and carefully.
If the burlap string breaks, that’s okay!

When the string is gone, you will have a nice straight line that you can cut along to make sure that you are cutting evenly.
Love this easy hack!
I measured some of my Pottery Barn place mats as a guide, so I wanted my finished product to measure 14″x20.”
I cut my burlap placemats to about 15 1/2″ x 21 1/2,” to allow for seam allowances.
Sew the Burlap Placemat Edges
I chose to sew the edges of each placemat under with a small seam allowance.
You can either skip the sewing altogether, or just sew a straight stitch around the edges without folding the material under (which will help reduce the fraying).
I think that sewing the edges gives it a nice finished look!
If you want to sew the edges under, I have an easy trick for you!
Use a very hot iron, fold each side of the placemats under, one edge at a time, and iron the seam down.
Place a dish towel on top of the burlap to sure that you don’t melt it.
Ironing the edges down kept them nice and flat, and prevented me from having to pin at all.
The edges stayed down perfectly so I could sew nice straight lines around all of the edges!
Now it’s time to sew around the edges of the placemats.
I used a stitch on my machine that made three stitches, since burlap is thick, just to be safe.
You can hardly even see the stitching through the burlap.
Paint the Easter Bunnies
You can choose to paint on your burlap palcemats or leave them as is.
Since I was making Easter placemats, I wanted to paint small white bunnies in the corner of each of mine.
I used foam pouncers, white craft paint, and a bunny stencil.
If you don’t have a bunny stencil, no worries!
It’s easy to cut your own stencil from a Cricut, Silhouette, or any other die cutting machine.
If you don’t have a die cutting machine, you can google “rabbit silhouette,” then make your own stencil out of poster board or cardboard.
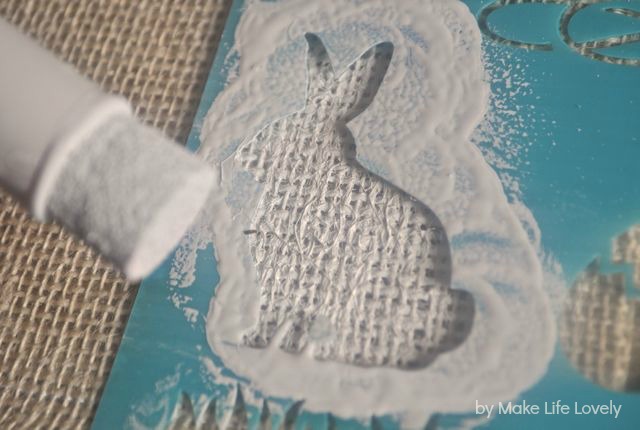
Hold your stencil firmly in the bottom right hand corner of your placemat.
Add some white paint to your pouncer or stencil brush, then pounce up and down over the stencil onto the burlap.
Make sure to hold the stencil down firmly so it doesn’t slip.

Paint the whole bunny evenly with white paint, then carefully lift up the stencil.
Let the paint dry, and your placemat is done!
I am not going to wash my placemats, because I don’t know how burlap holds up in the wash, but I will definitely spot clean these.

My Easter placemats only cost a couple dollars total at the most, and they look just as good!

I can’t wait to use these for some lovely spring dinners.
They would have looked so pretty on my Easter candy table or with our DIY bird nest filled with marbled eggs or gold leaf eggs on top!
I hope you give these DIY burlap placemats a try!

![]()
This article was updated in March 2025 and was originally posted in March 2013.
Rachel O. says
Cuteness. My in-laws are coming for Easter and I want to do something festive like this.
Laura @ Make Life Lovely says
Give it a try Rachel! Great way to impmress the mother-in-law with your crafty skills 😉
Krista says
They are adorable! I love the grassy centerpiece visible in the picture too! Thanks for sharing,
Krista @thehappyhousie.com
Laura @ Make Life Lovely says
Thanks Krista! I bought the fake wheatgrass at Pottery Barn a few years ago- I love it too, since I don’t have much of a green thumb 🙂