
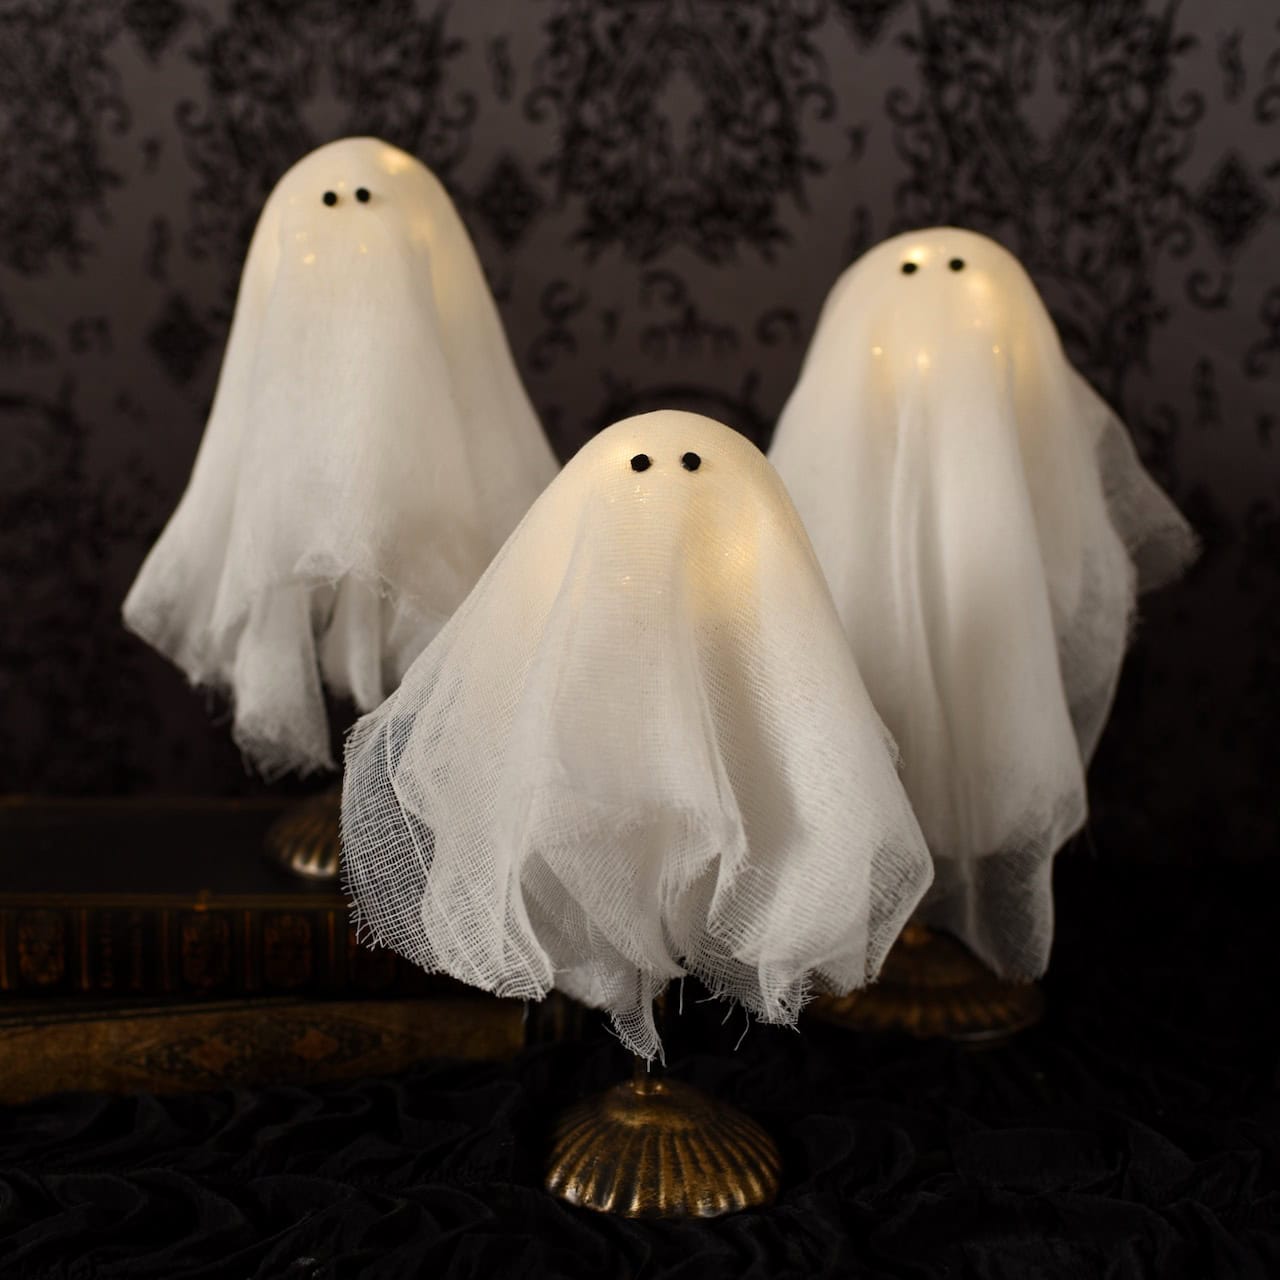
Make a darling light up ghost for Halloween with this simple tutorial and a Dollar Tree candleholder.
Halloween crafting is in full swing over here, and I couldn’t be happier about it.

Well, I could be a bit happier about it if it wasn’t 95 degrees outside, ugh.
But other than that, it’s full on fall and Halloween time at my house.
Don’t miss the TEN gorgeous potion bottles I recently shared!
Light Up Ghost Decoration
Today I’m sharing some sweet little light up ghosts that I made from some basic Dollar Tree candleholders I saw.
I had browsed the Pottery Barn website for must-have Halloween decorations and for must-make Halloween decor too.
I have a lot of Pottery Barn in my home, but I also like to DIY many of their simpler things to save money, and because I just love to craft for Halloween!
Pottery Barn Lit Mini Ghosts
My Pottery Barn scrolling stopped when I saw these sweet little light up ghosts, called the Lit Mini Ghosts.
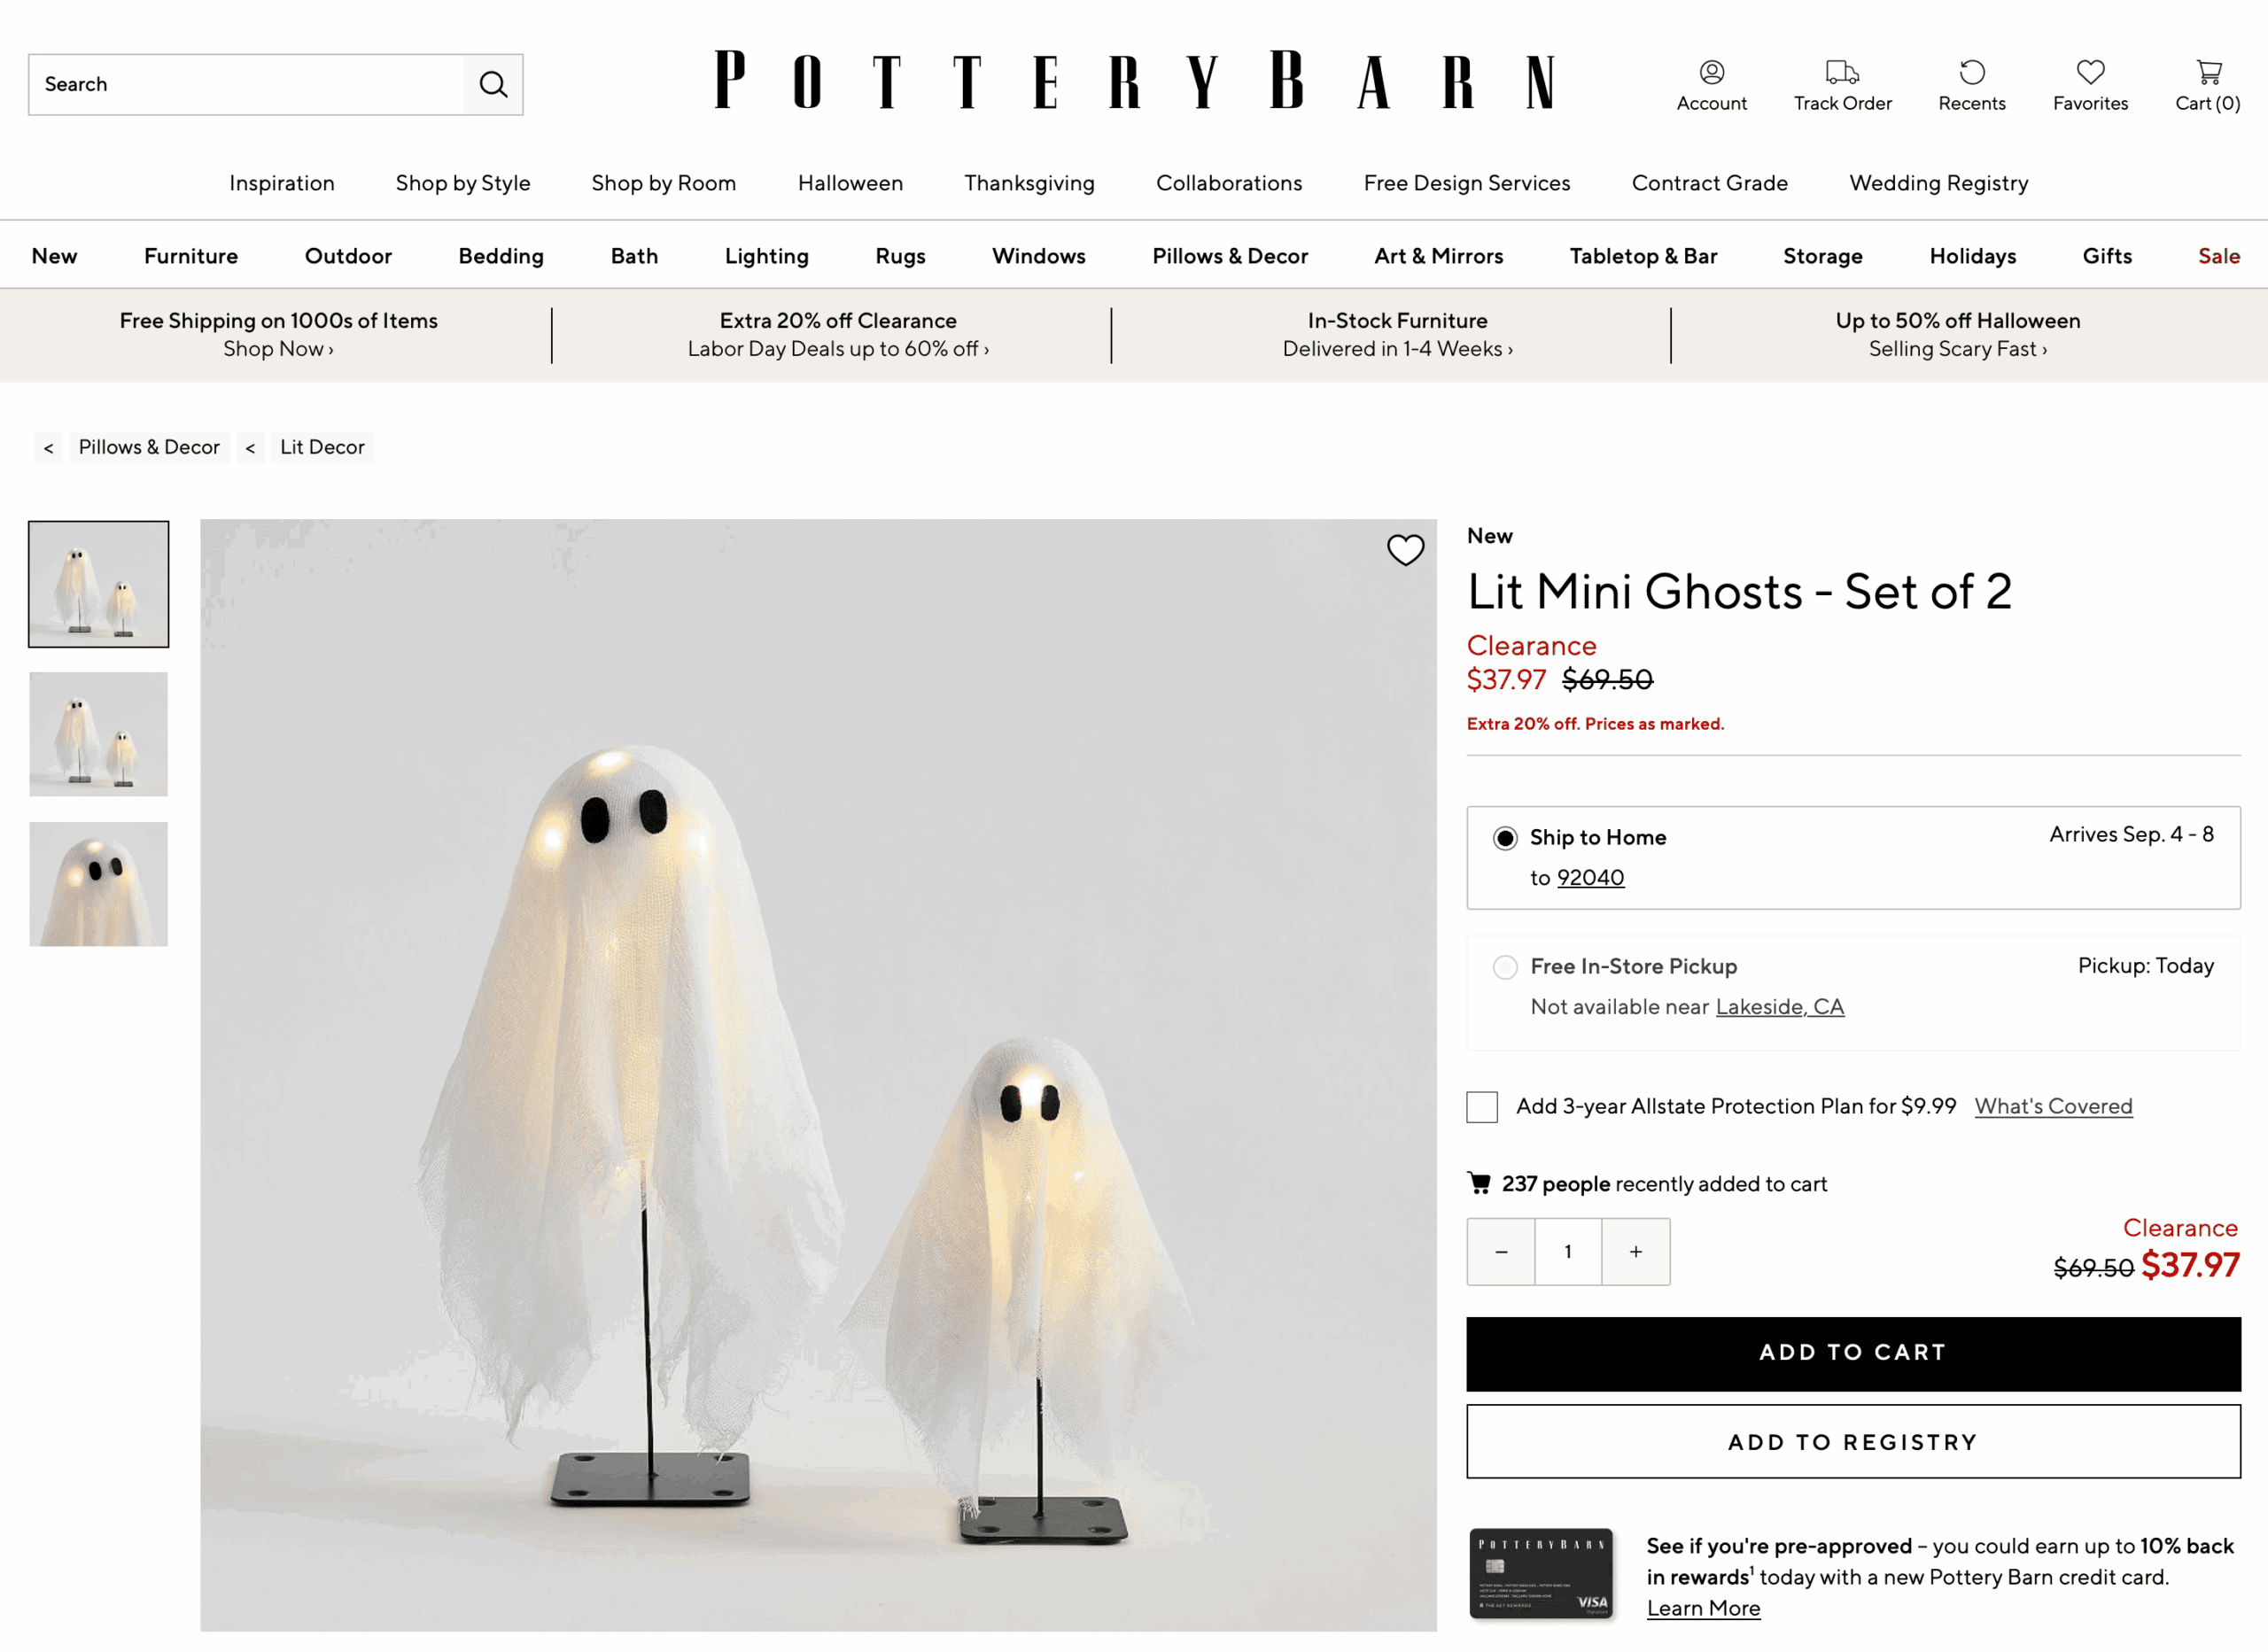
When I first saw these ghost decorations, they were $69.50 for just TWO ghosts.
I knew I could make a whole army of little DIY ghosts, an probably even make them cuter than the originals. 😉
So here’s what I came up with!
Spoiler alert- my version is not only cuter, but much much cheaper too!
How to Make a Ghost Decoration
I highly recommend you watch the video below to see EXACTLY how I made these DIY ghost decorations.
Then, read below to get all the details and links to everything I used.
This post contains Amazon affiliate links, which means I make a small percentage of any purchase made at no extra cost to you. Thank you!
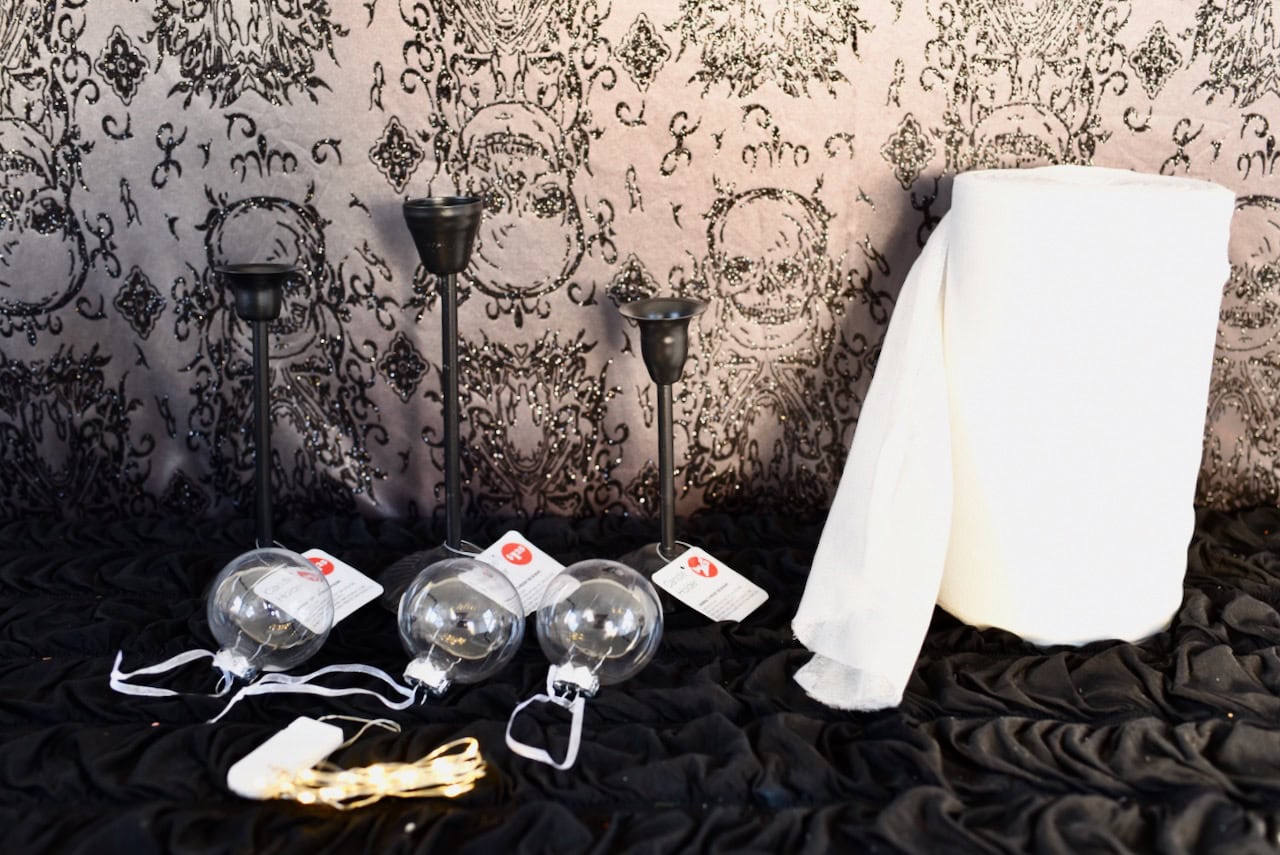
DIY Ghost Supplies
Candleholder
For the base of my ghosts, I used black metal Dollar Tree candle holders that were just $1.25 each.
They are sturdy, have a cute base that we will make even better, and have a little stand with a hole in the top that works perfectly for what we are going to do with it.
Clear Christmas bulb ornament
I used a clear plastic bulb I had in my stash, but you can use plastic bulbs or glass, as long as the ornament is clear.
Cheesecloth
Any grade of cheesecloth will work for this ghost craft, but I wanted a medium grade quality cheesecloth.
The cheapest grade is like the creepy cloth that twists and turns at the ends and is pretty thin and scraggly.
If that’s the look you want, great!
For me, I wanted my cheesecloth ghosts to be a little more substantial and for the cheesecloth to drape and hang a bit more, so I bought this cheesecloth roll from Amazon.
It is a great size and will last me for for years and many Halloween craft projects!
Fairy lights
You will need one 7 ft. strand of fairy lights per ghost that you would like to make.
I turned to my BFF Amazon, who never lets me down, and bought more of my favorite small fairy lights that I have used for many projects.
They’re my favorites for smaller crafts and projects (they are 7 feet long) and are great when you don’t need the longer lights.
Glue gun
You’ll need a glue gun sand glue sticks to attach the bulb to the candleholder.
Of course I used my favorite light pink glue gun!
White zip ties
You’ll need just one white zip tie for each ghost that you make.
Rub n Buff (optional)
Rub n Buff is a metallic wax that is the easiest thing to use and make such a difference!
I used the European gold color.
After you use this stuff, you will want to add gold to all the things.
It gives you instant gratification for practically no work!
Add the Fairy Lights
Unwind your fairy lights, then place one strand of lights inside the clear ornament bulb.
Leave the top of the bulb, and let the batteries of the fairy lights hang out the top.
Add a rim of hot glue around the top inside of the candleholder, then let the glue sit for a few seconds to cool a little bit.
Then place the bulb into the glue with the open side down.
Let the battery pack hand down a little bit.
Attach the Lights
To keep the fairy lights in place, wrap a white zip tie around the battery pack and the candle holder.
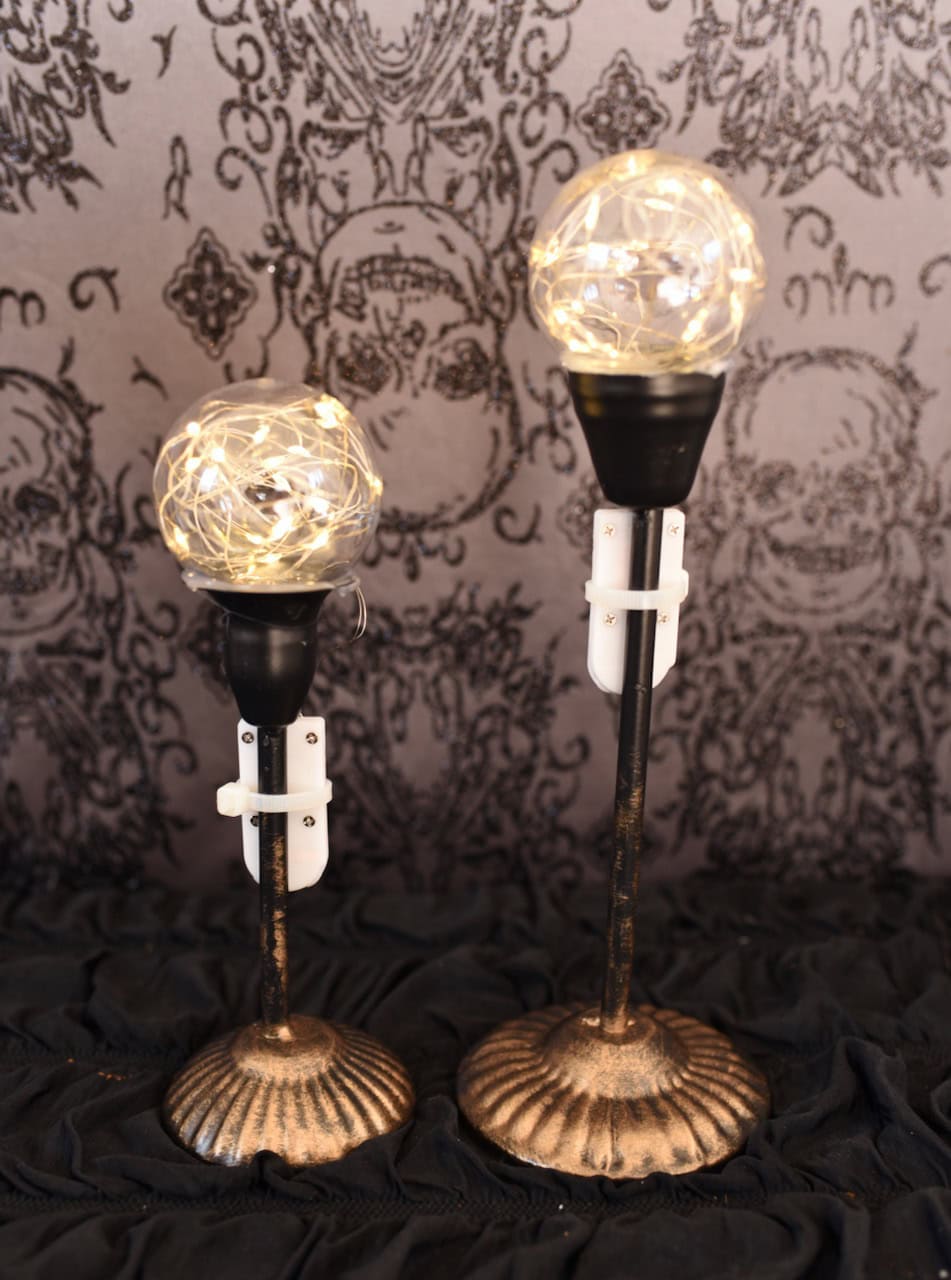
Trim off the end of the zip tie.
Now the lights are on nice and secure.
Creating the Ghost
Measure how long you would like your cheesecloth to be, then use sharp scissors to cut a couple pieces out.
Layer the pieces and stagger them a bit, then set them on top of your light up ghost stand.
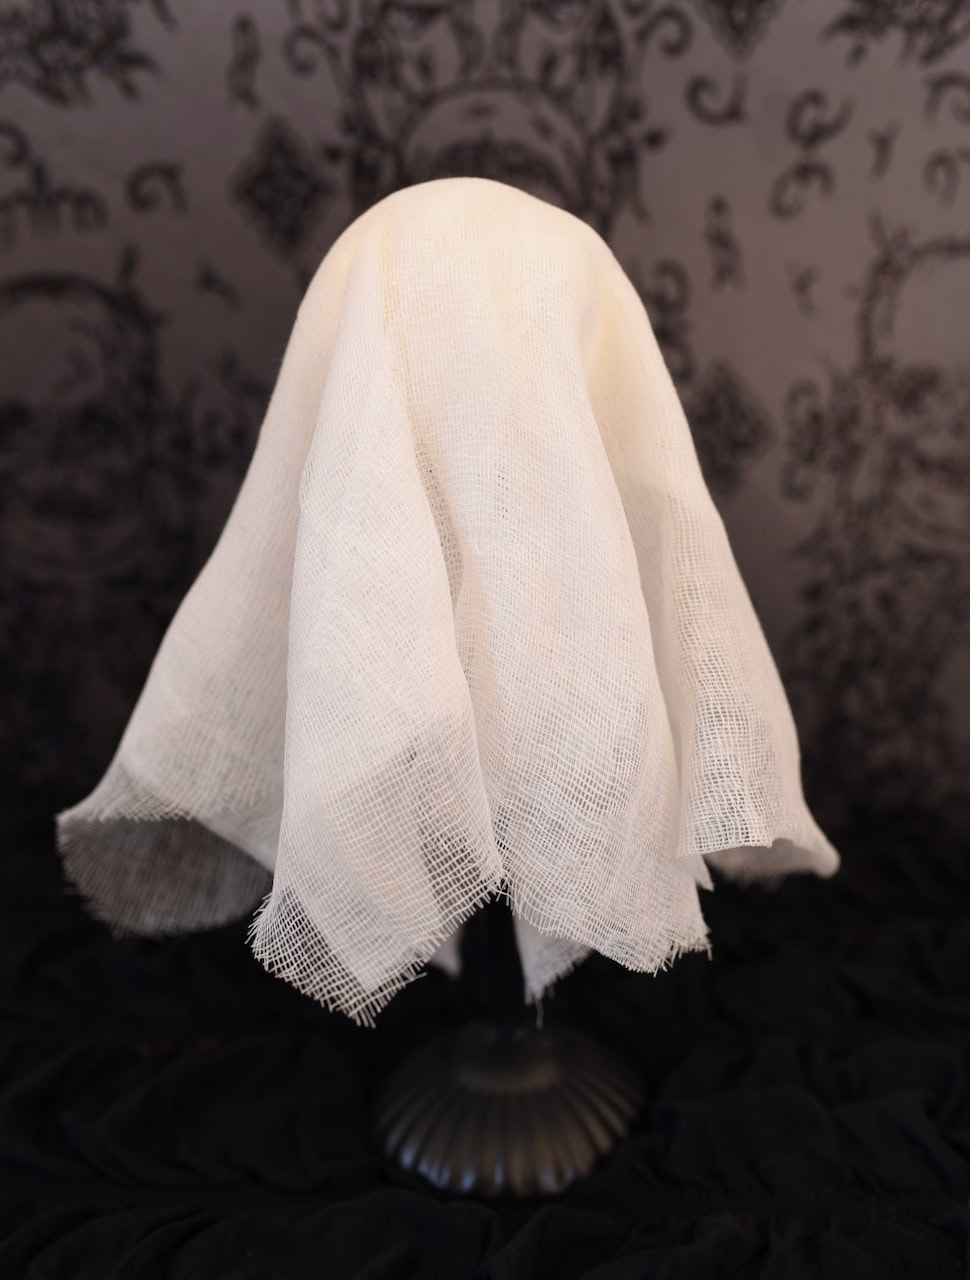
Once they are arranged how you want them, use a dot of hot glue on the top back to hold the cheesecloth in place.
Add the Eyes
Use a hole punch to cut black eyes out of craft foam or black paper.
You can even cut them out freehand if you like.
Use hot glue to glue two eyes to the front of your DIY ghost.
Stand for Light Up Ghosts
This part is totally optional, but very satisfying!
Use a tiny bit of gold Rub n Buff (I used European Gold color) and ribbon is light over the base of rod portion of the stand.
This will give the raised higher parts a nice gold highlight, and give it an old fancy vintage vibe.
Wish I would have had the Rub n Buff when I made my witch cauldron DIY and fake fire prop!
Finishing Up the DIY Ghost Decorations
Cut off any stray string of cheesecloth and remove any glue gun strings from your ghost.
Now it’s time to display your sweet little ghosts!
To turn on and off, just reach under the back of the ghost and switch the power with your finger or fingernail.
Easy peasy!
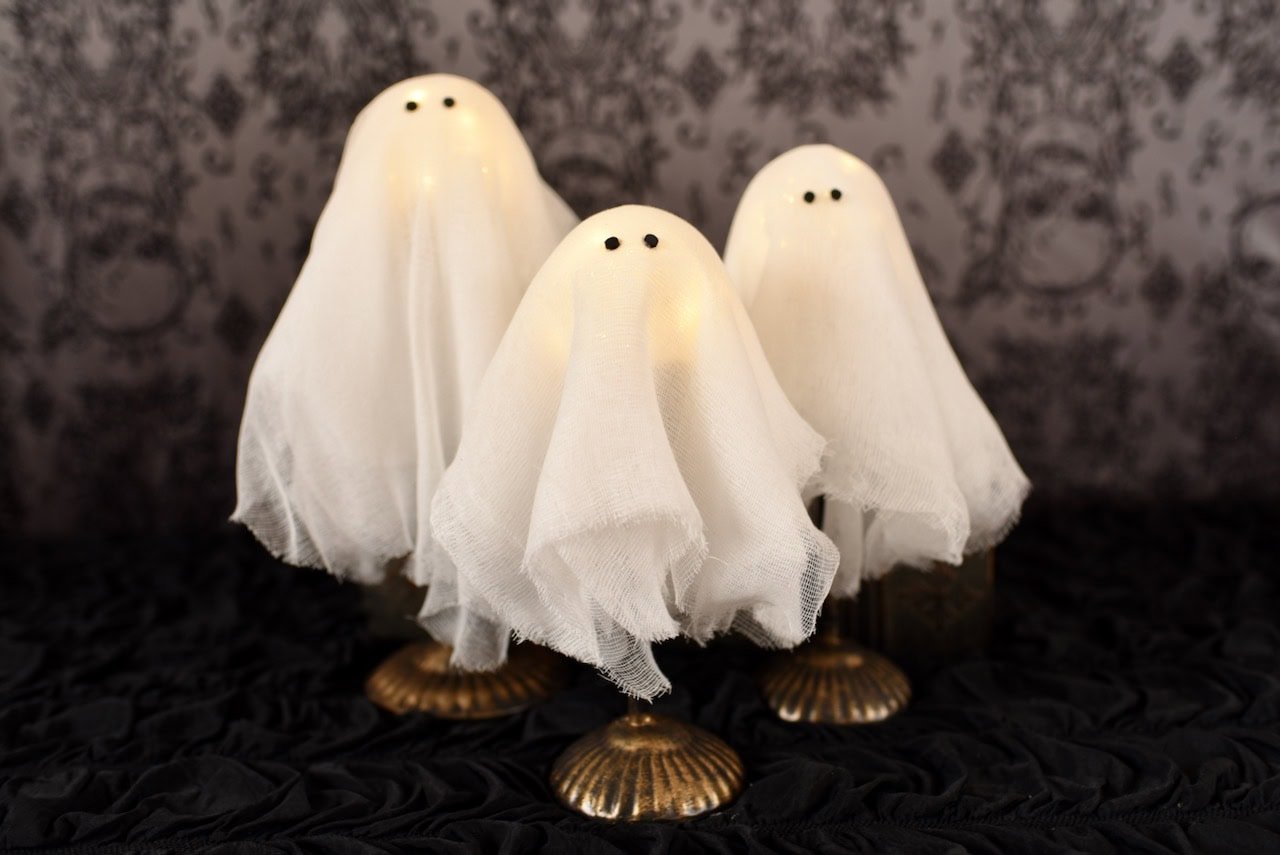
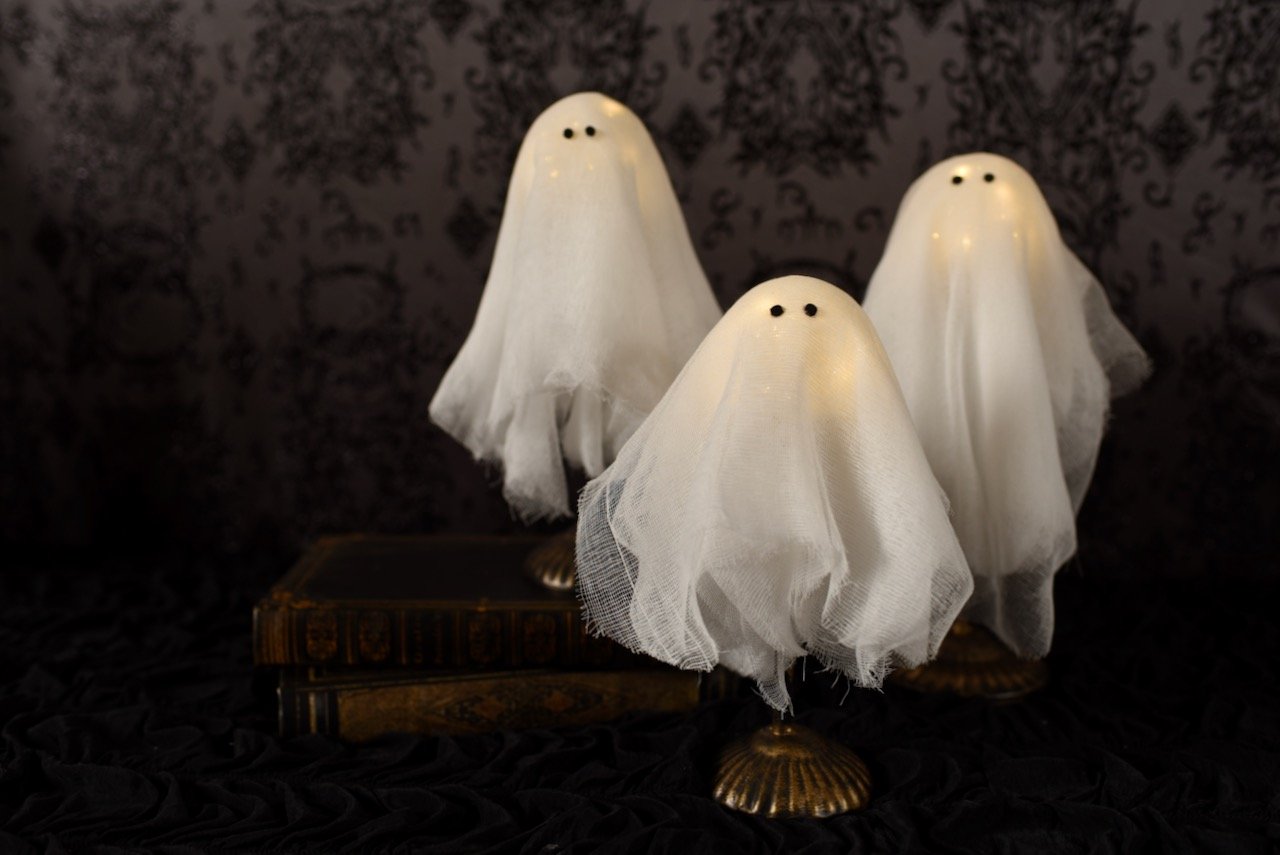
Aren’t they lovely?!
I just love the soft glow of the fairy lights that’s diffused by the layers of cheesecloth over the top of these light up ghosts.
These DIY ghosts look cute and innocent by day, but when the sun goes down and their light go on, they are so elegant and magical.
They almost look they are floating!
They would look so cool next to my witch boots decoration with lovely fall flowers inside.
I want to put a few of these cuties in each of my kids rooms, and about a hundred of them in my room. 😉
Happy crafting!
![]()
Leave a Reply