
Create an incredibly realistic fake fire prop with a few simple supplies. This cool DIY looks just like a real fake fire pit and makes the perfect Halloween decoration when you add a witches cauldron to it!
I’ve made a LOT of fun projects over the years, but I have to admit that this fake fire prop is one of my absolute favorites.

It still blows my mind that you can create a fake fire complete with faux burning embers from orange Halloween lights, spray foam, paint, and some plastic bones.
If you’re making a cauldron fire pit for Halloween, then the bones are the perfect addition for a bubbling, boiling witches pot.
Fake Fire Prop for Halloween
You might have seen the sneak peek I shared of the fire when I shared my plastic cauldron transformation.
If you missed it, you can learn how to transform a plain plastic witches cauldron into a realistic looking aged cauldron.

This faux fire Halloween prop and witch’s cauldron would have been perfect at my witch party or Gothic Halloween dinner party, especially with a DIY Snow White poison apple and DIY witch broom nearby.
Serve Halloween spaghetti with eyeballs or these easy creepy witch finger mozzarella sticks inside!
VIDEO- How To Make Fake Fire
Want to see our fake fire in action?!
Watch the video below to see a quick overview of how we made it.
Be sure to watch the whole video to see what the fire and lights look like during the day, evening, and in the dark of night!
This post contains affiliate links, which means I get paid a small percentage for any purchase made at no cost to you.

I am an Amazon affiliate and this post contains affiliate links, which means that if you make a purchase, I receive a very small commission at no extra cost to you.
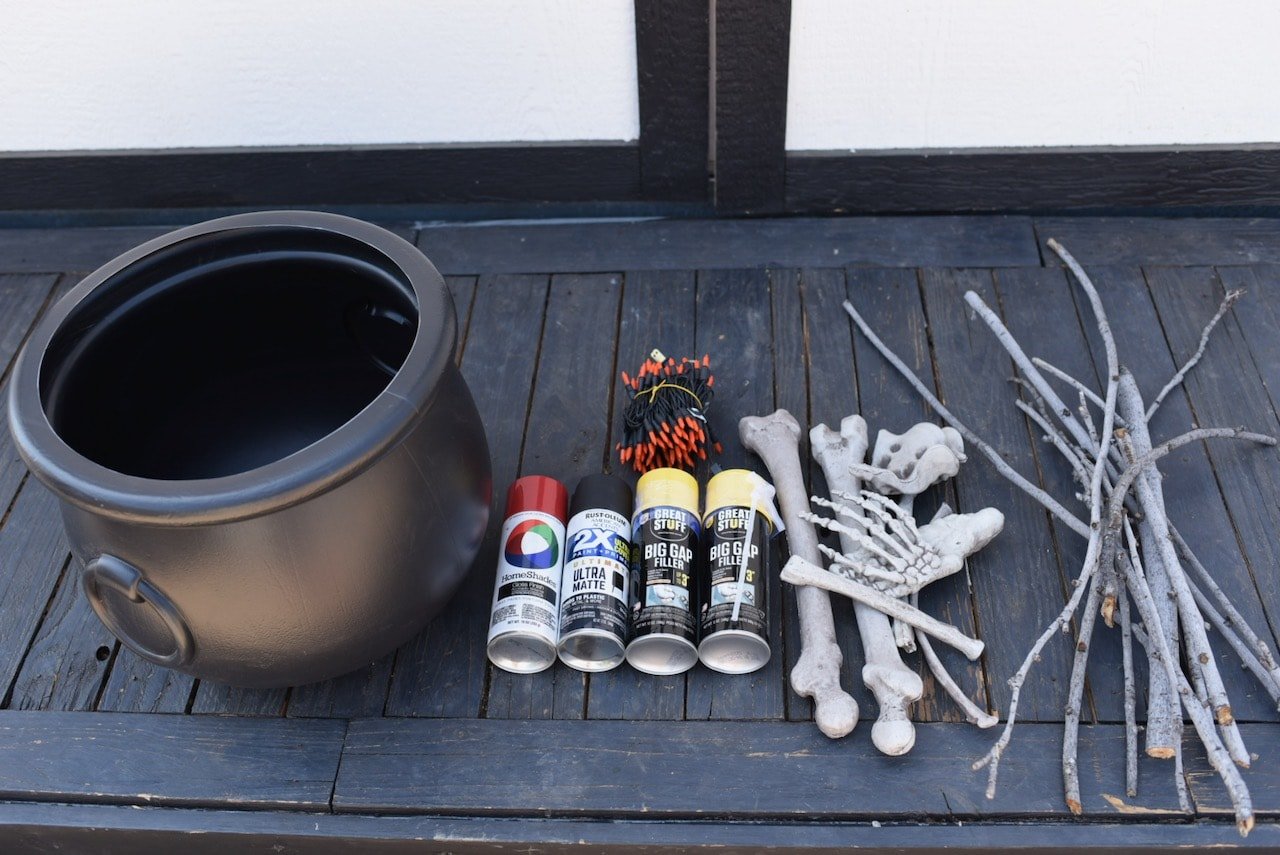
Fake Fire Pit Supplies
- Orange Halloween lights (I bought these lights from Amazon, but if I were to do it again I would choose lights that twinkle)
- Great Stuff spray foam (I used 3 full cans of foam)- you can buy at Walmart, Home Depot, Amazon, etc. Any variety should work! This pack of 12 is a good deal if you need foam for other projects.
- Black spray paint (chalkboard spray paint is best because it’s ultra matte if you don’t want it to look shiny) and red spray paint
- Plastic bones (optional, but looks really cool for Halloween)
- White paint and paintbrush
- Sticks (optional)
- Large plastic cauldron (optional)- mine came from Oriental Trading Company, but this cauldron set on Amazon would work great too!
If you’re using this fake fire prop at a Halloween party, make sure to print our FREE printable Halloween charades cards, printable Halloween party invitations, and printable Halloween cupcake toppers.
Prep the Bones
If you want to add a little creepiness to your faux fire, then you definitely should add some bones.

Place some plastic bones on a piece of cardboard outside and give them a light spray of matte black spray paint to make them look a bit charred.
Place the Orange Lights
You’re going to need to create a base for your fire.
I used cardboard, which seemed like a good idea at the time, but I regret it now.
I wish I had used wood!
A large wood disk from Home Depot would have been more sturdy to use as a base.
The cardboard definitely works too, it’s just not quite as durable.
If you’re going to place a plastic cauldron in your fire like I did to look like a witch’s fire, then you need to cover your cauldron if you want it to be removable.
Once the spray foam goes down, everything touching it will get stuck and will be practically impossible to remove.
I wrapped my cauldron in a big black trash bag as tight as I could, then placed it in the middle of my cardboard.

Next came the orange lights.
I bought a set of 100 lights that didn’t twinkle, but this would definitely look even cooler with twinkling lights!
Wrap the lights around the cauldron so that they go all the way around.
Make sure the black electric cord is pulled away enough from the cauldron so it won’t get covered in spray foam.

Spray Foam Time
Now for the fun and scary part… spraying the spray foam!
Spray foam can be a bit intimidating at first, but fun at the same time.
Make sure to follow all the directions on the can.
Be sure to wear gloves because this stuff is seriously strong and sticky and does NOT come off.
Give the can a good shake for a minute, then place the included nozzle on the end and spray.
The gold here is to mostly cover the lights but not completely.
You want a nice layer of foam that extends out around the cauldron on all sides of your fake fire prop.
I used an entire three cans of spray foam, but how much you use will totally depend on which kind you use, how large your finished fire will be, and how thick you make it.

Add the Wood and Bones to the Halloween Prop
Let your spray foam sit for a little bit so it can start to set.
After a little while then add the painted bones and some sticks or branches to the foam to make it look like it is a real fire.
I overlapped my pieces to make it look even more realistic.

Remove the cauldron by lifting up from the top.
Remove the trash bag from the cauldron and throw it away.
Let the spray foam dry completely.
Painting the Fake Fire Prop
Once the spray foam is completely dry, it’s time to paint.
This is when the big pile of foam and bones begins to look more like a fire.

Start with the black spray paint and add as much black as you want over the foam.
I went a little heavy on the black because one of the cans of spray foam I used was more of a yellow color so I needed to cover it up.
I also added little bits of red spray paint to make it look more fire-like.
Creating Burning Embers
Picture looking at a fire that’s been burning for hours.
The wood and coals have a whitish grayish color to them, and that’s what I wanted to create for my fake fire prop.

To do this, I used a dry paintbrush and some white and black paint.
I poured out some white and some black on a piece of cardboard, then would pick up a little of both colors with the brush and brush off some of the extra paint.
I wanted my paintbrush to only have a little bit of paint on it.
Then I dry brushed on the small amount of paint all over the bones, then wood, and the foam.
This gray added more depth and dimension to my faux fire prop.
It was starting to look good!
Highlight with White Paint
To create even more dimension, I dry brushed on small amounts of white paint to the tops and ends of the bones and wood.
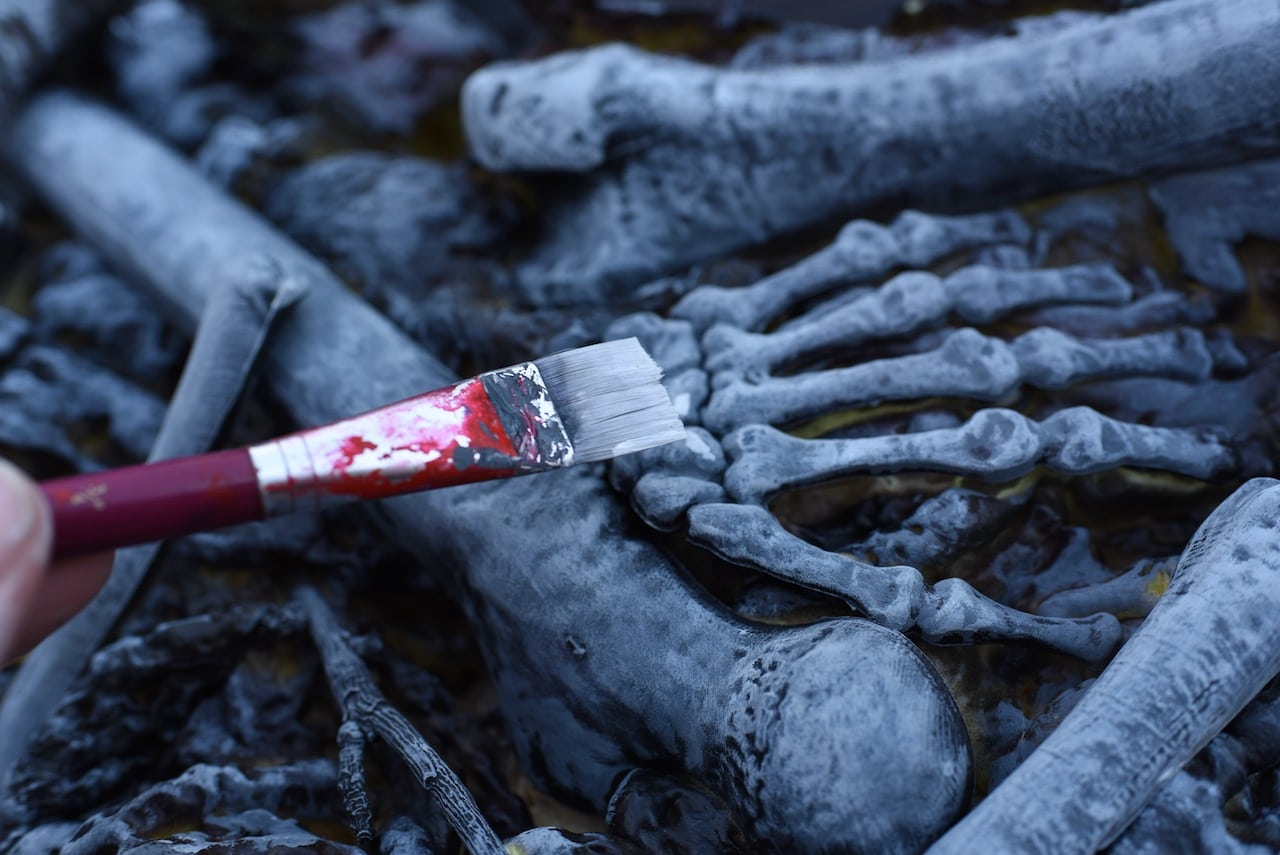

This REALLY made everything pop.
My fire pit totally looked like there were burning coals and embers that had been there for hours!

Place the Cauldron on the Faux Fire Prop
Once the paint is dry, cut the extra cardboard from around the edges of the foam.
Move the fire where you want it displayed, then place your cauldron in the empty hole in the middle.
Light Up the Cauldron Fire Pit
This was the moment of truth when it was finally time to see my fake fire in action.
I used a black extension cord plugged in outside to light up my electric fire.
It looked AMAZING!!
During the day the lights were subtle.
As the sun started going down, they looked great.
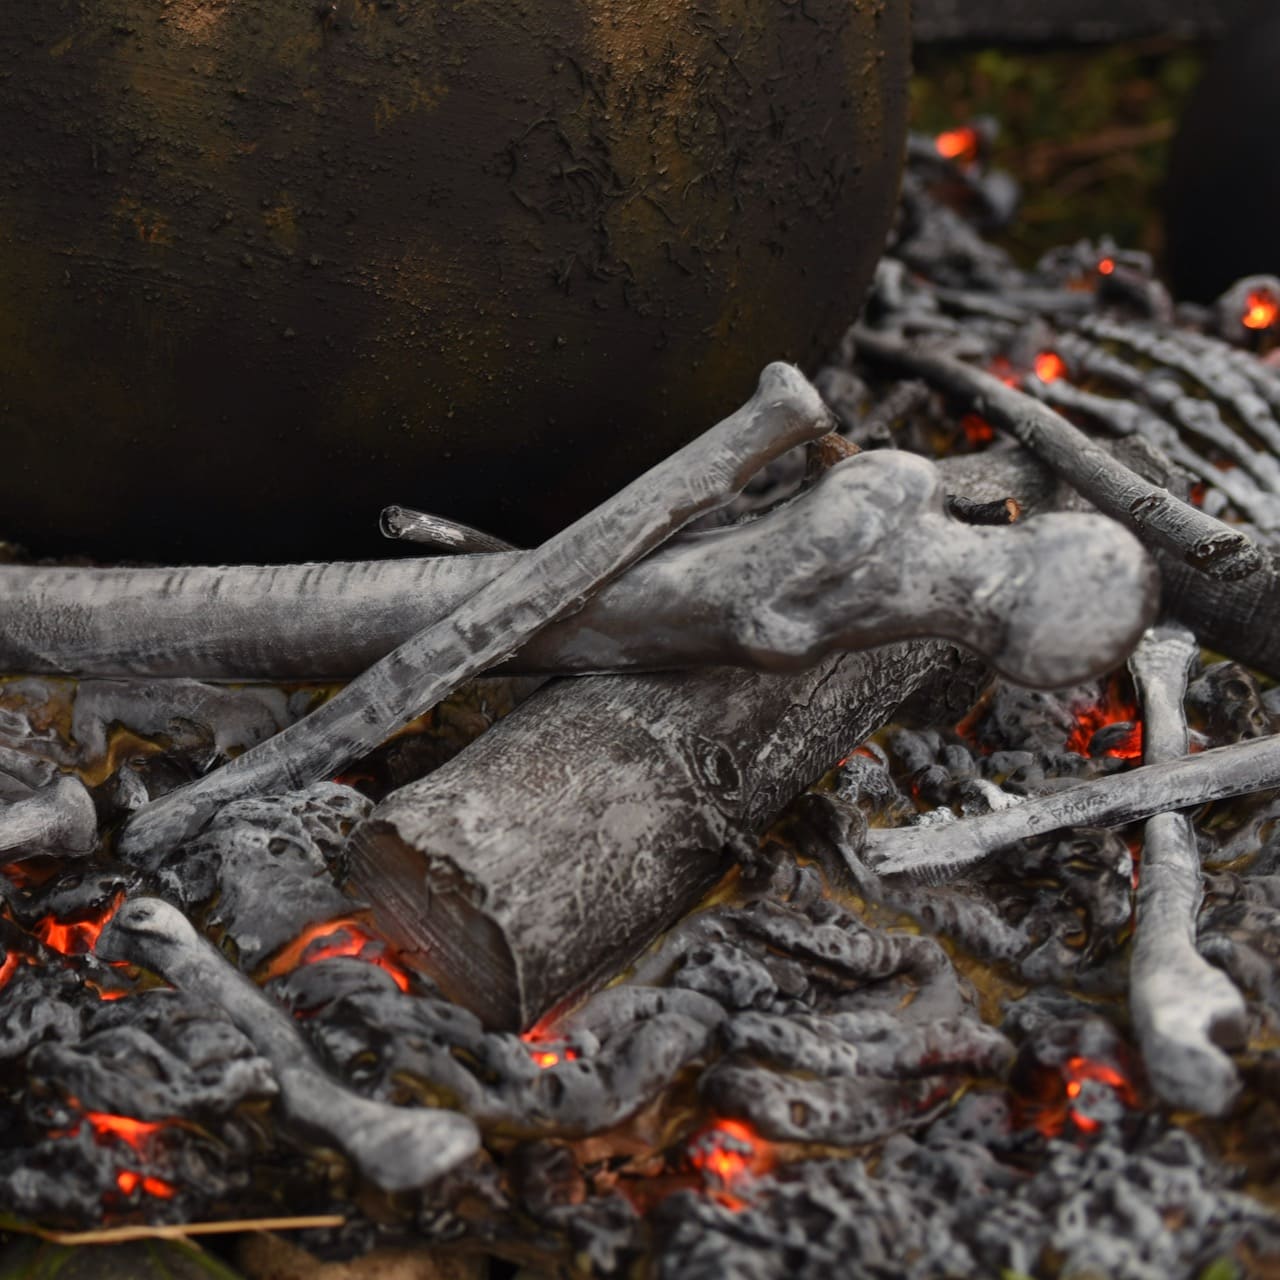
When it was dark, then looked absolutely incredible.
I just wanted to sit and stare at them for hours!

Look at all the cool detail on the bones!
The gray paint and white highlights helped make convincing burning coals, embers, and hot burning wood and bones.
Trick or treaters will love seeing this incredible witch’s fake fire prop that looks so real.

I left my fake fire on for a couple hours while I sat outside and watched.
I searched up some Halloween witch cauldron sounds and found some great effects that matched the cauldron and fire perfectly.
Even my five kiddos were super impressed, which is saying a lot!
A photo shoot with this cauldron and a child in our no-sew baby owl Hedwig costume would be so cute!

This fire will be going with us to our church’s annual trunk or treat this year.
I will love to create a fun witch theme and wow all the kids with my fake fire prop and the sound of cackling witches and a bubbling cauldron!
You could even serve Harry Potter pumpkin juice, glow in the dark punch, or Starbucks caramel apple spice inside.
More Fun Halloween Ideas
- Nightmare Before Christmas Wreath DIY
- Nightmare Before Christmas Halloween Party
- Goonies Halloween Party
Fall Favorites
- Easy Fall Stove Top Potpourri Recipe
- How to Make a Natural Fall Wreath
- Fall Bucket List Printable Punch Card
- Day of the Dead Skeleton DIY
Happy haunting!
![]()
This tutorial was updated in October 2024 and was originally published in September 2020.