

This Nightmare Before Christmas Wreath tutorial will show you how to make a gorgeous Nightmare Before Christmas wreath for Halloween this year that looks JUST like the Haunted Mansion version at Disneyland during the holidays!
Disneyland during the holidays is pure magic.
Every year the park is transformed into a holiday wonderland, especially the Haunted Mansion.

I love the dark wreaths with skulls and big black bows bows with white stripes that are hung all over the outside of the ride!
Nightmare Before Christmas Wreath Tutorial
Since we haven’t been able to use our annual passes much this year since the park has been closed, I knew that I just had to bring the park to us!
Guys, I’m REALLY proud of this one.

This awesome Nightmare Before Christmas Wreath DIY features a black pine wreath and some fall berries and stems (from the Dollar Store).
There’s also a really cool skeleton with a long black bow complete with white stripes, just like Jack’s.
I couldn’t find a photo of the wreath hanging at Disneyland in our family photos, but if you Google “Disneyland Haunted Mansion Nightmare Before Christmas wreath” you’ll see photos of the wreaths hanging outside the ride.
These real Disney versions were my model for creating this Nightmare Before Christmas wreath!

Remember my Nightmare Before Christmas Halloween party?
Wish I had this wreath back then!
It would have gone perfectly with the Nightmare Before Christmas party decorations I made.
I even made a creepy Oogie Boogie bug platter and Nightmare Before Christmas party favors for that one.
This post contains affiliate links, which means I earn a small percentage of any purchase made at no extra cost to you.
Nightmare Before Christmas Wreath DIY Supplies
Here are the supplies you’ll need to make a Jack Skellington wreath.
Just press on each item to see the exact supplies I used!
Plain pine Christmas wreath
My wreath came from Amazon and was 18″ and a great deal.
You can also find these at craft stores too.
Pink foam insulation board
You can find these boards at Home Depot or Lowe’s.
You only need a small piece for this project so you’ll have plenty of foam left over to make multiple wreaths if you’d like.
Black wired ribbon
Make sure you use wired ribbon.
The wire makes the bow look better and allowed you to make the cool waves and bends in the ribbon like the original Nightmare Before Christmas Wreath.
It also helps the bow to look nice and fluffy.
I bought my ribbon at Michaels, but you can also get it on Amazon too in your jammies from home. 🙂
My ribbon was 2 1/2″ wide.
White dimensional fabric paint
THIS one is a must you guys! This amazing paint is what transforms plain black ribbon into ribbon that looks EXACTLY like the ribbon on the Disney Haunted Mansion wreaths.
Hot glue
Small knife
Flat black spray paint
Black and white craft paint
Paintbrush
Floral Wire or thin wire

How to Make a Nightmare Before Christmas Wreath
Ready to make the ULTIMATE Halloween wreath?
Gather all your supplies and let’s go!
This tutorial is a bit long, but I wanted to explain every step as much as possible so you can really replicate this wreath at home.

Paint the Wreath Black
First you’ll need to spray paint the plain green wreath black.
Believe it or not, I used black chalkboard paint, just like I did when making my realistic witch’s cauldron from a plastic cauldron.
Chalkboard paint has such a nice flat finish to it.
Even regular flat black spray paint reflects the light and looks a bit shiny to me, but not chalkboard spray paint.
Take the wreath outside and place on a large piece of cardboard.
Spray multiple light coats, letting the wreath dry between coats.
Make sure the entire wreath is covered, then let dry completely.
Add Decorative Halloween Wreath Fall Accents
The Disneyland Haunted Mansion Jack Skellington wreath has some cool big berries, smaller purple and orange berries, and some dark green leaves on it.
I couldn’t believe my luck when I stepped into the Dollar Store for a few supplies and I saw all of these exact supplies I needed!
Every one of the berries and leaves I got for just $1 at the Dollar Tree.
Score!

I had enough left over to make probably two more wreaths too.
A little bit goes a long way!
If your Dollar Tree doesn’t have these or it’s not the right season, try Michaels, Hobby Lobby, or Joann to find something similar.

Arrange all the pieces onto your wreath where you would like them, making sure to leave a blank space for the white skull that will go in the bottom center of the wreath.

Place hot glue all long the bottom and middle of the stem on all slides, then carefully slide it in.
Do this for each set of berries you’ll be using.
Create the Jack Skellington Skull
Now it’s time to create the cool skull on the bottom of the wreath.
I looked at the Disney version of the wreath and drew out a template for me to trace to make my skull.
You are free to use my template I made if you’d like!

Just visit the link below, print, then cut out the skull.
On my original template I cut the last little bottom piece a bit too short, so be sure to add a little length to that last piece when you trace it out.
Visit here for FREE Nightmare Before Christmas skull template
Use the skull template to trace the design onto the pink foam insulation board.
Use a small knife to cut out the skull carefully.

Don’t worry about it looking perfect at this point, because it’s going to be a bit rough.
That’s okay!
For the eyes, I just traced around these really hard with a pen over the eye shapes.
This made a line that was easy for me to see once I removed the paper.
Use these lines as a guide to cut down into the eyes and nostrils a bit to add dimension.
Finishing Up the the Jack Skellington Skull
To refine the skull and give it a more finished look, you will need to sand it.
I rubbed a small piece of coarse grit sand paper across the top of the skull, inside the eyes and nostrils, and around all the sides and edges.
Next I used a piece of fine grit sand paper across the entire skull to smooth everything out.
Sanding really helped make the skull look more realistic and refined.
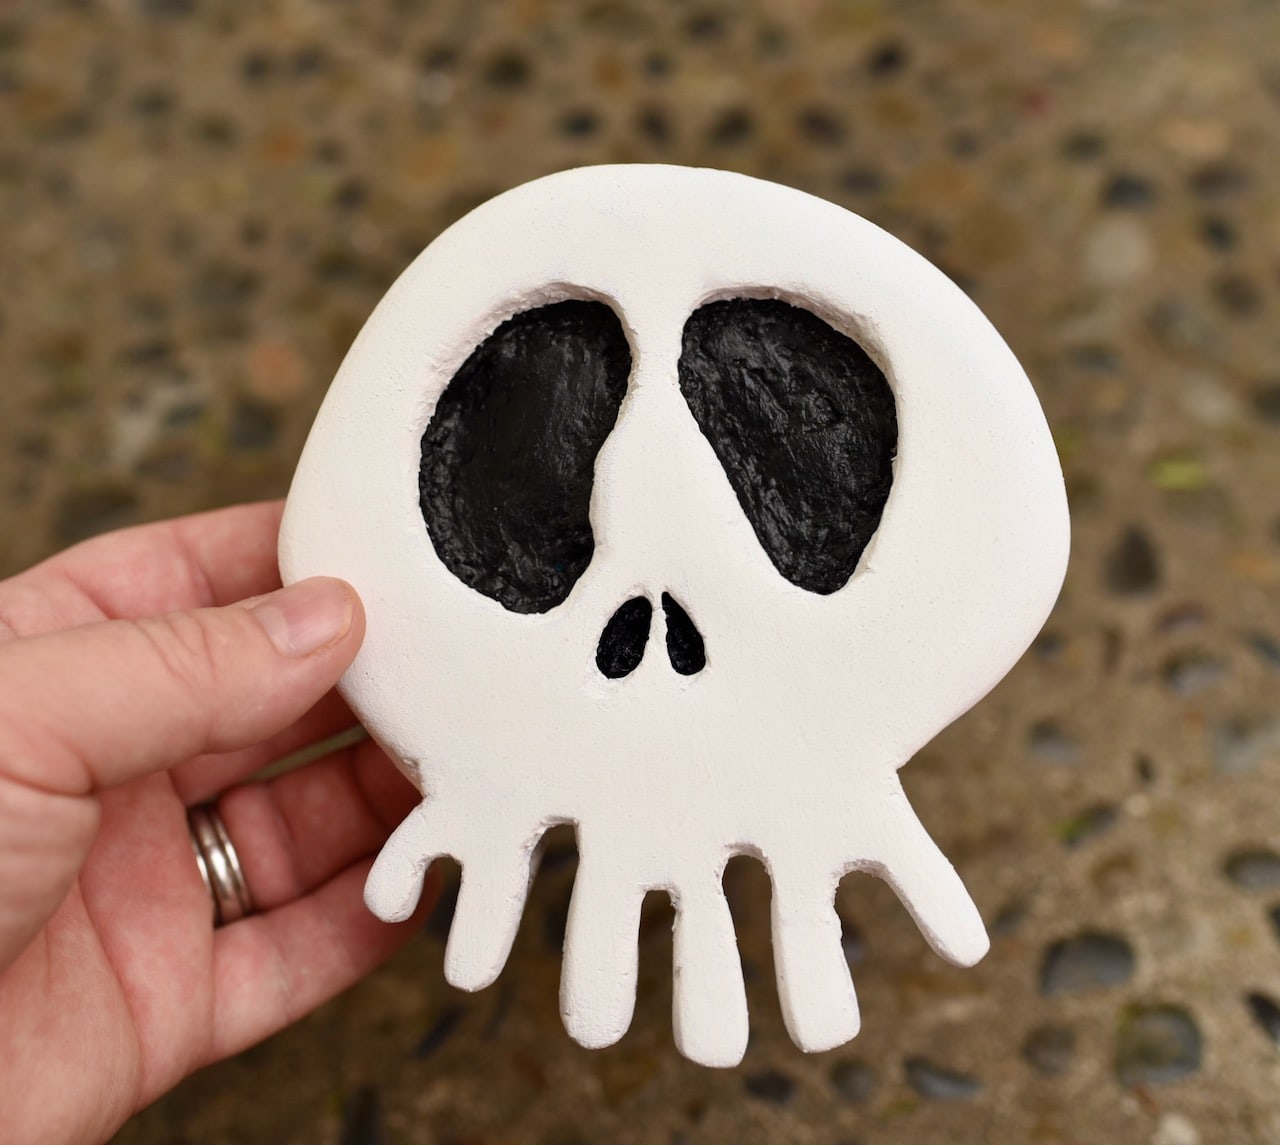
Paint the Haunted Mansion Wreath Skull Prop
It took a few coats of white craft paint to completely cover the skull and make him look very white.
After the last coat of white paint was dry, I used a small paintbrush to paint the insides of the eyes and nostrils black.
After a couple coats of black my skull was now complete and looking amazing!
Helpful Tip: Be careful when cutting and painting around the bottom of the skull. While the insulation foam is pretty hardy, those little pieces cut out at the bottom can be easily broken while you’re cutting or sanding if you’re not careful.
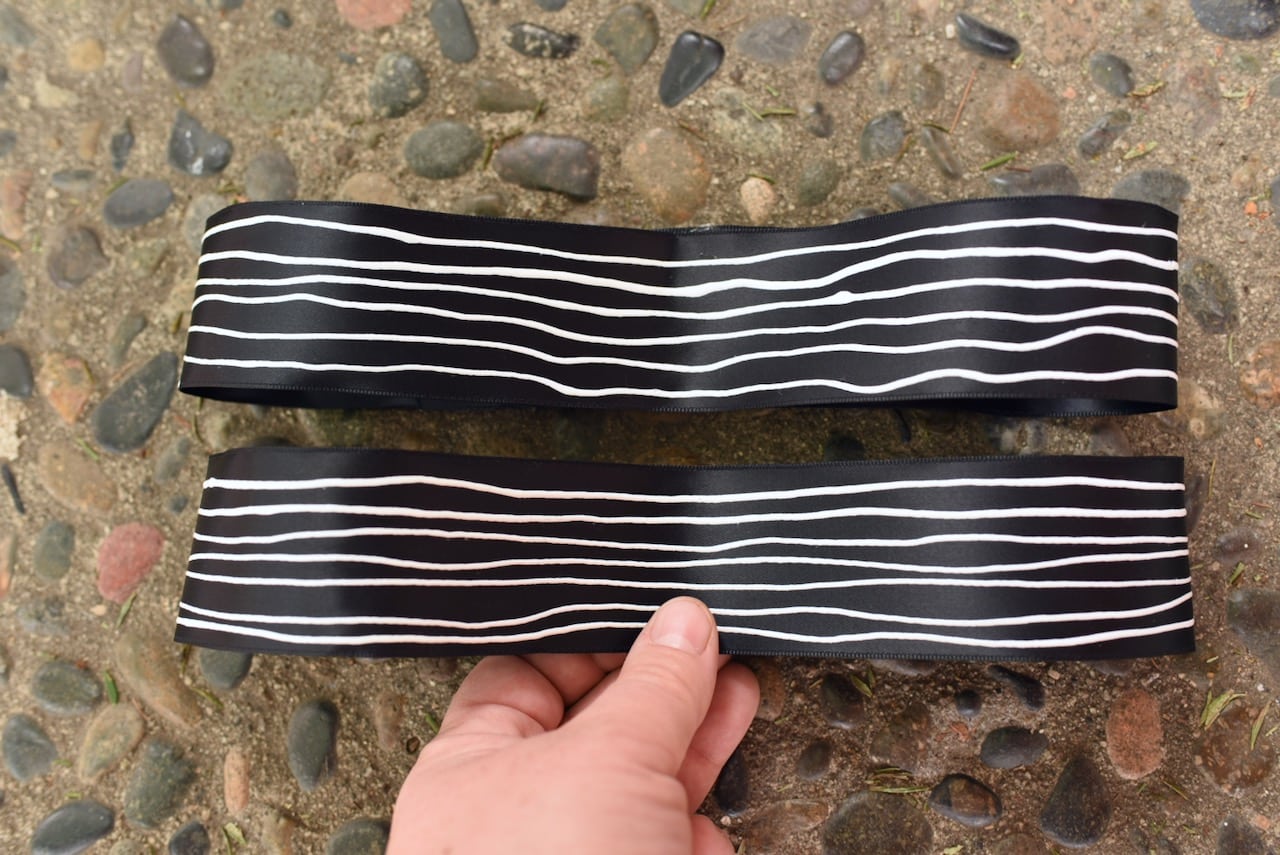
Make the Lines on the Jack Skellington Black Ribbon
One of my FAVORITE parts of this Nightmare Before Christmas Wreath was making the really cool black ribbon with the white stripes.
I already had black and white striped ribbon, but it didn’t look enough like the original wreath to me to use it.
I wanted a legit version of the real thing.
Roll out the Ribbon
First, lay out a looonnnnggggg piece of ribbon.
I unrolled the ribbon down the hall and into a bedroom (sorry, boys!).
I really should have measured, but I didn’t.
You can fold over the ribbon if you’d like for how big you think your bow needs to be, and then add some more and cut.
For me, it was just easier to roll out a whole bunch.
That way I knew I would have more than enough!

Paint the White Lines
Use the Tulip Dimensional Fabric Paint to create a long thin line close to one side of the ribbon.
Even though you’ll want to make this line perfectly straight (which was my first instinct), don’t.
The lines on Jack Skellington’s suit and tie aren’t perfectly straight, and neither are the lines on the bows at Disney.
Try to make them somewhat straight, but just a little bit wavy and wonky, like everything in Tim Burton’s world.

After you’ve finished making one long semi-straight line down the ribbon, you’ll just repeat that step to make more lines until the bow is covered like mine.
Please ignore the outdoor photos with leaves on the ground. It was too dark in the house when I was taking these photos so I had to go outside, leaves and all!
My ribbon width looked good with 6 lines across it, but this will depend on the width of ribbon you use.
Just be sure to use wired ribbon!
Let the ribbon dry untouched for a few hours.
This paint goes on so smoothly and dries really well.
It has a nice slick raised finish that is perfect for this project.

How to Fold the Nightmare Before Christmas Wreath Bow
I wanted my Nightmare Before Christmas wreath to have a double bow under the skull to make it more interesting.
I also knew I wanted two long bow tails at the bottom, since I would make them a little wavy with jagged ends like the original version.
Since I only painted one side of the ribbon, I used a few tricks instead of tying it like a regular bow.
This way you don’t see the plain black inside.
It also makes the bow look fluffier and bigger.
Decide how big you’d like your bow loops with a piece of ribbon.
Cut out the ribbon to make one of those loops.
Hot glue the ends of the ribbon together and place the glued side on the back of your loop.
Repeat this step to make a second loop if you’d like to make a double bow like mine.
Knot the Bow
How to Make the Bow Loops
Place one loop over the other in a really wide “X” shape.
Place your finished skull over the top and adjust the loops so they look great with your skull.
Once the loops are how you want them, use hot glue to glue the top one onto the bottom one in the middle.

Use another piece of ribbon to wrap around the middle and around the back to hold it all together.
Cut the end in the back and glue it together in the back.
How to Make the Bow Tail Pieces
To make the two long bow tail pieces, you’ll first need to decide how long you’d like the ends to be.
If you’re a visual person like me, it helps to have someone hold up the wreath where you’d like to hang it.
Then you can hold up the ribbon and decide how long you would like it to hang.
Once you know the length, cut the ribbon pieces.
Place them both on the back center of the bow and arrange how you’d like them.
Use hot glue to stick them on.
Use scissors to cut into the bottom of each ribbon to make jagged edges, just like the Disney Haunted Mansion wreath version.
Put the DIY Nightmare Before Christmas Wreath Together
Now it’s time to put the final pieces together on the wreath!
I attached my bow onto the wreath before I glued the skull over the top.
Glue the Bow onto the Wreath
Put hot glue on the back of the bow and carefully pressed down on the bow to hold it in place.
It will be very hot so use something else to press down with so you don’t burn those fingers!
Attach with Wire
Next, I used a piece of green floral wire, but any thin wire would work too.
Take a piece of wire and wrap it around the front of the bow.
Then wrap around the back of the wreath to hold it in place.
Twist the ends together and cut off any excess.
You can use a couple pieces of wire to hold it in place and make it nice and secure.
Add the Skeleton to the Bow
Place a lot of hot glue on the center front of the bow, then carefully place the Jack Skellington skull over it.
Press down on the foam and hold in place for a minute or so while the glue cools.
Use your fingers to make little waves in the hanging ribbon so they look wavy like the Disneyland Haunted Mansion wreaths.
All done!
Hang the Nightmare Before Christmas Wreath
Now it’s time to hang your gorgeous new Nightmare Before Christmas wreath and get ready for the compliments to come rolling in!
I used a wreath hook to hang my new Jack Skellington wreath.
This Halloween wreath looks VERY impressive and is such a fun and unique way to decorate for Halloween and fall!
If you’re really into the Nightmare Before Christmas, you could even use this wreath as a Christmas decoration too.

Don’t forget to pin this wreath to make later!
More Fun Halloween Ideas-
- No-Sew Baby Owl Hedwig Costume
- Fortnite Bush Costume
- How to Make a Fake Fire Prop for Halloween
- Nightmare Before Christmas Halloween Party
- Goonies Halloween Party
- Free Printable Halloween Party Invitations
Fall Favorites-
- Easy Fall Stove Top Potpourri Recipe
- How to Make a Natural Fall Wreath
- Starbucks Caramel Apple Spice Recipe
- Apple and Pear Picking in Julian, CA
- Fall Bucket List Printable Punch Card
- Day of the Dead Skeleton DIY
![]()
This Nightmare Before Christmas wreath DIY was updated in August 2021 and was originally posted in September 2020.
Leave a Reply