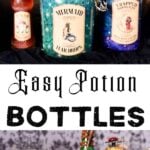
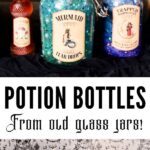
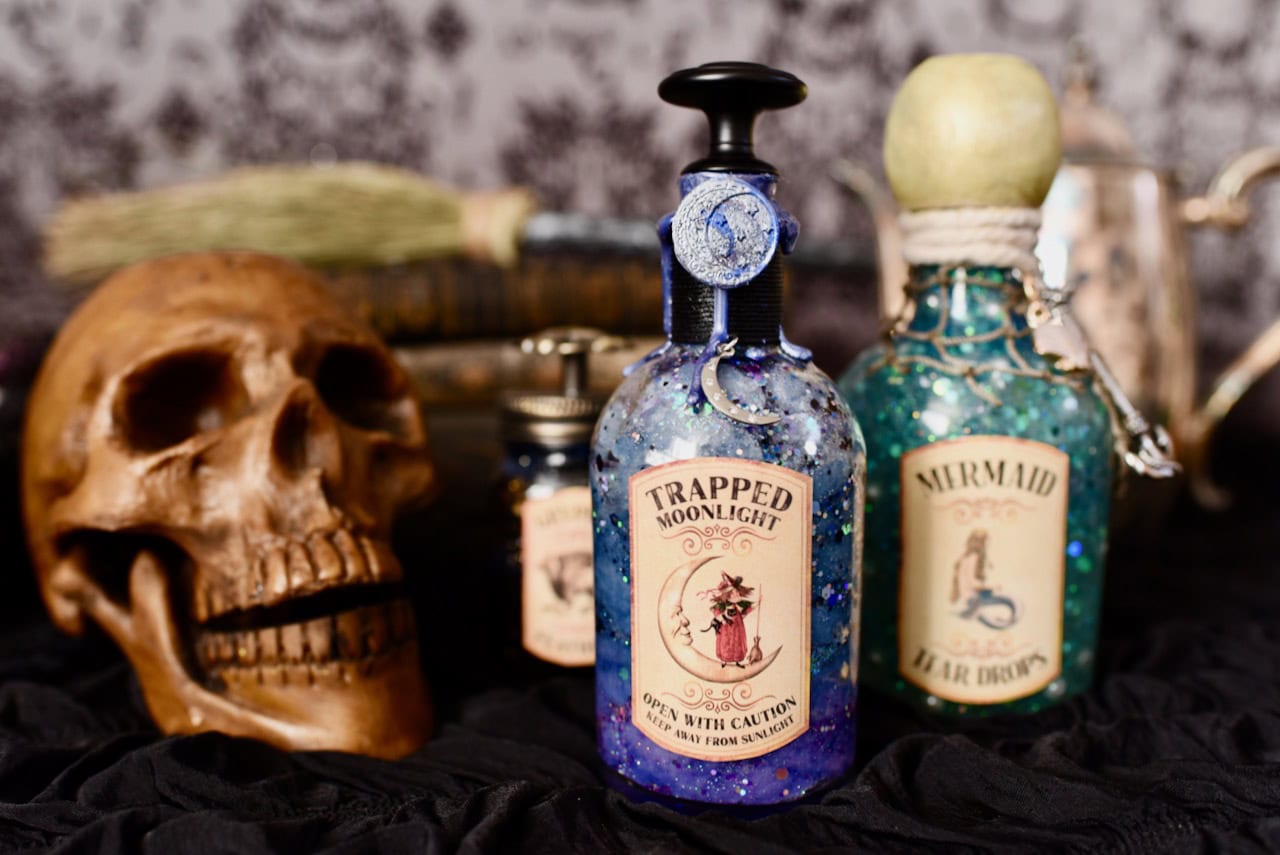
Make STUNNING potion bottles at home for Halloween that look just like fancy movie props! These DIY potion bottles are the perfect Halloween decoration and are so easy to make yourself.
Every store you go in these days, you’ll see Halloween potion bottles in all different shapes and sizes.
But did you know that you can make your own set of colorful witch potion bottles that look SO much cooler and cost MUCH less?!
These go perfectly with our popular fake fire prop and witches cauldron DIY!
DIY Potion Bottles
Today I’m going to show you how to make the ultimate magic potion bottles with so many cool, magical details.
You won’t even be tempted to buy those boring store versions again!
I experimented for over a week on these pretties, and used a few different techniques and potion craft recipes to make my set.
This post covers EVERYTHING you will need to know to make every single one of the ten easy potion bottles I made!

Go big or go home, right?
It took me another full week to write up all the instructions and supplies with a lot of detail so you can recreate these beauties for yourself.
I hope you enjoy these pretties as much as I do!
If you’re a big Potter head like me, you can use these same techniques to create your own Harry Potter potions to add to your potions shelf.
Our Harry Potter pumpkin juice and Hedwig baby owl costume are our fan favorites for Halloween time!
VIDEO: How to Make Potion Bottles Halloween Decor
I HIGHLY suggest you watch the video below that I made to show you EXACTLY how I made my bottles!
It’s much easier for you to see how I made them before you read the directions.
After you watch the video, keep reading to get the details of every single bottle I made and how you can make your own!
I shared how to make the mermaid potion bottle and the trapped moonlight potion in the video, but I share below how to make ALL of the bottles.
You can also check out my potion bottle tutorial on Youtube to see a video of all of the bottles.
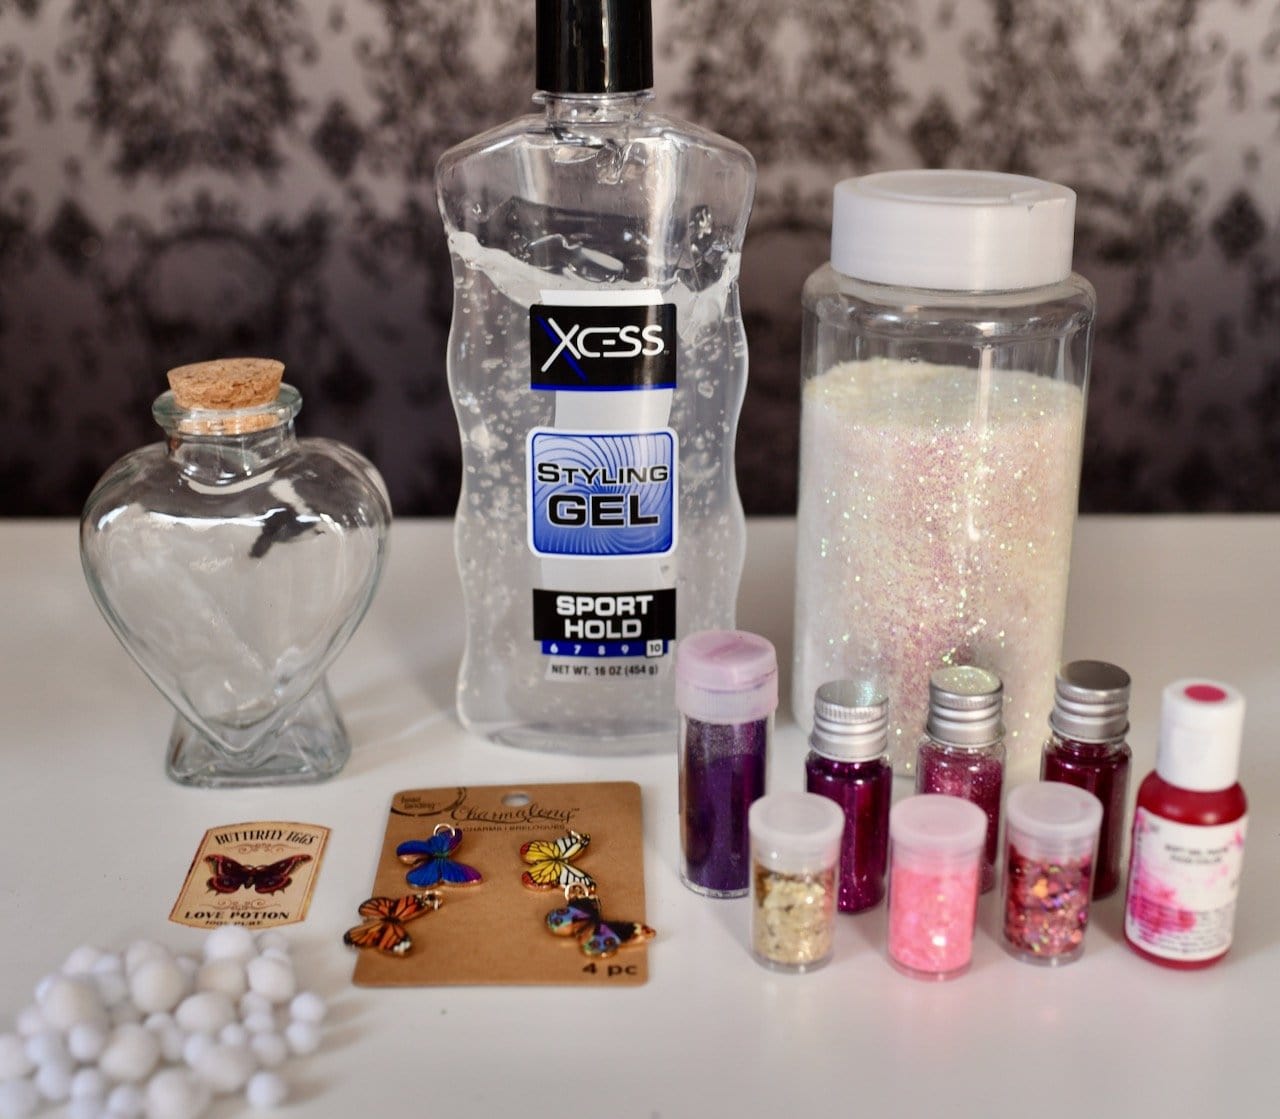
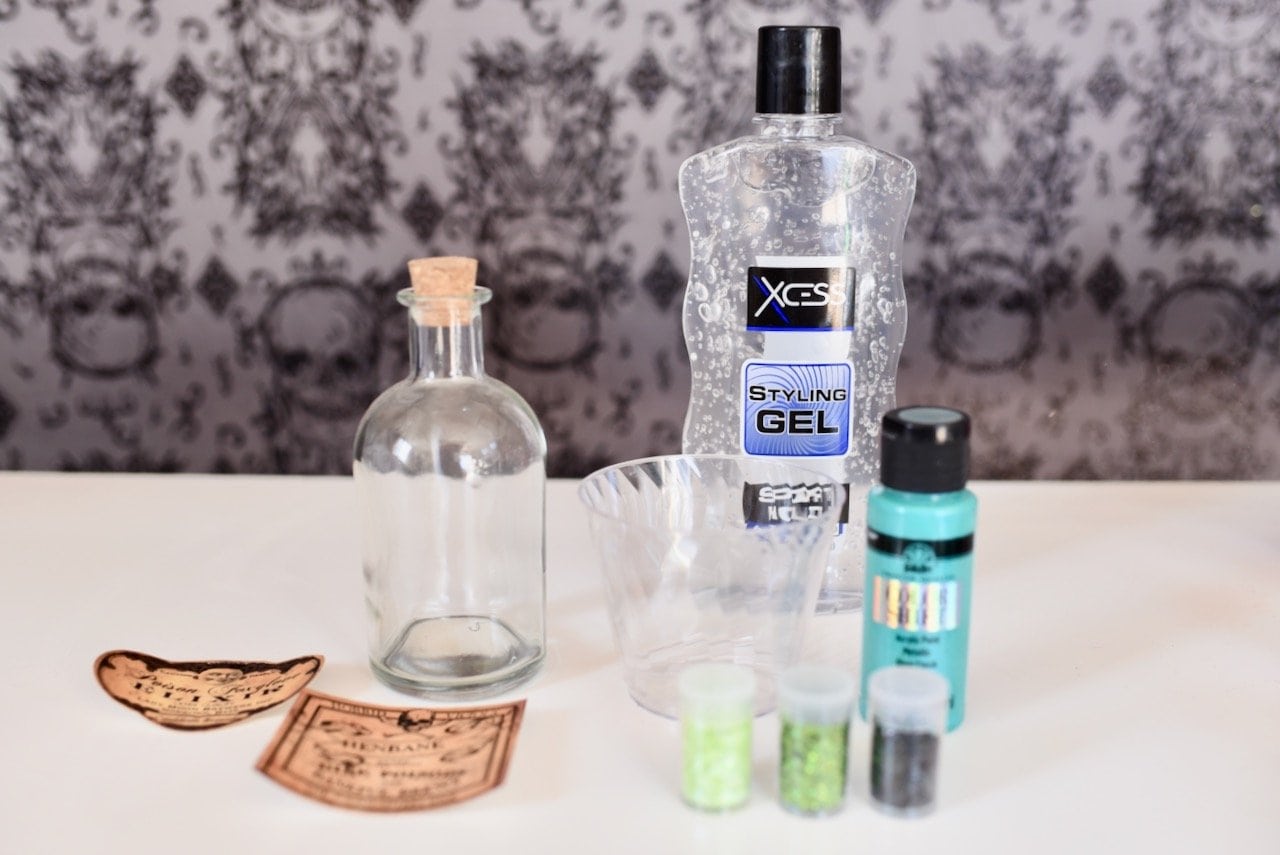
The following supplies are what I used to make multiple potions using those different techniques. This post contains Amazon affiliate links, which means I make a small commission of any purchase made at no extra cost to you.
Potion Bottle Supplies
Glass Bottles
You’ll need a glass bottle for each of the glass potion bottles you would like to make.
You could make plastic potion bottles, but glass is so much more durable and look much nicer than plastic (in my opinion).
I repurposed some Cholula hot sauce and buffalo sauce bottles (the ones with the round wood tops), a glass syrup bottle, a jam jar, and more.
Any old jars or new ones will work!
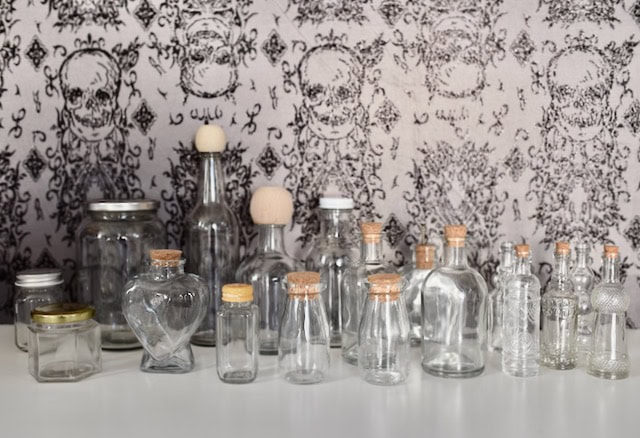
Look twice at that glass before you throw it away, since many of them can be used in your potion making adventures.
You can also find cheap ones at thrift stores, dollar stores, and at craft stores.
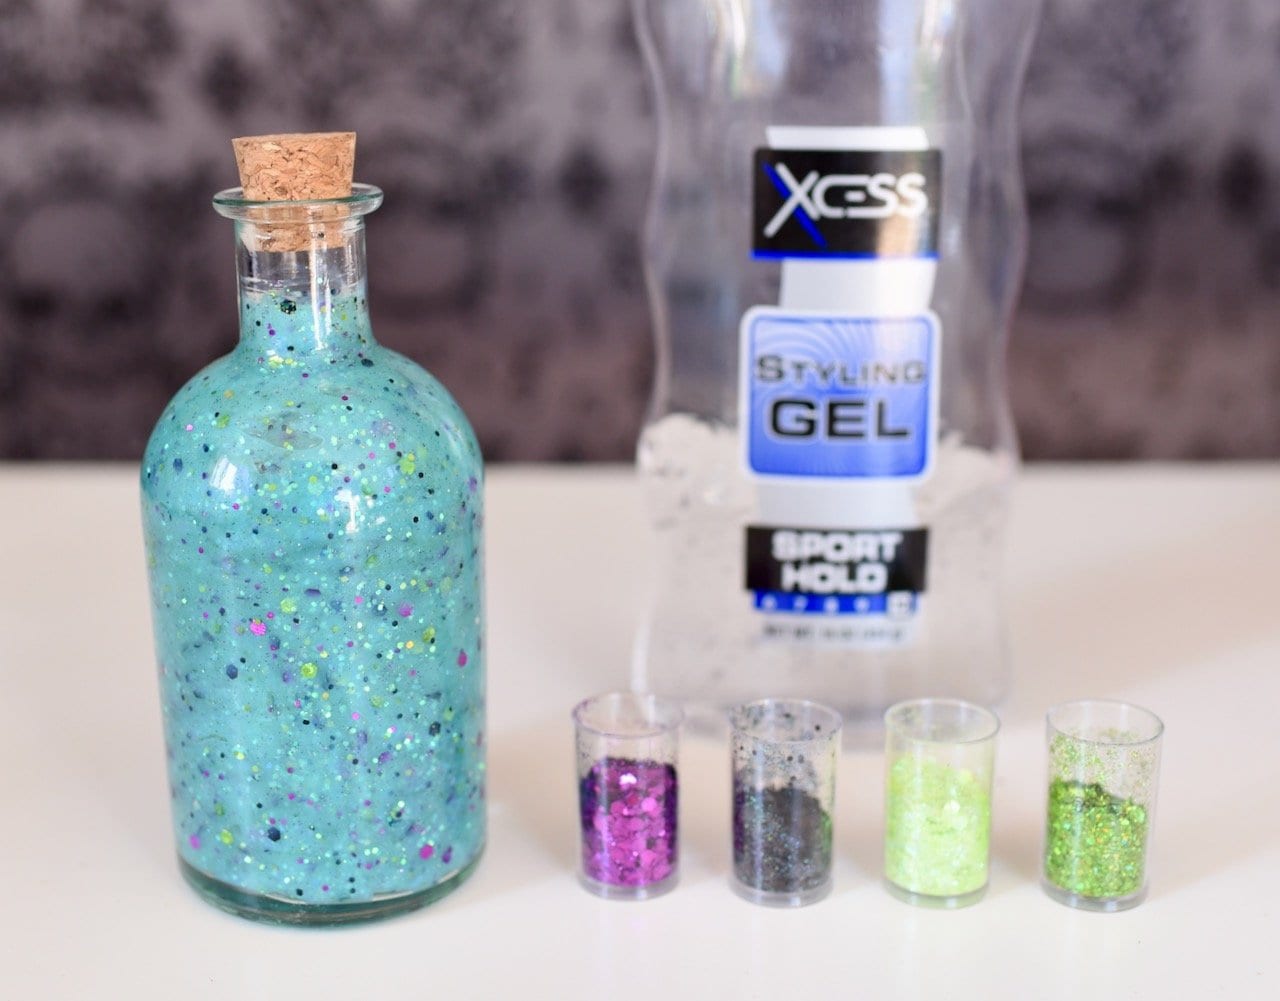
Hair Gel
Believe it or not, hair gel makes the perfect base for creating your own witch potions and was a staple for my bottle potions!
Gel won’t get yucky over time like water, and whatever little additions you add to each bottle will stay suspended in the gel for a really cool effect.
I bought some 16 oz bottles of clear gel and smaller bottles of blue hair gel for just $1.25 at Dollar Tree.
Rubbing Alcohol
Some of my bottles were filled with rubbing alcohol that I colored just like I would with water, since the rubbing alcohol won’t go bad like the water will.
I used rubbing alcohol in a lot of the bottles that didn’t have cork tops.
I was worried about the rubbing alcohol shriveling up the cork over time, so this worked well with my glass jars that had metal lids.
Distilled Water
Regular tap water is filled with impurities and yucky chemicals that will make your potions slimy and gross after the Halloween season.
To make each potion bottle last much longer, I used distilled water instead.
It doesn’t have all the impurities of tap water, and you can get a big jug of it for around a dollar at most stores.
Glycerin
I also added some vegetable glycerin whenever I used water, just like I do for making DIY snow globes.
Glycerin helps to suspend the glitter, so I wanted to try it with my witch potions.
The distilled water worked great in the bottles with corks, since I didn’t want rubbing alcohol to ruin the corks over time.
Glitter
Glitter is a fun and essential part of this Halloween craft!
I found a set of glitter in 32 different gorgeous colors on Amazon that worked amazingly for this project and adds a nice shimmer to your potions.
It had such a great variety of colors and have TONS of glitter left for many more projects!
Cotton Balls
You’ll need some plain cotton balls that you will end up stretching out to add depth and variety to your bottles.
Plastic Cups
Plastic or paper cups work perfectly to mix up each colored concoction before you add it to your container.
Skewer Sticks
Thin wood skewer sticks are invaluable for this project and can be found at most dollar stores.
You will use the skewer sticks to push things through the tops of the bottles and to mix up the glitter.
Coloring
Coloring is an essential, and you definitely have options based on what you already have at home.
You can use gel food coloring (like what you would use to tint frosting), regular food coloring, or acrylic paint to color your potions.
I already had lots of gel food coloring, so that’s what I used.
For many of my bottles I just used lots of glitter too to help color my potions!
Funnel
A funnel will definitely make your life MUCH easier and prevent lots of spills.
I used two different funnels, one for the liquids and one for the glitter (so the glitter wouldn’t stick to the wet funnel).
Hot Glue
You’ll need hot glue to glue the lids of your bottles down to prevent sealing as well as to help slow down evaporation of the liquids inside.
Hot glue also comes in handy to add some of the extra decorations to the outside of each bottle.
Potion Bottle Labels
Cool labels are the icing on the cake.
I thought about making my own, but I found a set I LOVED so I decided to just buy them to save time.
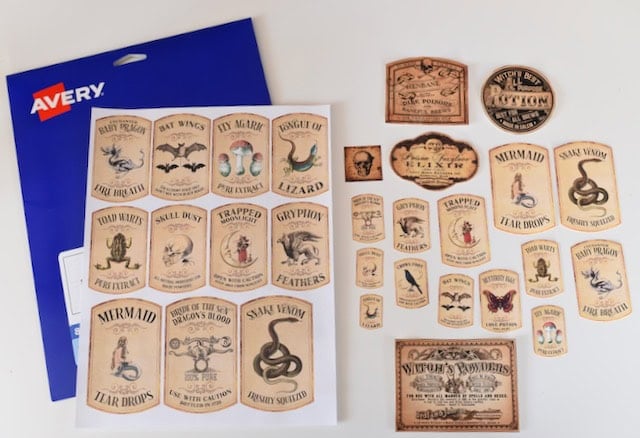
I used these labels from Design Bundles for abound $4 and I used one of these labels too.
You can also find an Etsy shop with ones that you love and then print them out onto full sheet adhesive sticker paper.
This matte Avery sticker paper worked great for me!
There are some really cute ones out there!
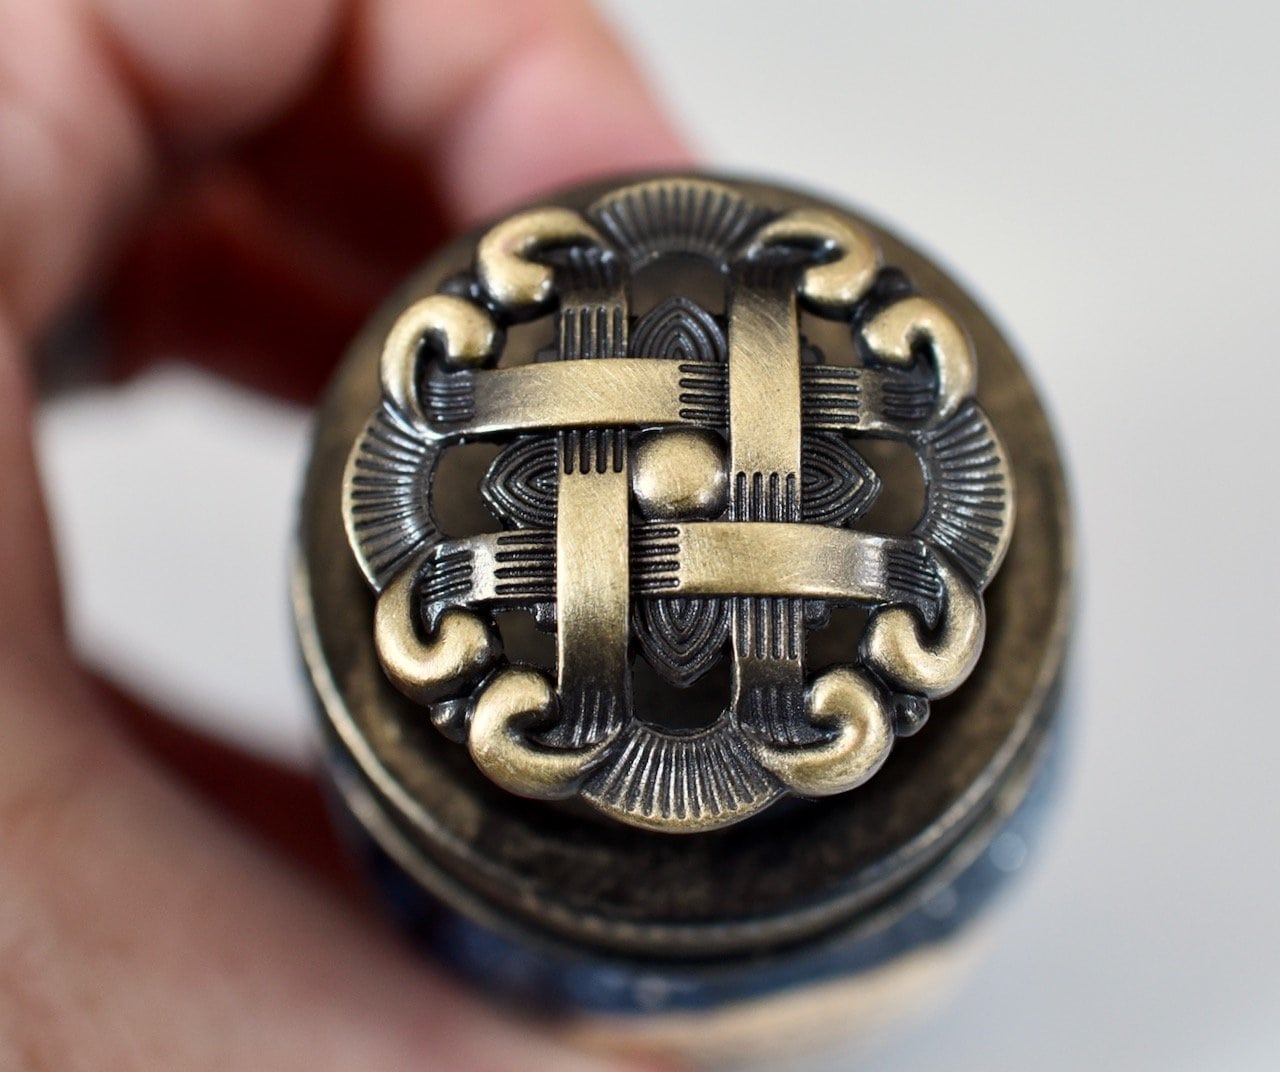
Knobs and Drawer Pulls
To give my bottles an impressive look and to add variety to each one, I used wood and metal knobs and drawer pulls that I bought at Home Depot.
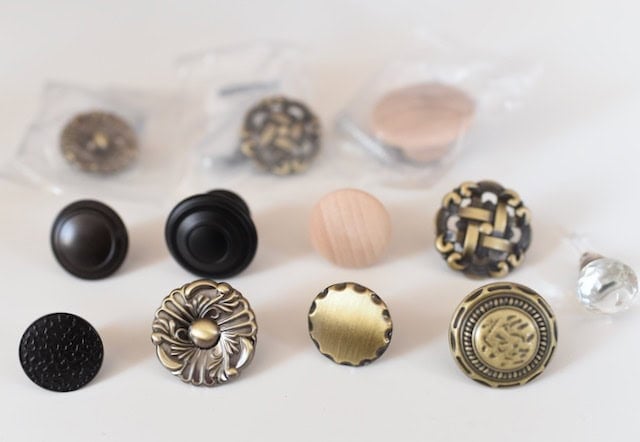
I was shocked that each one only cost me between 98 cents and $2, because they added so much to this Halloween craft!
Optional Craft Supplies
The following ingredients are all optional, but they definitely will take your project to the next over the top level!
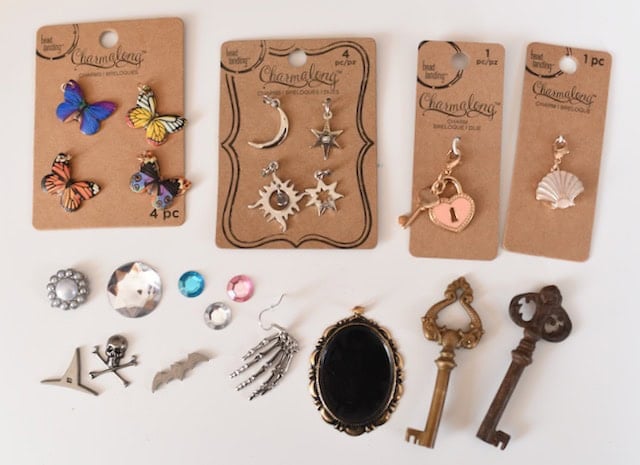
Dig through your craft stash and look around the house for creative items you can use.
- acrylic paint and paint brush
- metal charms (You can get 100 metal charms for super cheap on Amazon!)
- black and brown cord, twine, jute, or suede
- old vintage keys (here’s a great set of 125 keys for cheap)
- wax seal stamp (I used this one)
- wax seal wax and warmer (I used this one)
- colored hot glue sticks
- large fake rhinestones (used in kids crafts)
- fish net
- black mesh material
- luster dust (pearl is my favorite)
- silver metallic marker (I used a metallic Sharpie)
- pearls (cheap fake kids pearls work great)
- fake worms (I used a bag of worms from Oriental Trading I’ve had for years)
Do This Before Making Your Potion Bottles
Before you start making your witchy Halloween concoctions, you need to:
- remove any price tags or stickers
- wash your bottles inside and out with dish soap
- dry bottles thoroughly
- clean the outside of the bottles with rubbing alcohol on a cotton ball to remove residue and oils so hot glue will adhere better to the bottle
* These potion bottles are for decorative use only. Do NOT drink or eat any of the contents, and keep out of the reach of small children. Be sure to seal each bottle so small hands can’t open them.
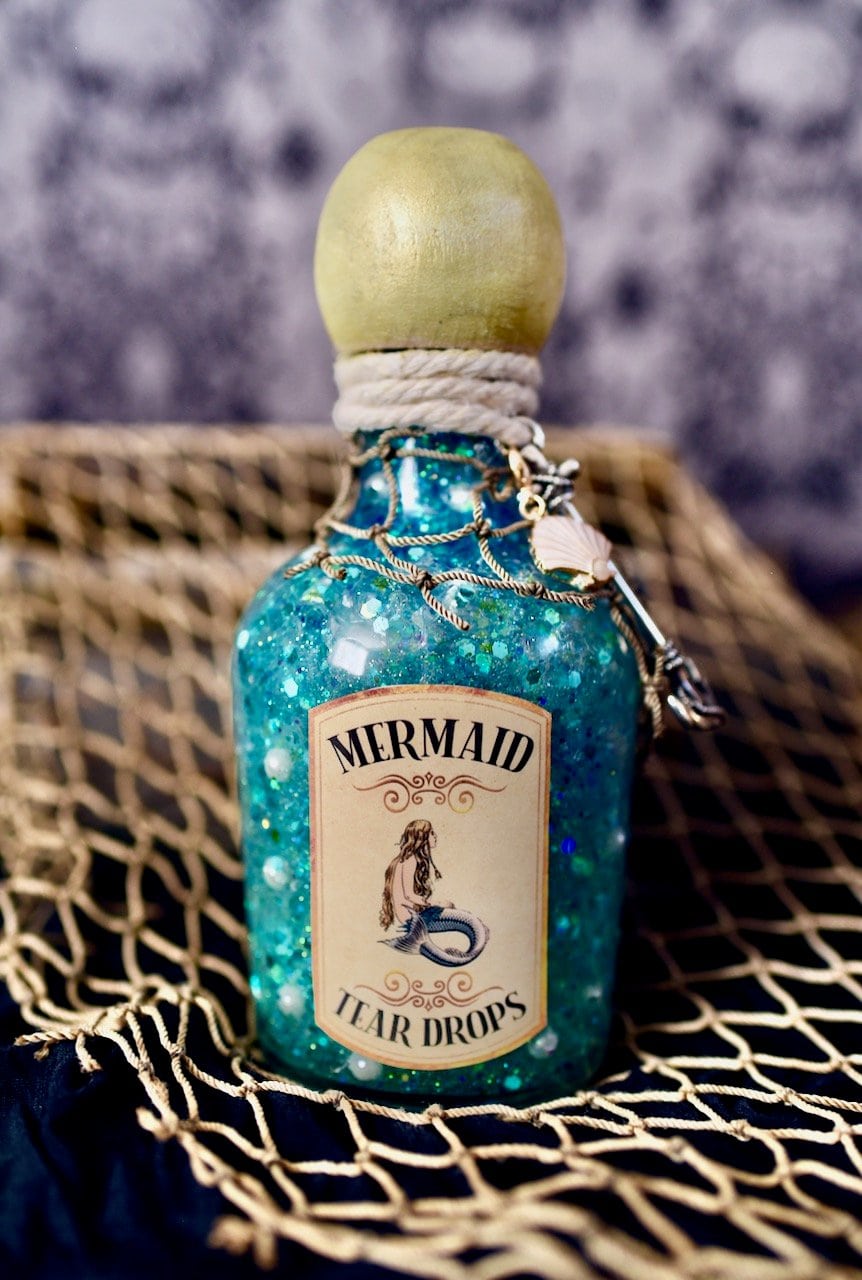
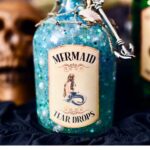
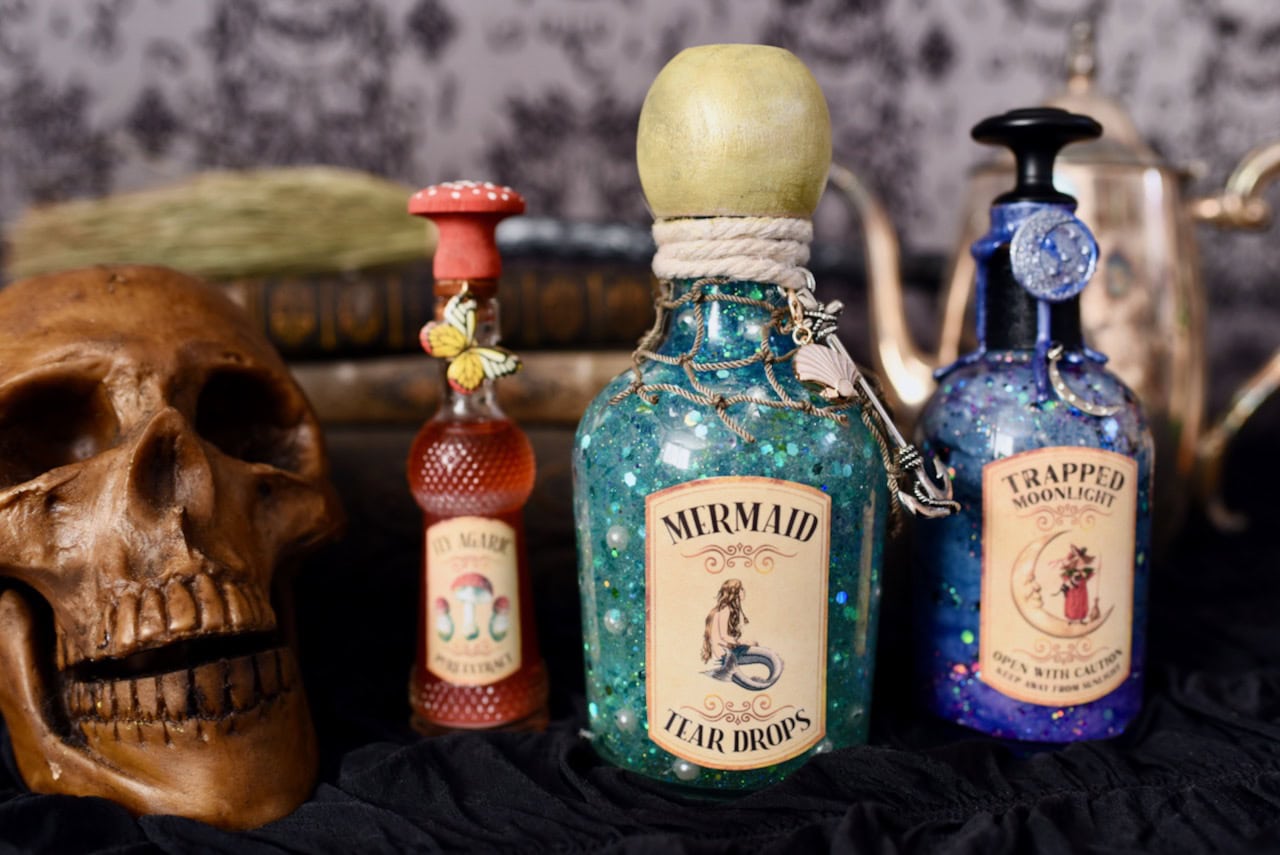
Mermaid Potion
A gorgeous mermaid tear drops potion filled with shimmery pearls, blue, turquoise, and green sparkles, and a lovely shell and anchor charm.
Our 2-ingredient mermaid drink and edible sea glass match this pretty potion perfectly!
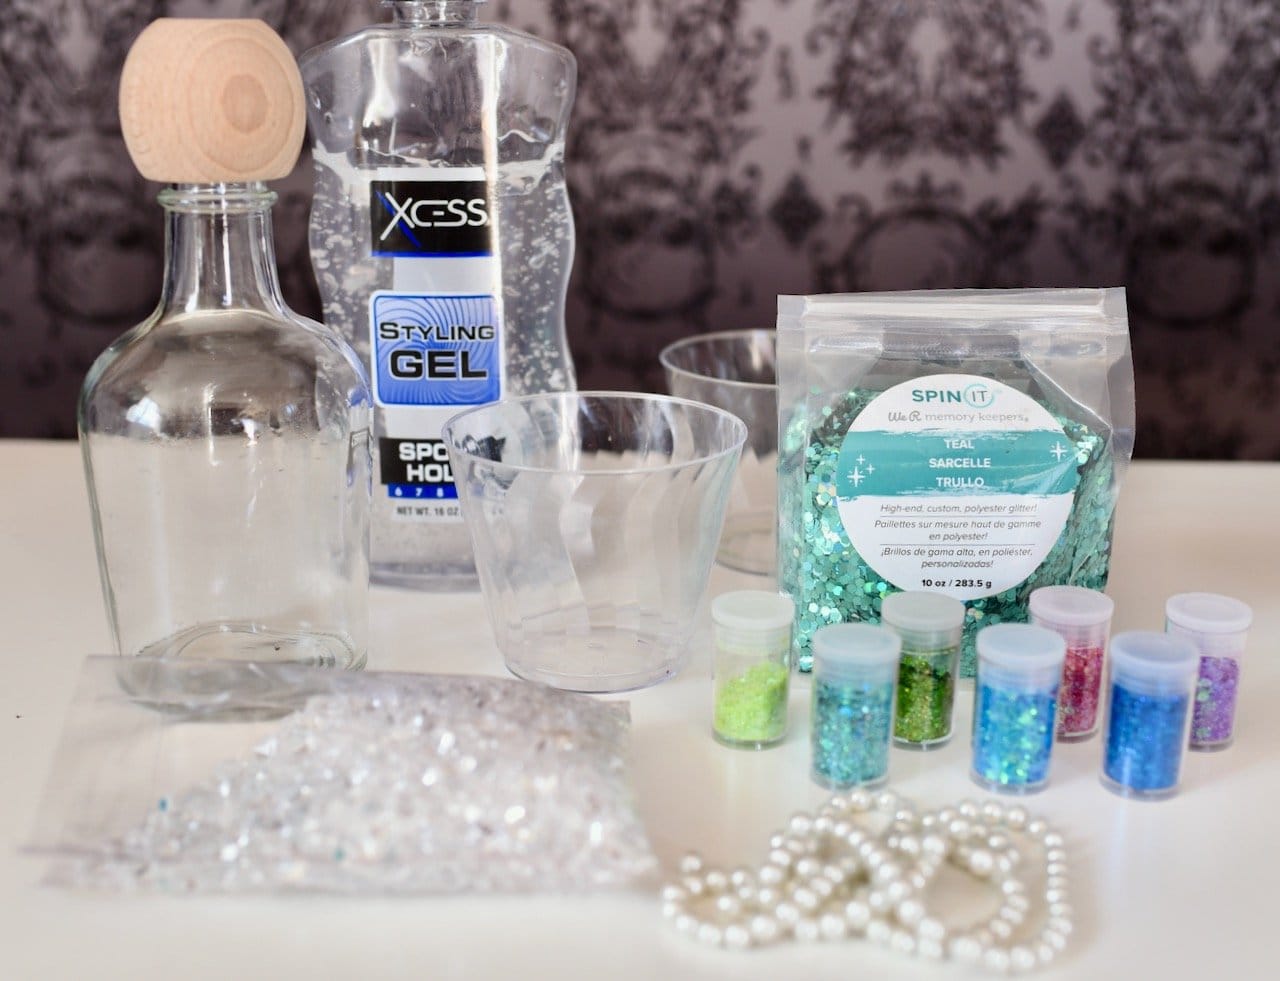
Supplies
- glass bottle (I used a Cholula buffalo sauce bottle that I cleaned)
- clear hair gel
- two plastic cups
- funnel
- glitter– I used turquoise, blues, greens, and little purple and pink
- craft pearls
- white jute
- mermaid label
- little piece of netting
- hot glue
- white and gold acrylic paint + paint brush
- nautical charms (I used a shell charm from Michaels and an anchor charm I already had)
- optional- craft clear diamonds (they’re plastic but look like little diamonds)
Creating the Mermaid Potion
Fill both plastic cups with clear hair gel.
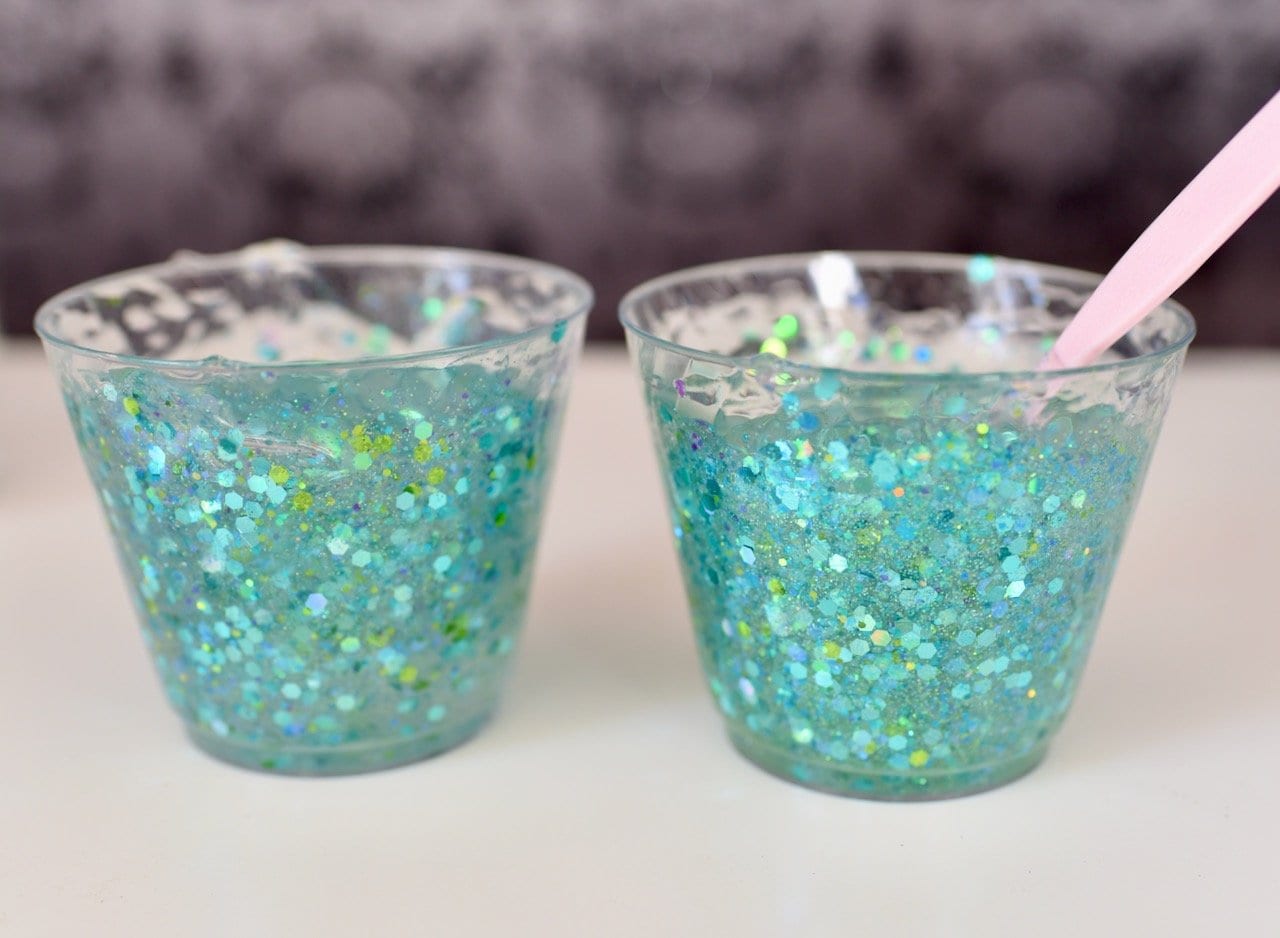
Add glitter in the various colors and stir until you get the color of potion that you want.
I used mostly turquoise, blue, and green, then added small amounts of pink and purple.
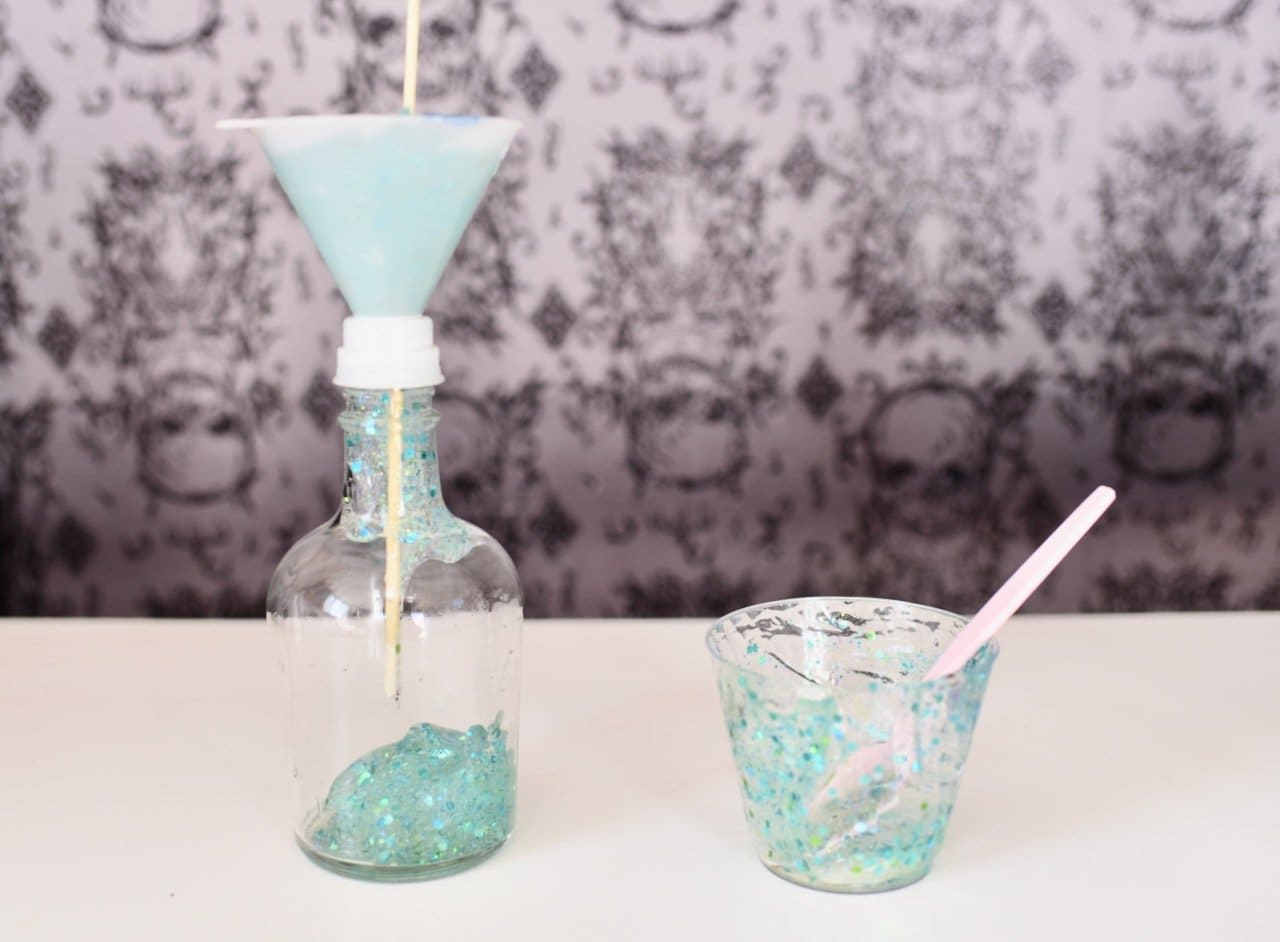
Place a funnel in your glass bottle, then add the glittered hair gel to the funnel.
Helpful Tip:
Use a skewer stick to help push the gel down the funnel if it’s moving too slowly.
You can also add layers of glitter to the gel and stir it around with the skewer stick if you’d like to add more color variety to your jar.
Wipe the top and inside of the entire bottle with a paper towel, then wipe it with a cotton ball with some rubbing alcohol on it.
Let the rubbing alcohol dry (this will help the glue to stick to the glass), then add a line of hot glue to the top of the bottle.
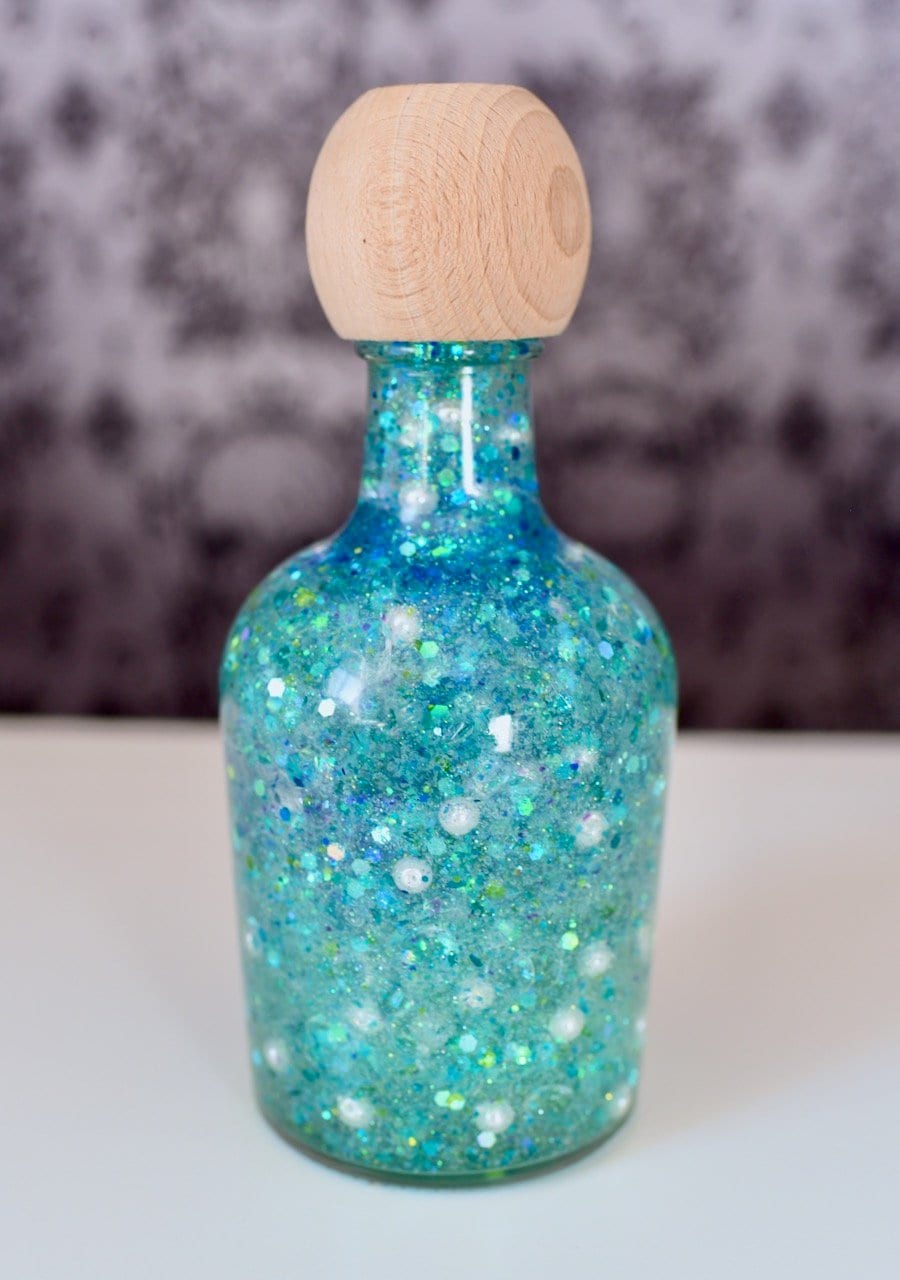
Quickly screw the lid over the hot glue as far as you can to seal it.
This will help to prevent evaporation of your mermaid potion.
Adding the Mermaid Details
Choose which side of your jar you’d like the front to be, then place the mermaid tear drops sticker on the front.
Dry brush a little white paint onto the wood lid, then dry brush some gold paint over the top of the white.
Clean the top of the glass bottle with some rubbing alcohol, then add a ring of hot glue around the top.
Quickly place the dried painted lid on the glue and twist the lid on as tight as it will go to seal it.
Cut a small piece of net out of a larger net, then use hot glue to glue it just under the lid around the neck of the bottle.
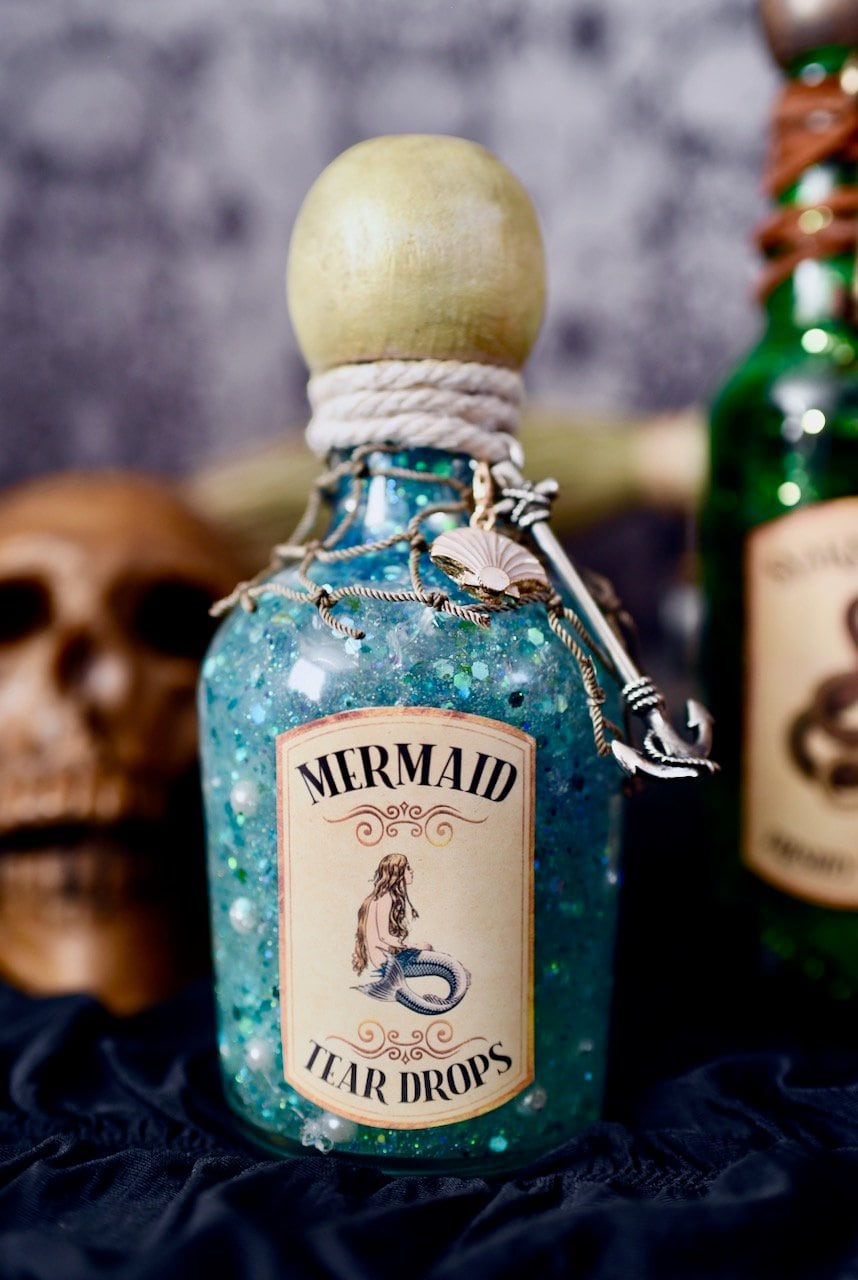
Wrap some white jute around the top under the round lids, then add a couple charms to the top.
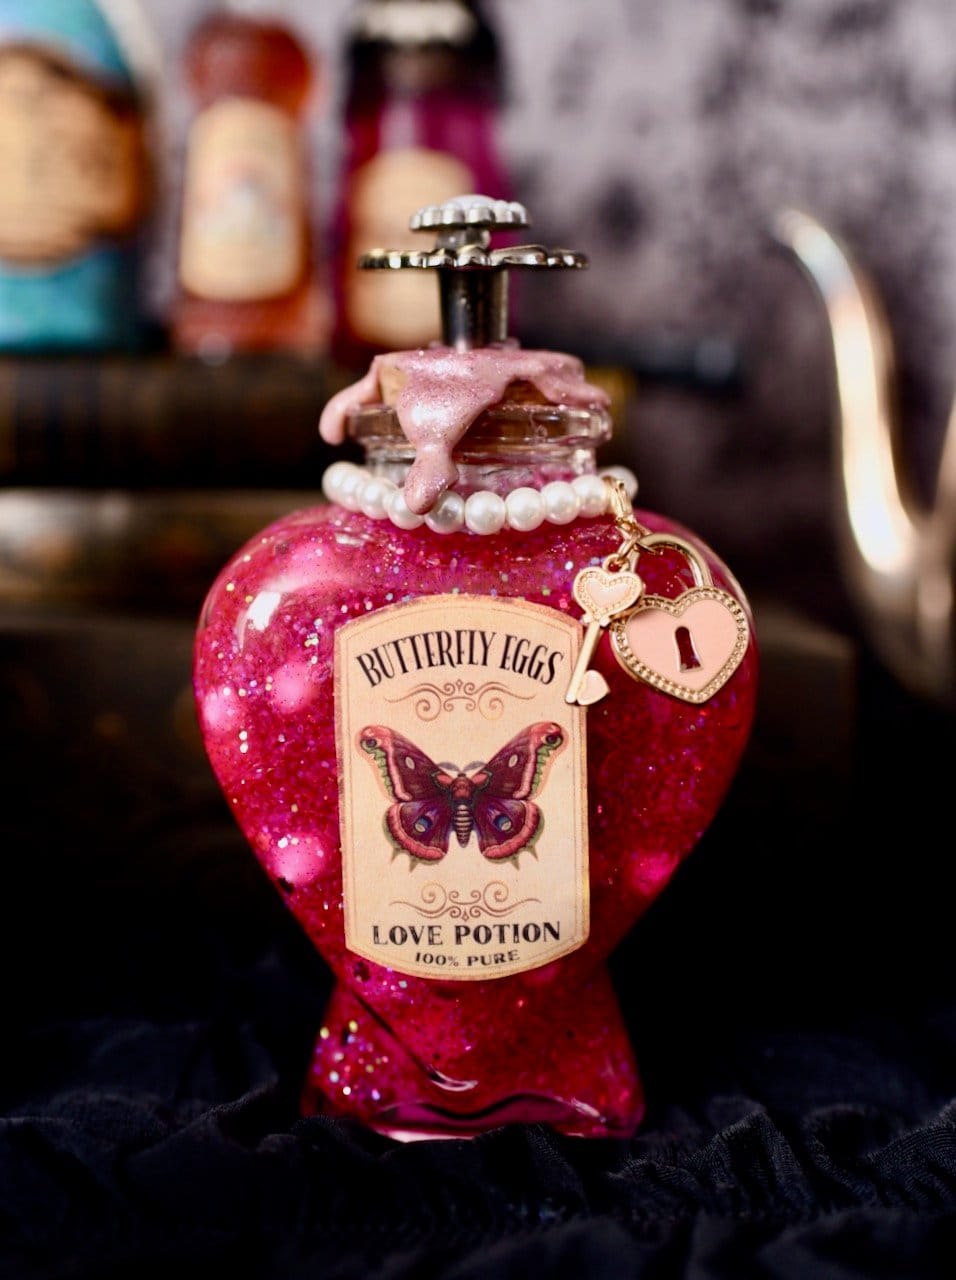
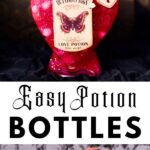
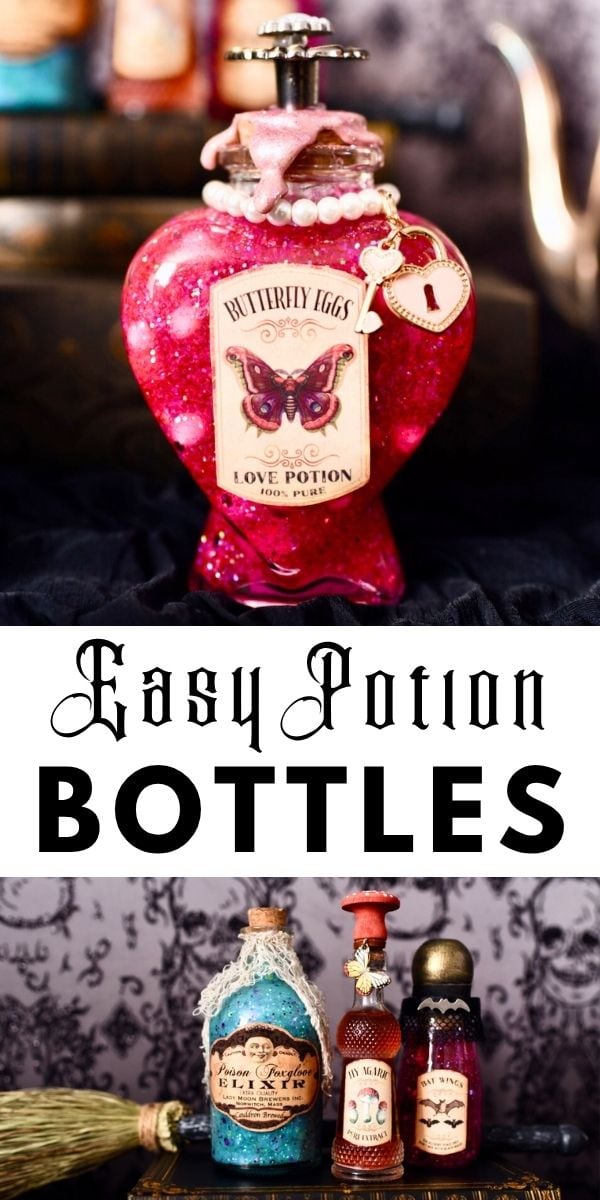
Love Potion Bottle
A pretty pink butterfly eggs love potion in a heart-shaped bottle with a metal top, heart key and lock charm details, and a sealed and glittered pink wax top.
This love potion bottle looks like the Harry Potter love potion, doesn’t it?
Supplies:
- heart glass bottle (mine was from Michaels)
- clear hair gel
- plastic cup
- pink gel coloring
- glitter– I used iridescent, pinks, purples, and gold
- small white craft pom poms
- heart key and lock charms (mine is from Michaels)
- love potion label
- metal knob (Home Depot)
- Super Glue or E6000 adhesive
- pink wax and wax warmer (you can also use candle wax drips)
- string of pearls
How to Make the Love Potion
Fill your cup with clear gel, then add a small amount of pink gel coloring.
Stir the color in and add more if needed.
Add in some iridescent, pink, purple, and gold glitter and stir until you get the color you would like.
Carefully spoon the pink love potion into the heart bottle and fill about halfway.
Drop in some small white pom poms to mimic the look of butterfly eggs.
Use a skewer stick to push the “eggs” to the sides of the bottle where they can be seen, making sure to place them at various heights.
Add in the rest of the pink gel mixture, then drop in some more white pom poms and place them with the skewer.
Wipe the top and inner top of the bottle with a paper towel, then wipe it with a cotton ball with some rubbing alcohol on it.
Let the rubbing alcohol dry (this will help the glue to stick to the glass), then add a line of hot glue to the top of the heart bottle.
Quickly screw the lid over the hot glue as far as you can to seal it.
Decorating the Heart Bottle
Cut a small piece off a strand of fake pearls and tie it around the neck of the bottle.
Add a drop of hot glue over the knot to help strengthen it.
Add the heart key and lock charms to the strand of pearls.
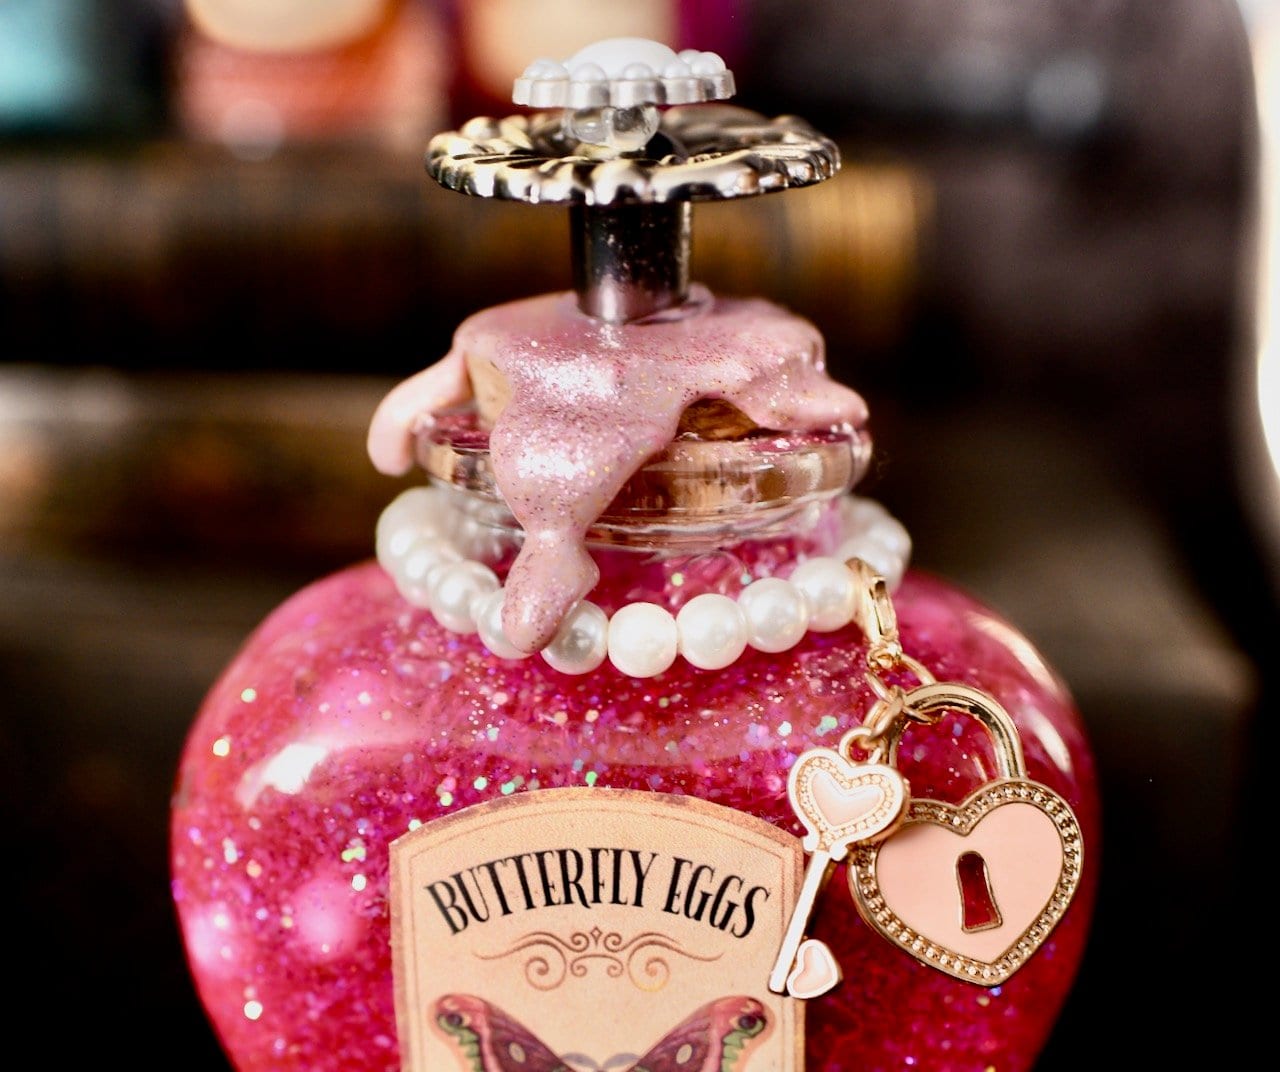
Peel the paper off the back of the sticker label, and place it onto the front of the glass.
Drip hot pink sealing wax over the top of the cork and let the wax drip down the sides.
Sprinkle some pink glitter over the hot wax, then press a metal knob into the top and hold it in place as the wax dries.
Once the wax dries, the knob will pop right off.
Add a little dab of Super Glue or E6000 into the hole where the knob goes in the wax, then place the knob over the top.
Hold in place for a minute with your hands, then let sit while the glue dries and cures.
I used hot glue to add a decorative pearl piece I pulled off a scrapbooking brad that I had in my craft stash, but you could leave it plain or add a fake rhinestone or jewel to the top if you’d like!
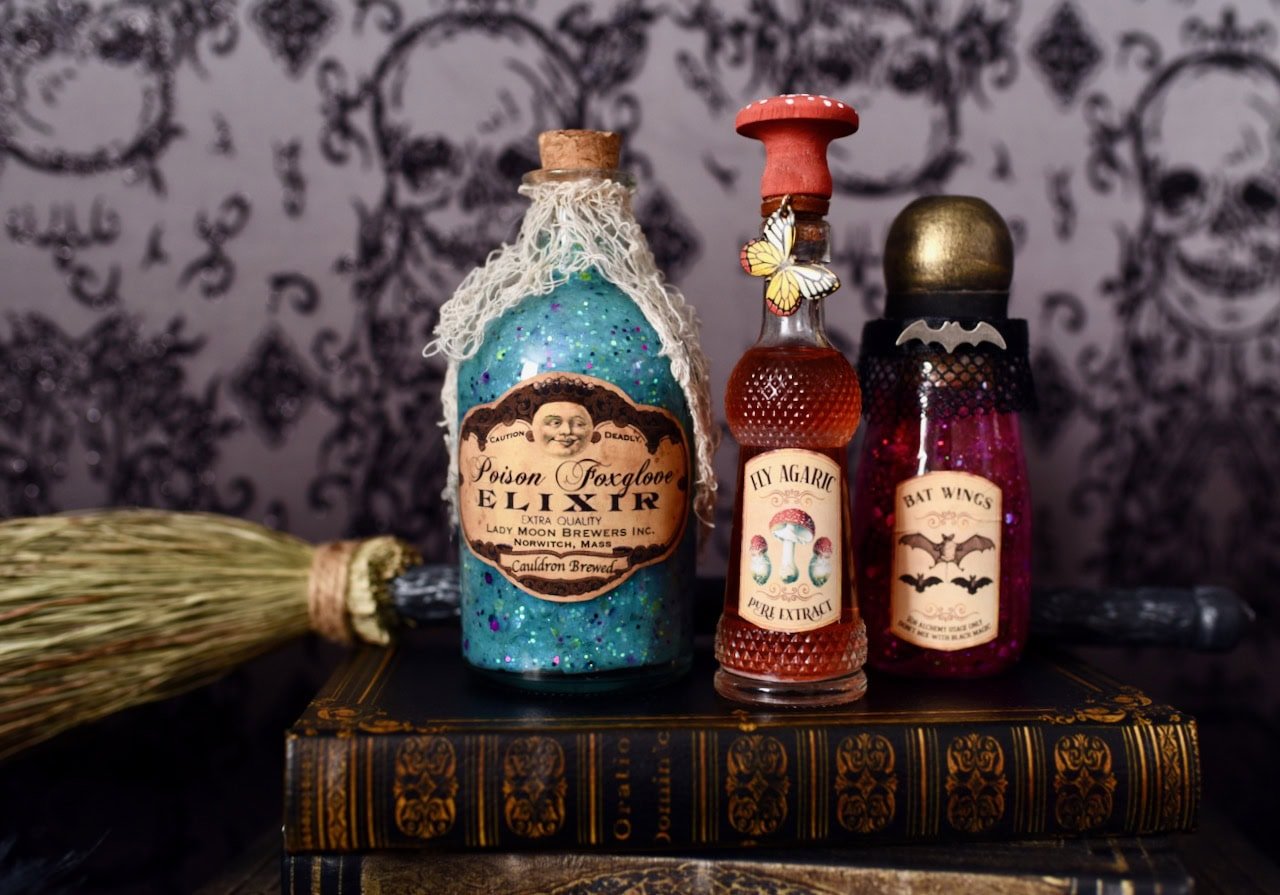
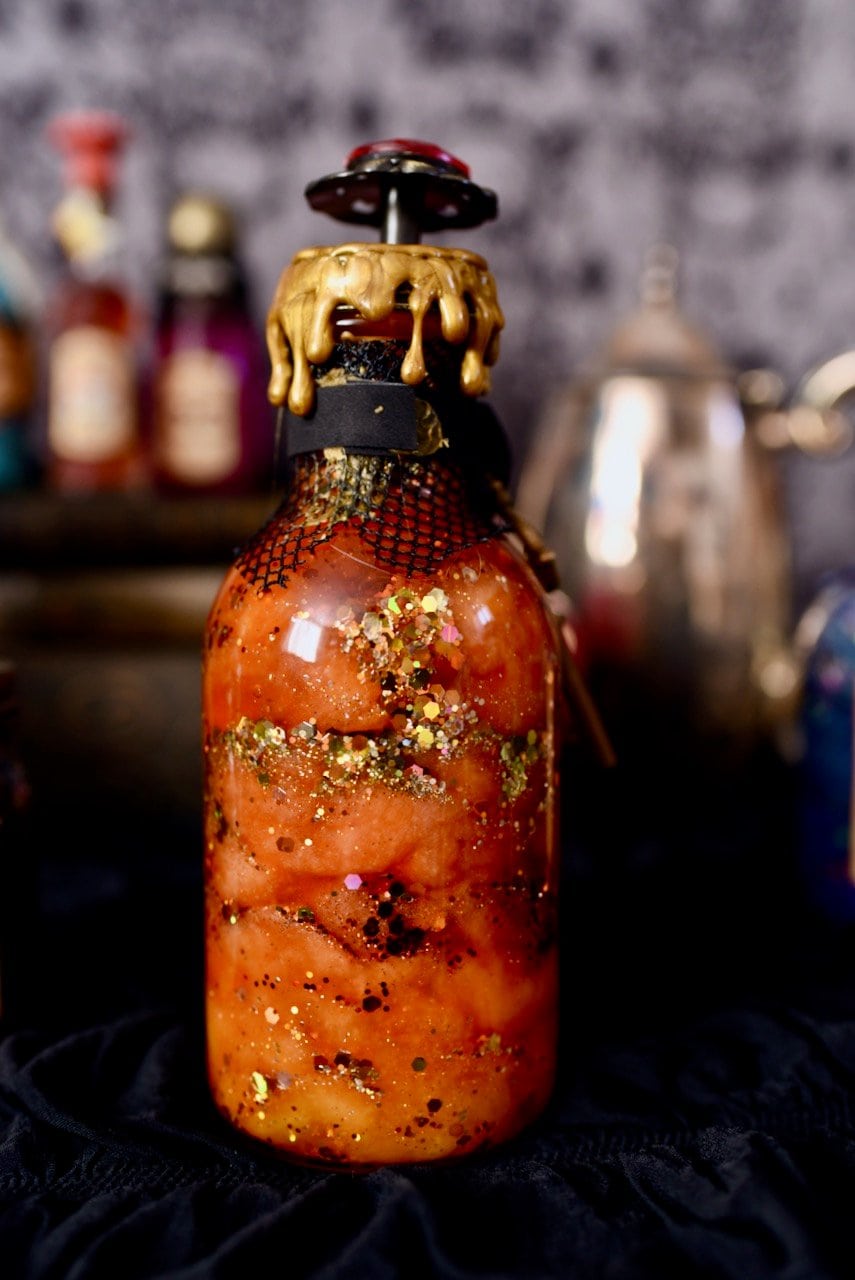
DIY Dragon Potion Bottle
A fiery bottle of enchanted baby dragon fire breath that is filled with vibrant hues of red, yellow, and orange swirls with sprinkles of enchanting gold glitter. This magical bottle is topped with black net, drippy gold metallic wax, a detailed metal lid with a red jewel, and an old gold key.
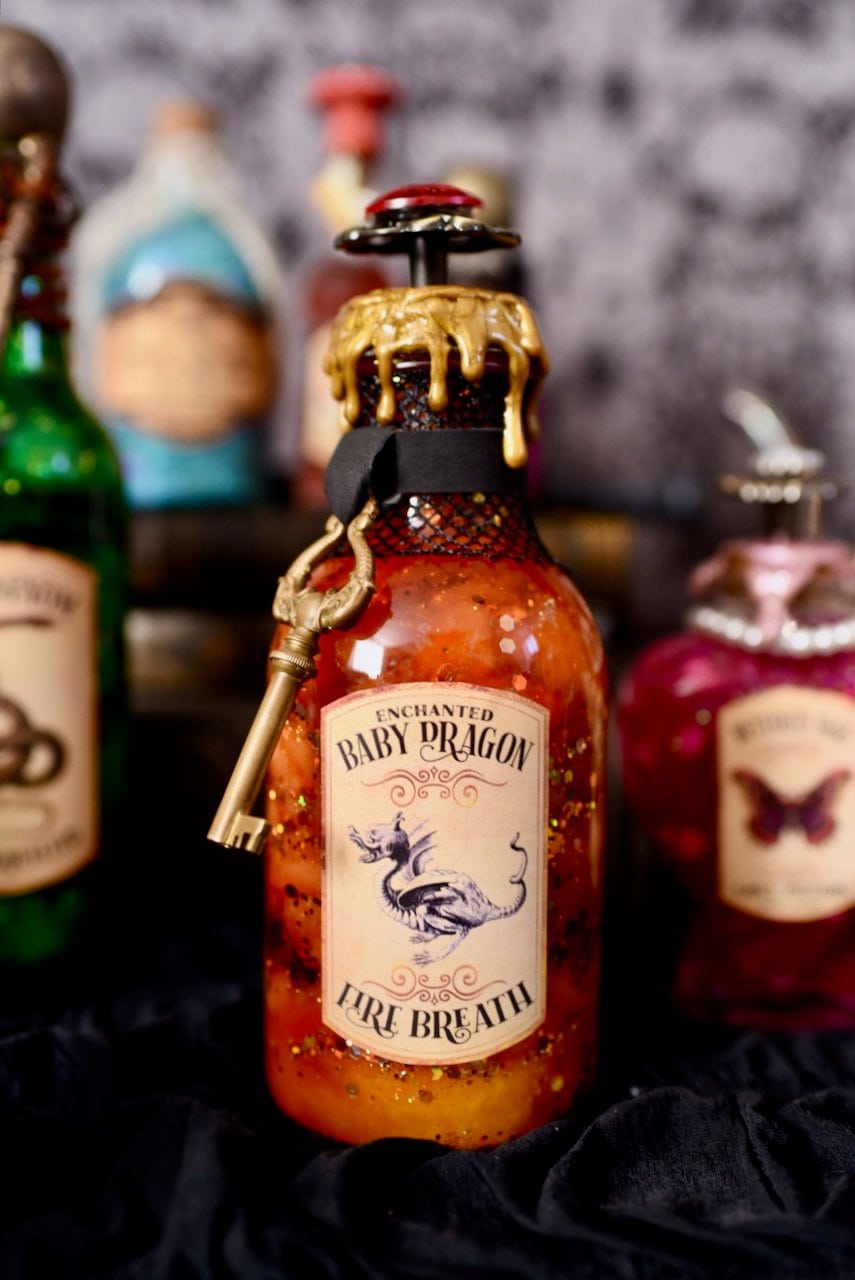
I try not to play favorites, but this baby dragon fir breath potion bottle is definitely one of my favorites (if not my absolute favorite!).
The colors in this potion are just STUNNING (the photos don’t do it justice), and I LOVE the magical extra that the gold glitter adds.
Not to mention the top of the bottle… isn’t it so fun?! I think all the extra decorations match the dragon potion perfectly!
Supplies:
- glass bottle (I used a syrup bottle with a screw top lid- no corks since we are using rubbing alcohol)
- two plastic cups
- cotton balls
- glitter– red, orange, yellow, and gold
- rubbing alcohol
- red and yellow food coloring (I used gel because it’s more vibrant but regular food coloring will work as well)
- funnel (two funnels is better)
- wood skewer stick
- metal knob
- red craft rhinestone
- vintage key
- gold hot glue stick
- hot glue
- black mesh, tulle, or net material (mine was some old Halloween material I already had)
- black ribbon
- dragon potion label
How to Make the Dragon Potion
Add some rubbing alcohol to both of the plastic cups.
We are using rubbing alcohol because it won’t get as slimy and yucky like regular water and will help our potions last much longer.
Don’t use tap water!
Next, add some red food coloring to one cup and some yellow to the other cup.
I added a little black gel coloring to the red too, to make it a little darker.
Grab a handful of cotton balls and start unrolling them and stretching them apart.
You want your cotton balls to be long thin strands instead of small clumps.
This way the cotton balls will have the appearance of swirling magical liquid and will help to create the layered look.
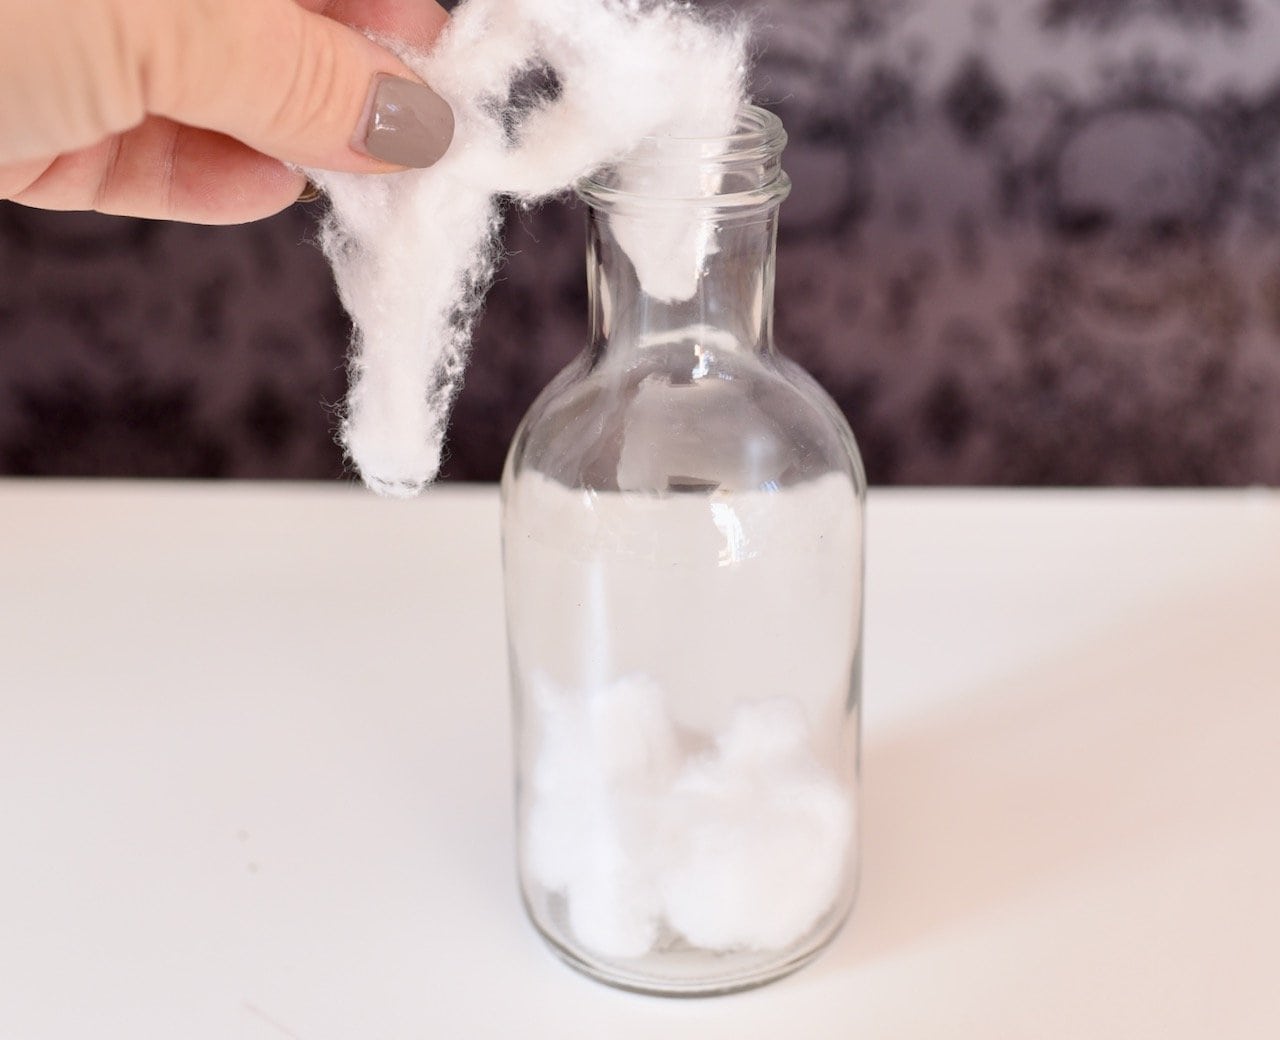
Place a few stretched cotton balls into your bottle.
Pour some yellow rubbing alcohol into the jar through a funnel until the cotton balls are covered.
Helpful Tip:
I used two funnels, one for the liquid and one for the glitter so the glitter wouldn’t stick on the liquid in the funnel.
If you only have one funnel, though, you’ll want to wipe down in the funnel before adding glitter.
Add some yellow and orange glitter over the top, then stir it around a bit with the skewer stick.
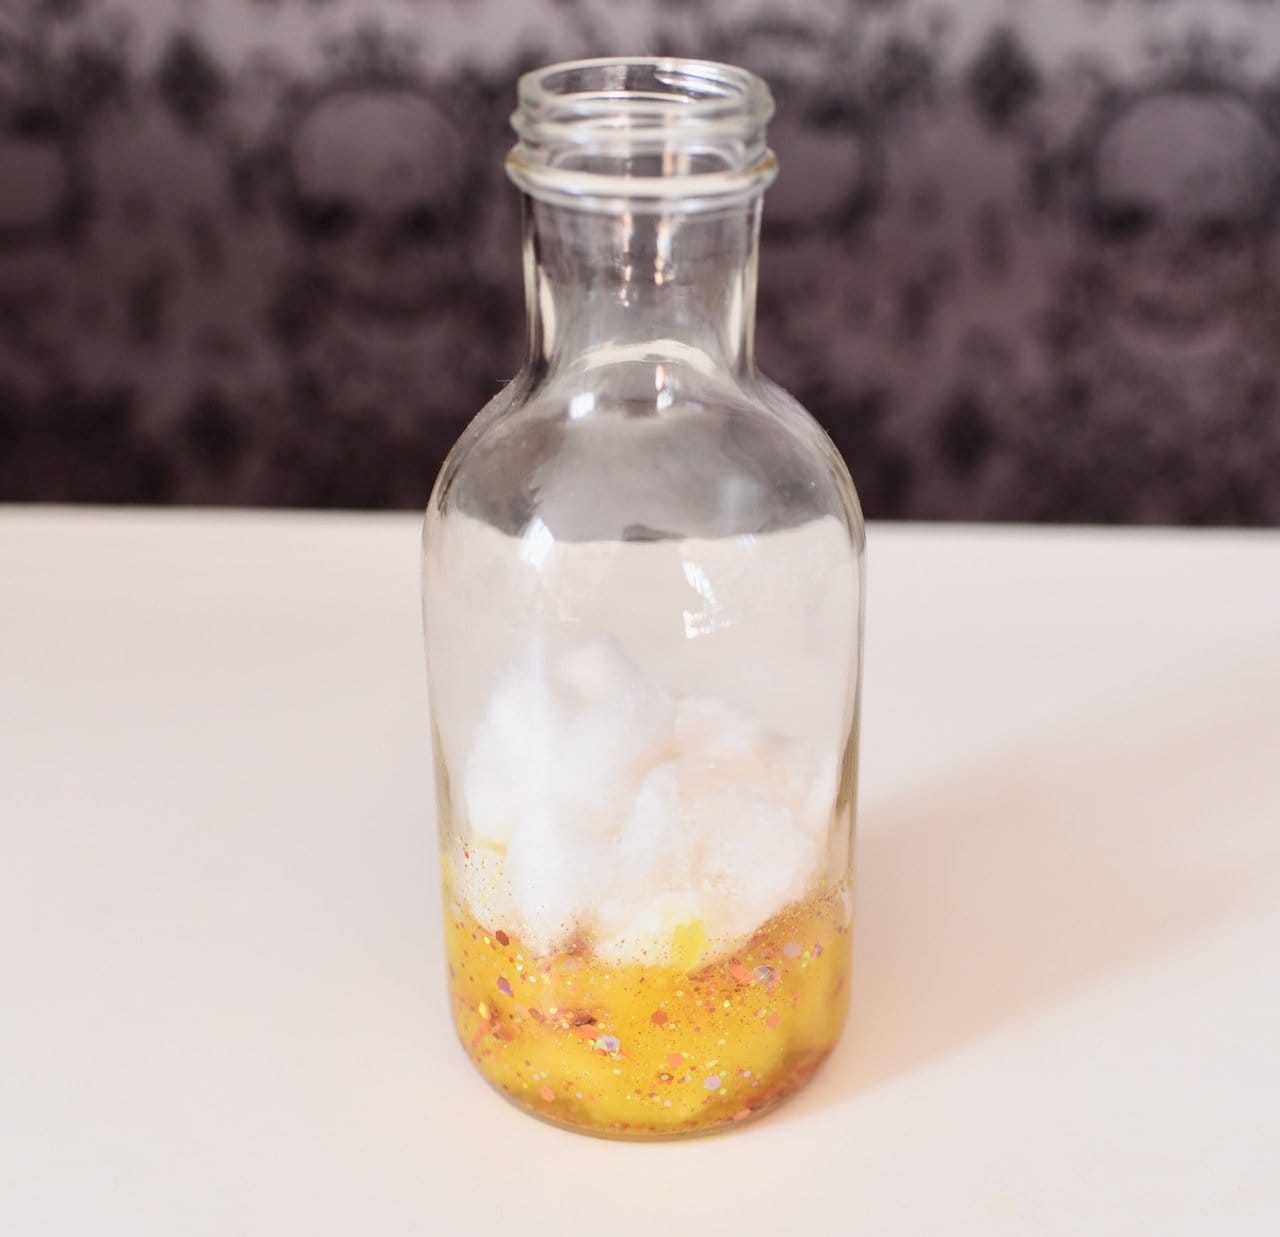
Add more stretched cotton balls if necessary so that that liquid is filled with tight cotton balls.
Now it’s time to add more stretched cotton balls for the next layer, which will be red.
Drop in a some more stretched cotton balls and use the skewer stick to make the cotton ball layer somewhat even.
Pour some of the red liquid through the funnel into the bottle, then add a good amount of red glitter.
Use the skewer stick to move the glitter around to all sides of the bottle so it can be seen.
You can also use the skewer stick to gently press down on the sides of bottles so the glitter goes down into the next layer a little too.
How to Keep the Potion Layers:
Don’t push that stick too far down though, because it can also mess up those pretty layers by combining the two colors too much.
Continue this process with adding cotton balls, alternating the yellow and red liquid, the glitter colors.
Use the stick to push down on the cotton balls to make sure they are packed in pretty well so they will create the layers.
Helpful Tip: The layer of glitter over each layer helps to separate the colors and adds a nice swirling magical potion look to the bottles.
Don’t skimp on the glitter!
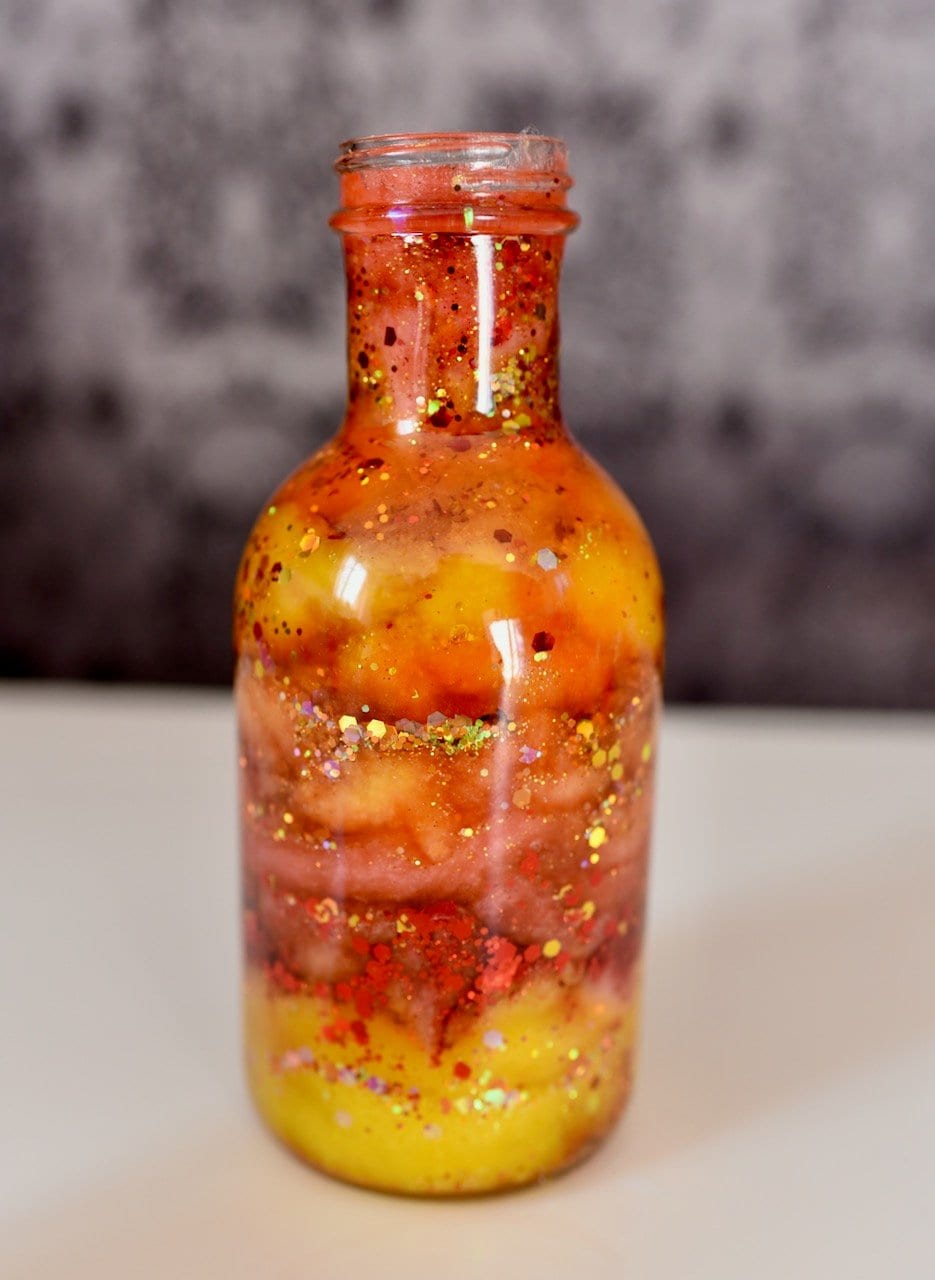
Continue this pattern until the bottle is almost all the way full.
Once full, be sure to wipe the top and inner top of the bottle with a paper towel, then wipe it with a cotton ball with some rubbing alcohol on it to remove extra glitter and residue .
Let the rubbing alcohol dry (this will help the glue to stick to the glass), then add a line of hot glue along the top of the bottle.
Quickly screw the lid over the hot glue as far as you can to seal it to help prevent evaporation, as well as little hands from trying to open the bottles.
Decorating the Dragon Potion Bottle
Cut a piece of black mesh, tulle, or net material that will fit around the neck of the glass bottle that you are using, then attach with hot glue.
Place a piece of black ribbon (I used black Cricut leather that I already had) through the hole in an old key, then glue or tie the ribbon around the bottle near the top.
Attach a red craft rhinestone to the top of a metal knob pull, then set aside.
Add a gold glue stick to your glue gun, then drip the gold glue down the sides of your bottle lid.
Squeeze some more gold hot glue onto the top of your lid so it’s covered.
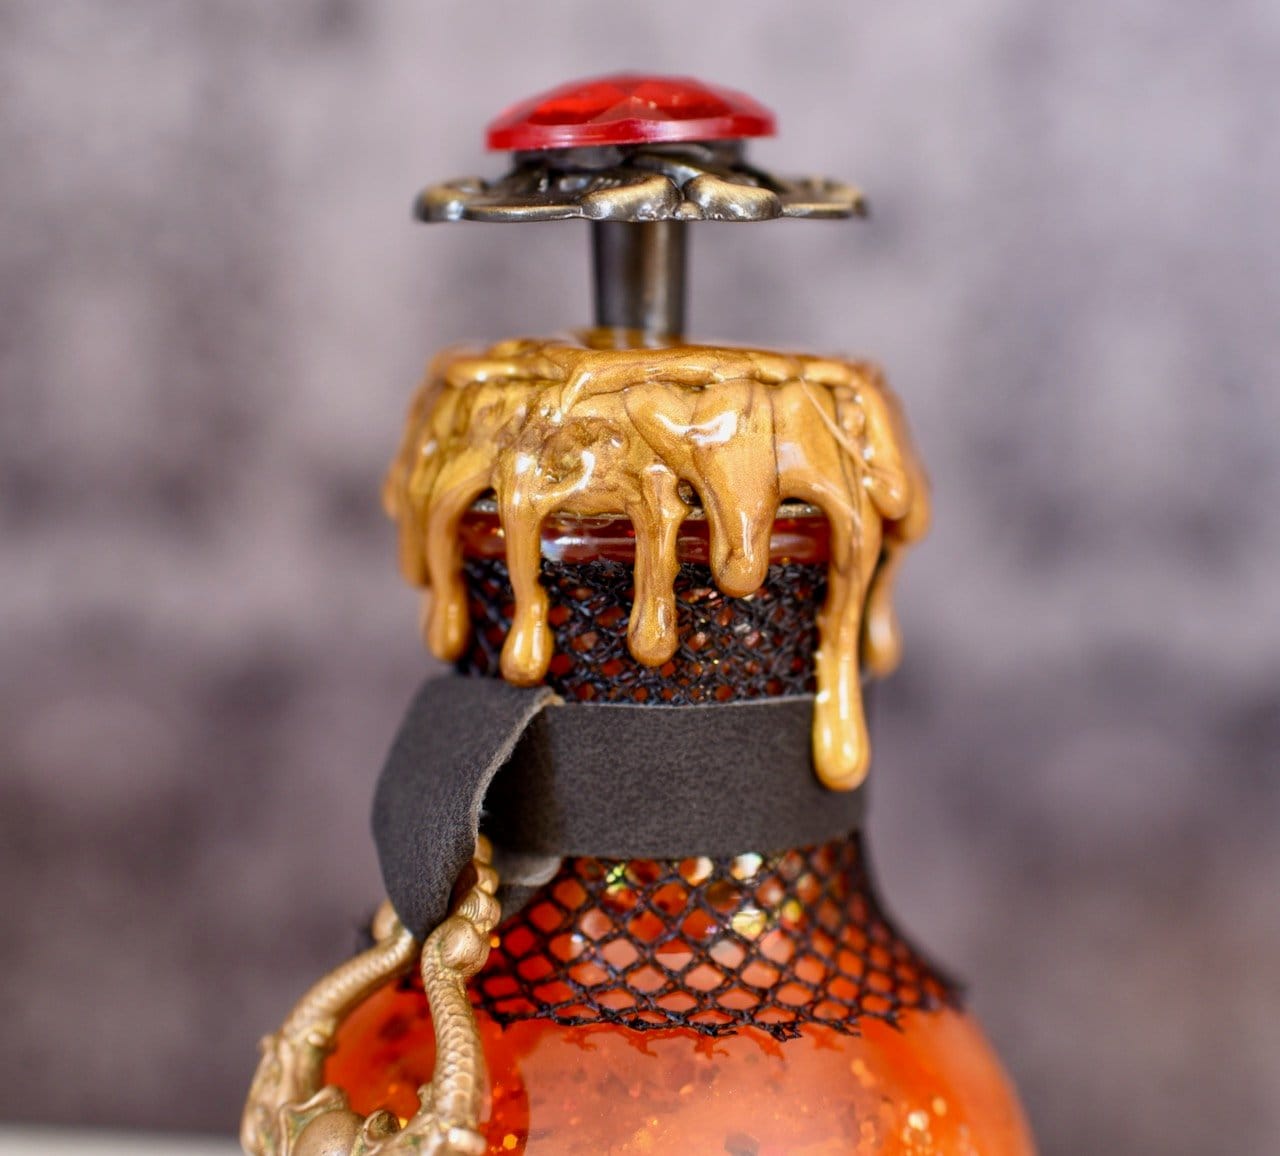
Quickly place the metal know onto the top of the lid, then hold in place for a minute as the wax cools.
Once the wax is cooled, the knob should pop right off.
Add a drop of Super Glue or E6000, then place the knob back in and hold in place for a minute or two until the glue dries.
Add the dragon potion bottle label to the front of your potion.
Isn’t she beautiful?!
She looks just like a medieval witches potion. Love how this one turned out!
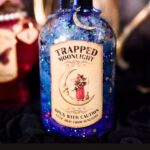
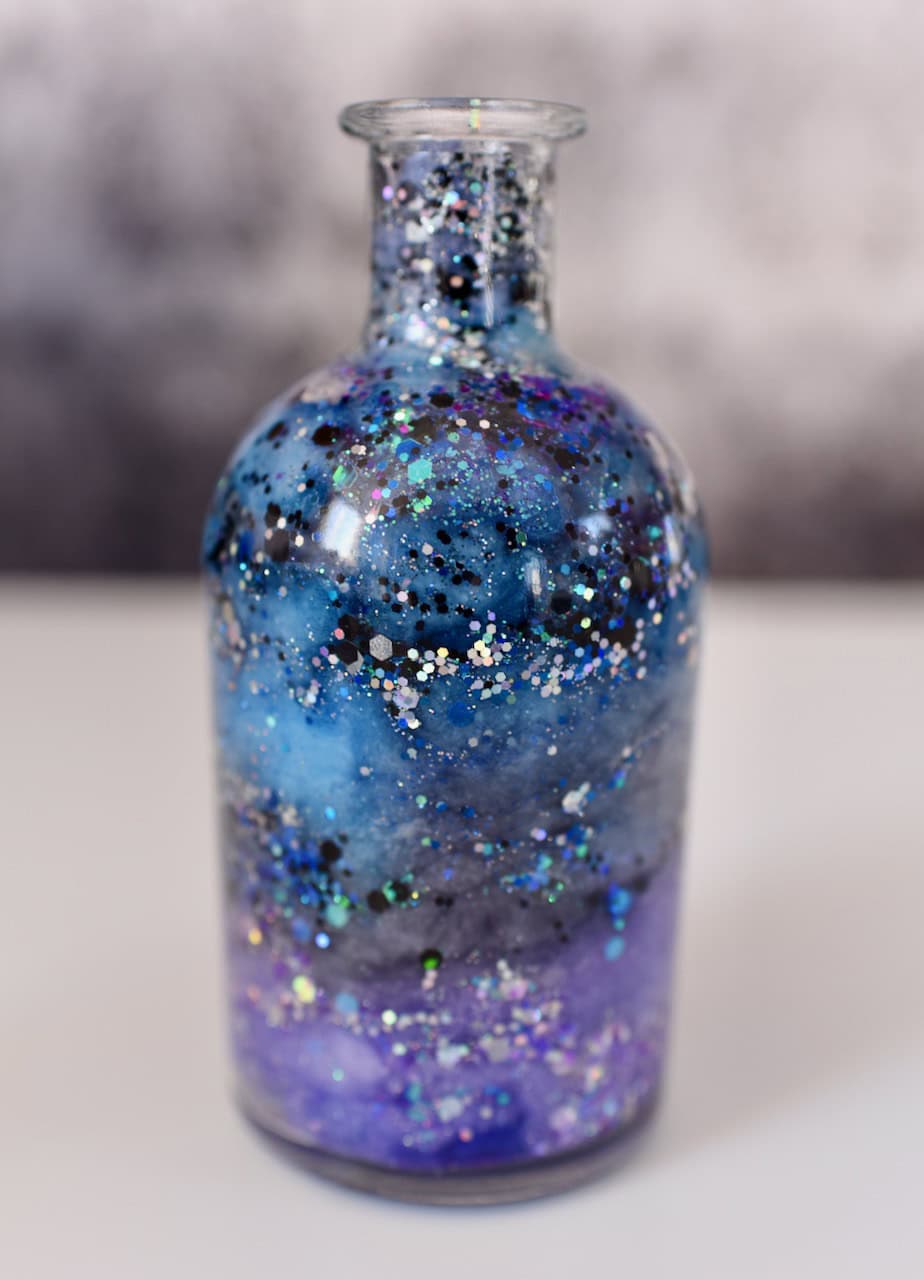
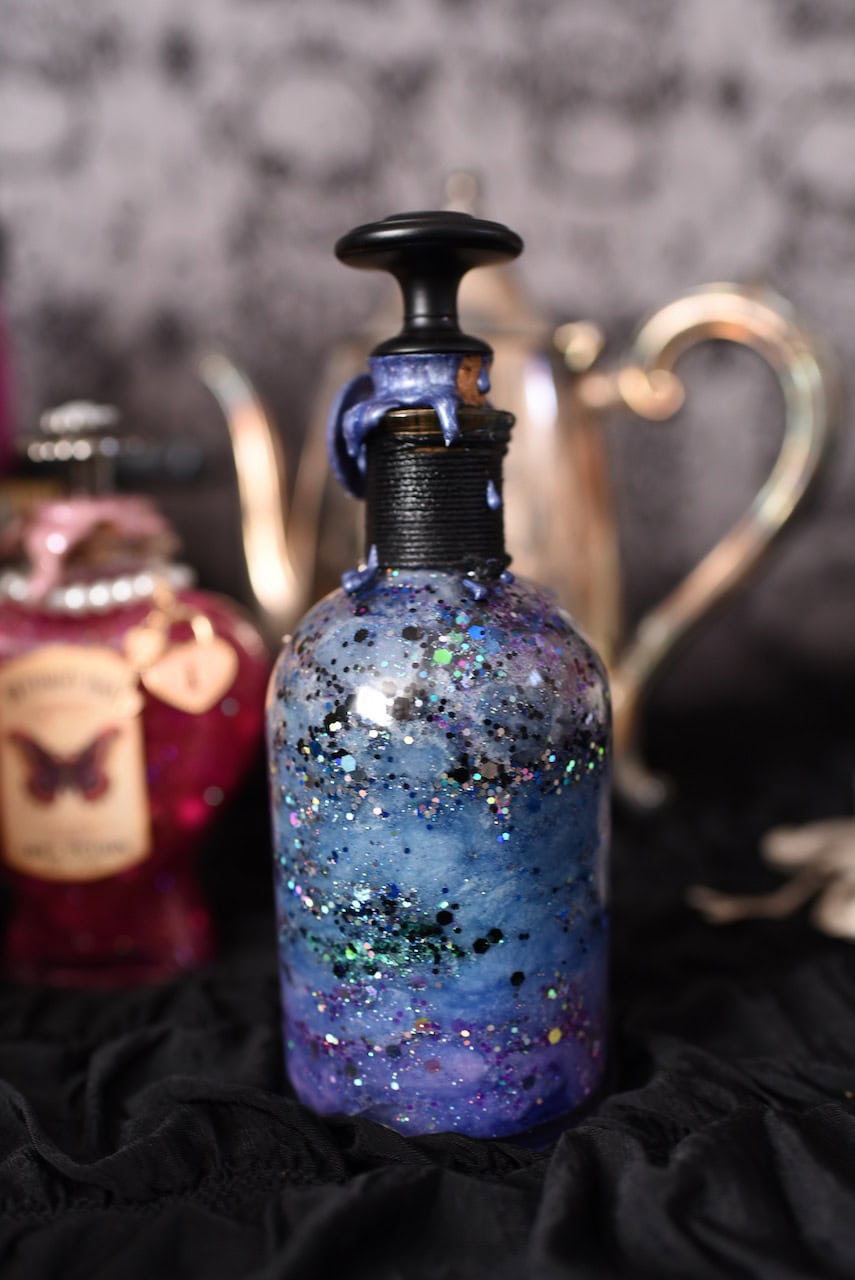
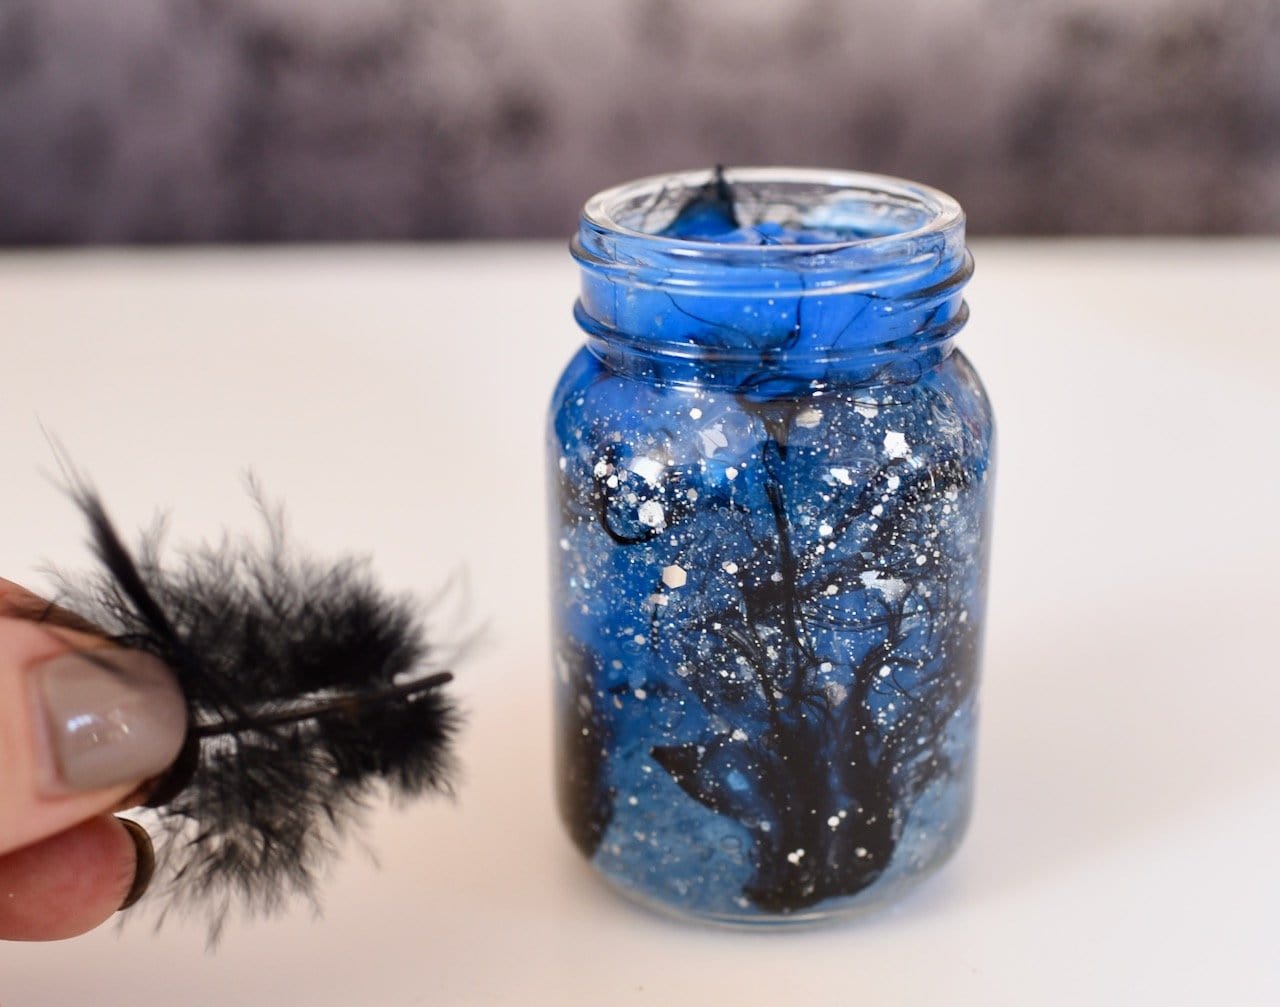
Moonlight Galaxy Potion Bottle
Deep, dark, and mystical, this trapped moonlight contains bits of silver moonlight swirled in a beautiful sea of blues and purples that mimic a magical moonlit sky. With a lovely moon wax seal detail that matches the potion, dark dripping wax detail, and a silver moon charm, this stunning potion will be a lovely addition to your Halloween potions shelf!
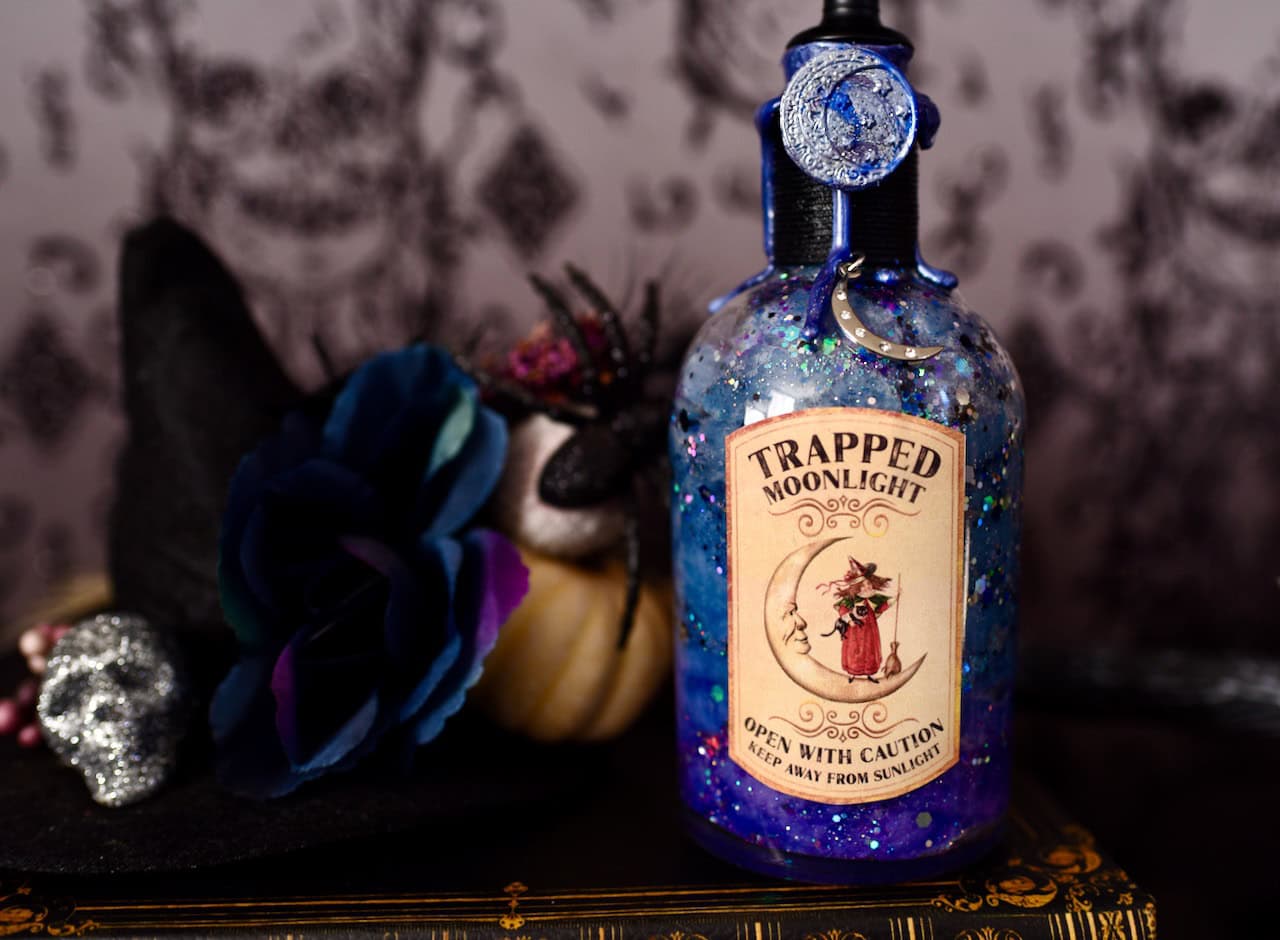
I already told you I try not to play favorites, but this gorgeous trapped moonlight potion bottle is just perfection!
This beauty could be a movie prop straight out of a Harry Potter movie (you can use these ideas with different labels to make your own Harry Potter potion bottles too).
Yep, it’s just that beautiful!
Why Use Distilled Water?
Because I used a bottle with a cork, I didn’t want to use rubbing alcohol since it could possibly start to disintegrate or shrivel up the cork over time.
I want my witch potion bottles to last a long time, so I couldn’t have that happen.
Instead, I used distilled water, which doesn’t have all the yucky chemicals and extras in it like tap water does.
I also added glycerin to the water since I always add it to my DIY snow globes to help suspend the glitter.
Not sure if it did much, but my bottle turned out really cool and the glitter looks fabulous, so it definitely might have helped!
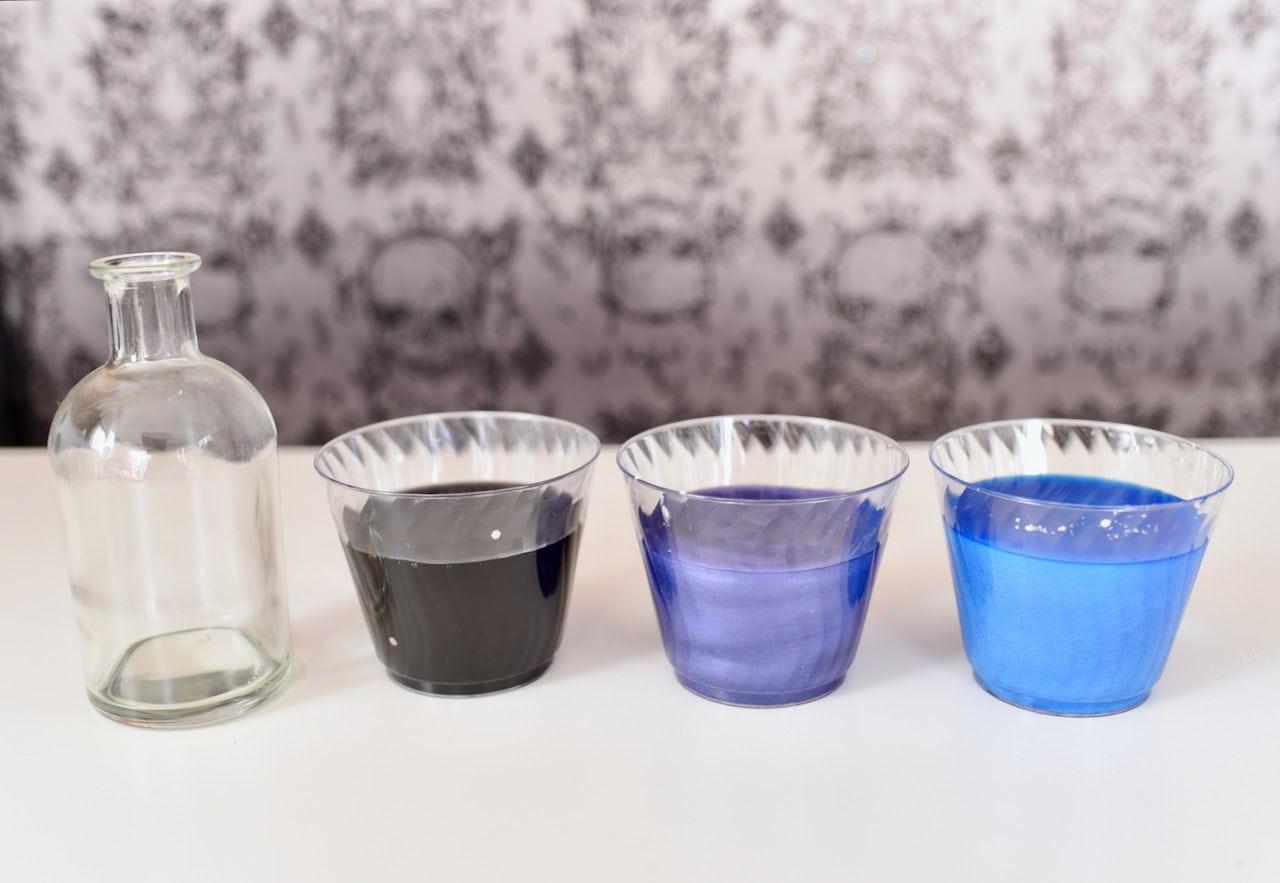
Supplies:
- glass bottle with cork
- distilled water
- vegetable glycerin (can be found at Walmart near the pharmacy or on Amazon)
- three plastic cups
- black, purple, and blue gel food coloring
- cotton balls
- funnel
- glitter– purple, silver, blue, and iridescent
- black knob
- silver moon charm (mine came from Michaels)
- black jewelry cord or twine
- hot glue
- silver, blue, and purple wax (for was seals)
- moon wax seal and wax warmer
- silver Sharpie
- Supe Glue or E6000
- moonlight potion bottle label
- optional- pearl luster dust (to give a pearly, ethereal look to the colors)
How to Make the Trapped Moonlight Potion
Pour distilled water into three plastic cups, then add a little glycerin to each one and stir.
Add black gel food coloring to the first cup, purple to the second cup, and blue to the third cup.
Stir each of the cups to distribute the colors evenly.
I stirred pearl luster dust into the purple and blue colors to add a shimmery, magical look to them.
I love how they turned out!
Luster dust settles over time in the liquid, but as I look at my bottle (two weeks later) the potion still has a pearly look to it.
I think the cotton balls helped to hold the luster dust in place.
Making this potion bottle is very similar to the way I made the dragon one, but with different colors.
How to Add the Cotton Balls
First, stretch out a bunch of cotton balls.
You can usually unroll them to make this easier, then stretch them out a bit.
Place some of the cotton balls in the bottom of the bottle.
Add the Black Liquid Layer
Use a funnel to pour some of the purple mixture into the bottle to cover the cotton balls.
Add some light purple and silver glitter to the bottle with a funnel.
I used a separate funnel for the glitter so it wouldn’t stick to the liquid in the first funnel.
Use a skewer stick to move the glitter to the sides of the bottle so it can be seen.
Push down on the cotton balls with the skewer to get the glitter lower down into the bottle.
Add more stretched cotton balls to soak up any remaining purple liquid and sue the skewer stick to push the cotton down into the color.
Now add more stretched out cotton balls, then use the funnel to add some of the black liquid over the top.
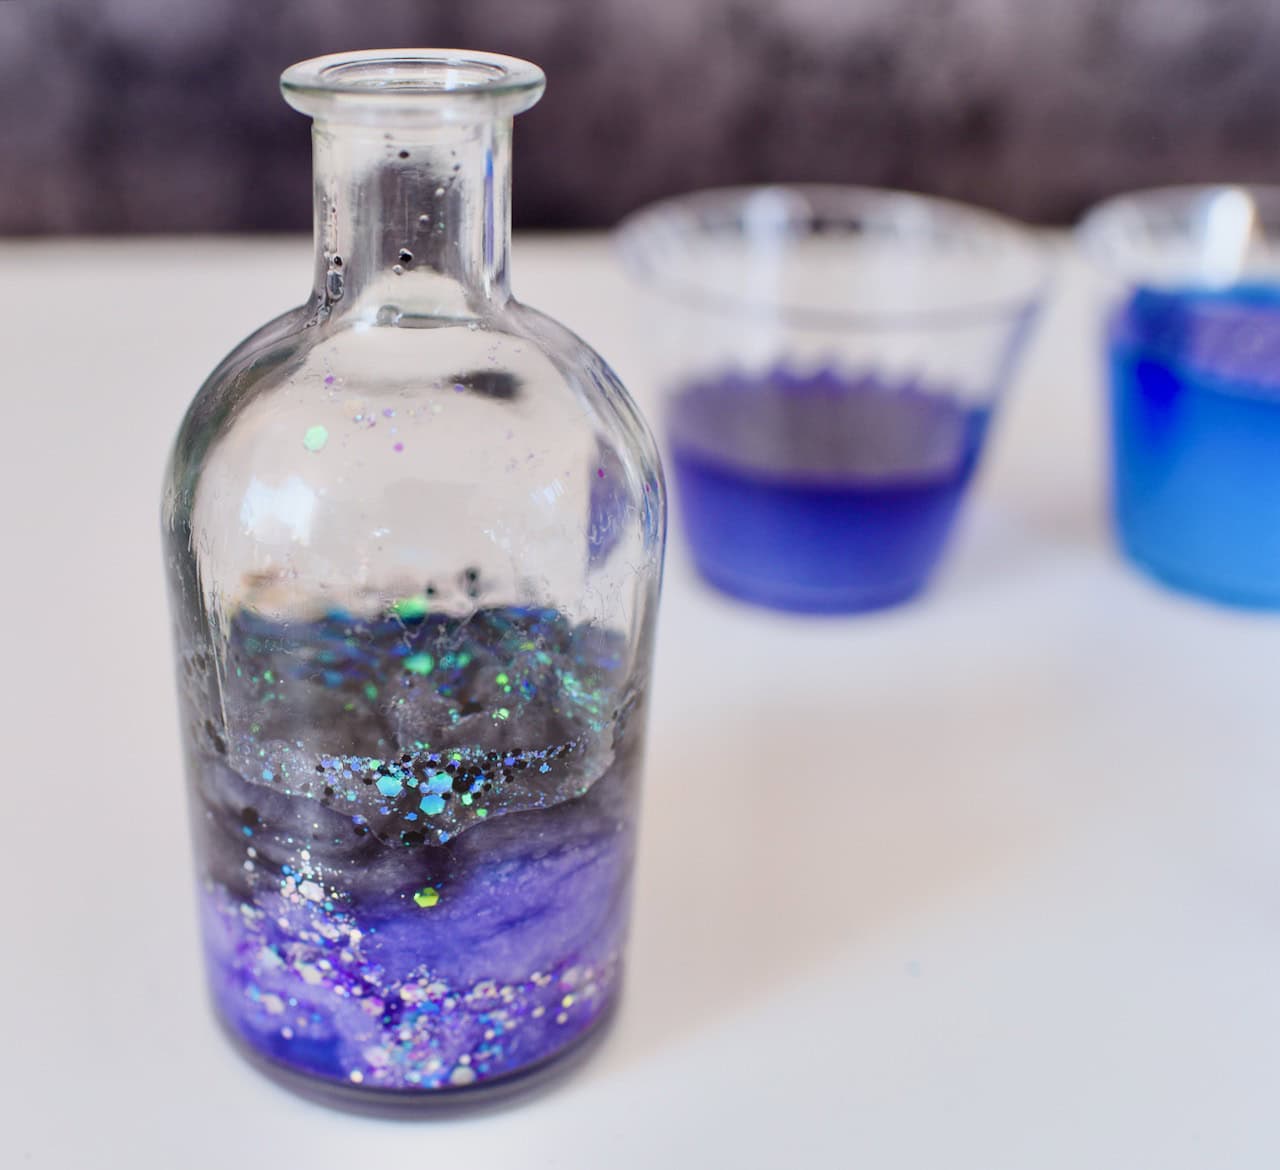
Add the Black Glitter
Pour some black glitter over that, then add some iridescent glitter.
Use the wood skewer to gently push down the sides and move the glitter to the sides so you can see it and it looks the way you would like.
Add more cotton balls, then repeat the same process with the blue liquid and blue and iridescent glitter.
Next I did a black layer again with black and purple glitter.
After that was a small blue layer with glitter, then a black layer at the top with glitter.
Helpful Tip: The silver and the black looked the coolest and stood out the most- don’t skimp on them!
Wipe the top and inner top of the bottle with a paper towel where the cork will go.
Next, wipe it with a cotton ball with some rubbing alcohol on it to remove extra glitter and residue .
Let the rubbing alcohol dry (this will help the glue to stick to the glass), then add a line of hot glue along the top inside of the bottle.
Quickly place the cork down into the bottle to seal it to help prevent evaporation (and little hands from trying to open the bottles).
Decorating the Potion Bottle
I wrapped black jewelry cording (from my craft stash) around the neck of my glass bottle starting at the top.
I used little drops of hot glue on the back to seal it in place as I went.
At the bottom, I added a little silver moon charm to the cord in the center of the bottle, then glued the end of the cord to the back to hold it in place.
Next, I added the trapped moonlight sticker (printed onto full sheet sticker paper) to the front by pressing it on.
Helpful Tip: Twirl the bottle around to find the best looking side to put the label.
Making the Wax Seal
This next part is optional but it looks so cool and really takes this diy potion bottle to the next level!
My daughter recently bought a wax seal kit that we used to melt some purple, blue, and silver wax.
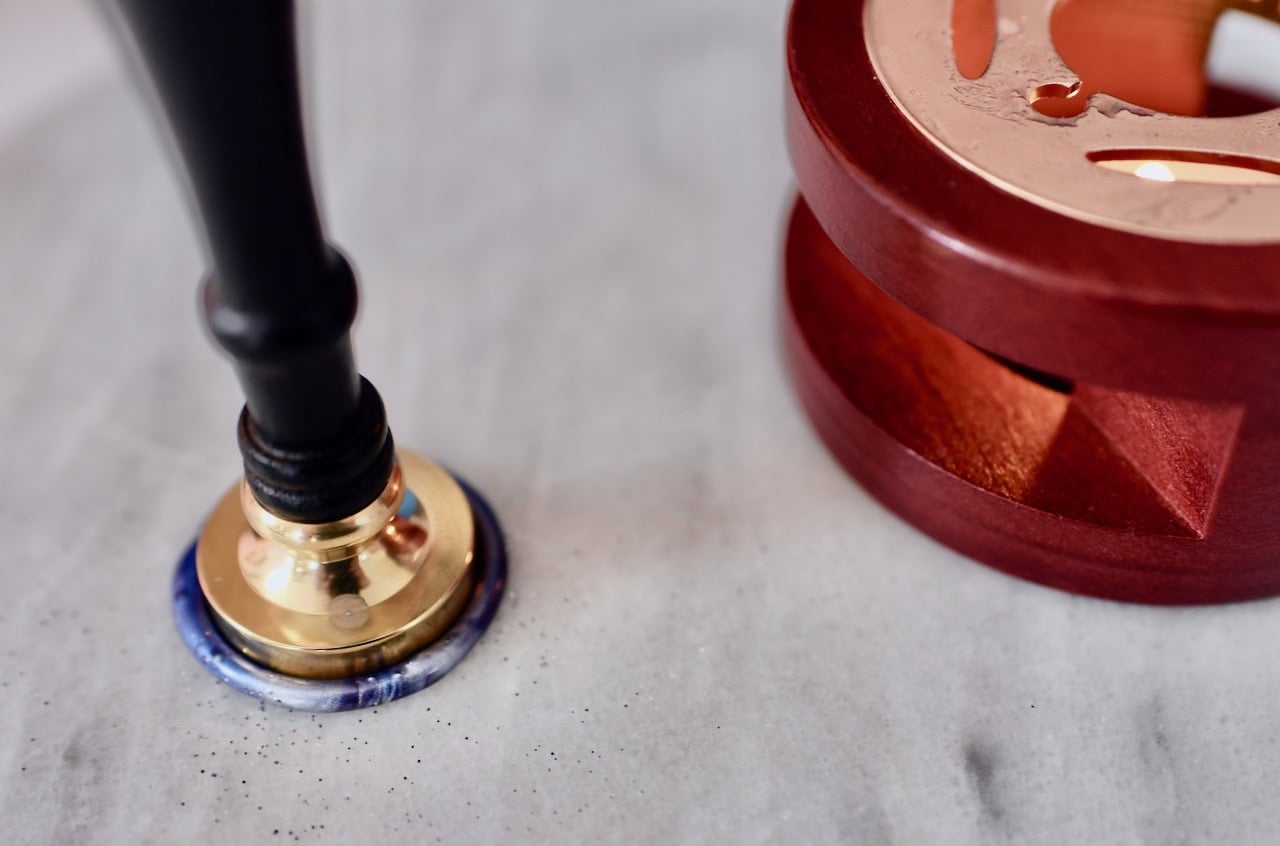
Once the wax melted, we poured it onto a piece of marble, then used my moon wax stamp to stamp the moon shape into the wax.
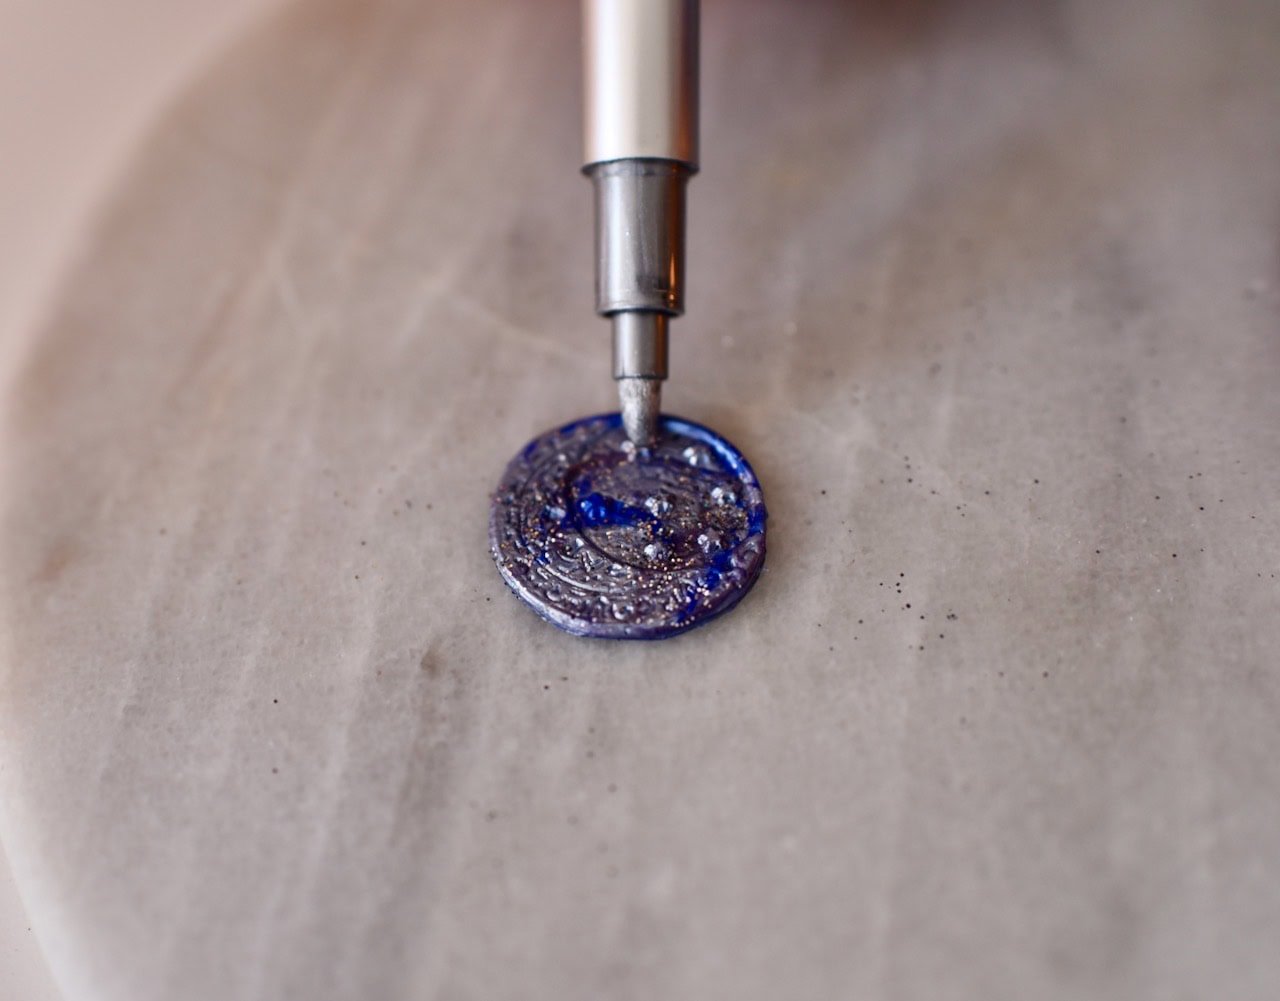
After the wax cooled, I removed the stamp, and used a metallic silver Sharpie to highlight the moon and stars, then set the seal aside.
I melted more wax in the same colors, then dripped the hot melted wax down the sides of the bottle.
Then I dripped more wax across the very top of the cork, then set my black knob down on top and held it place until it cooled.
Once the wax cooled, I pulled it right off and added drop of E600.
Then I pressed the knob into place.
Let this sit for a while without touching it until the glue completely dries and cures.
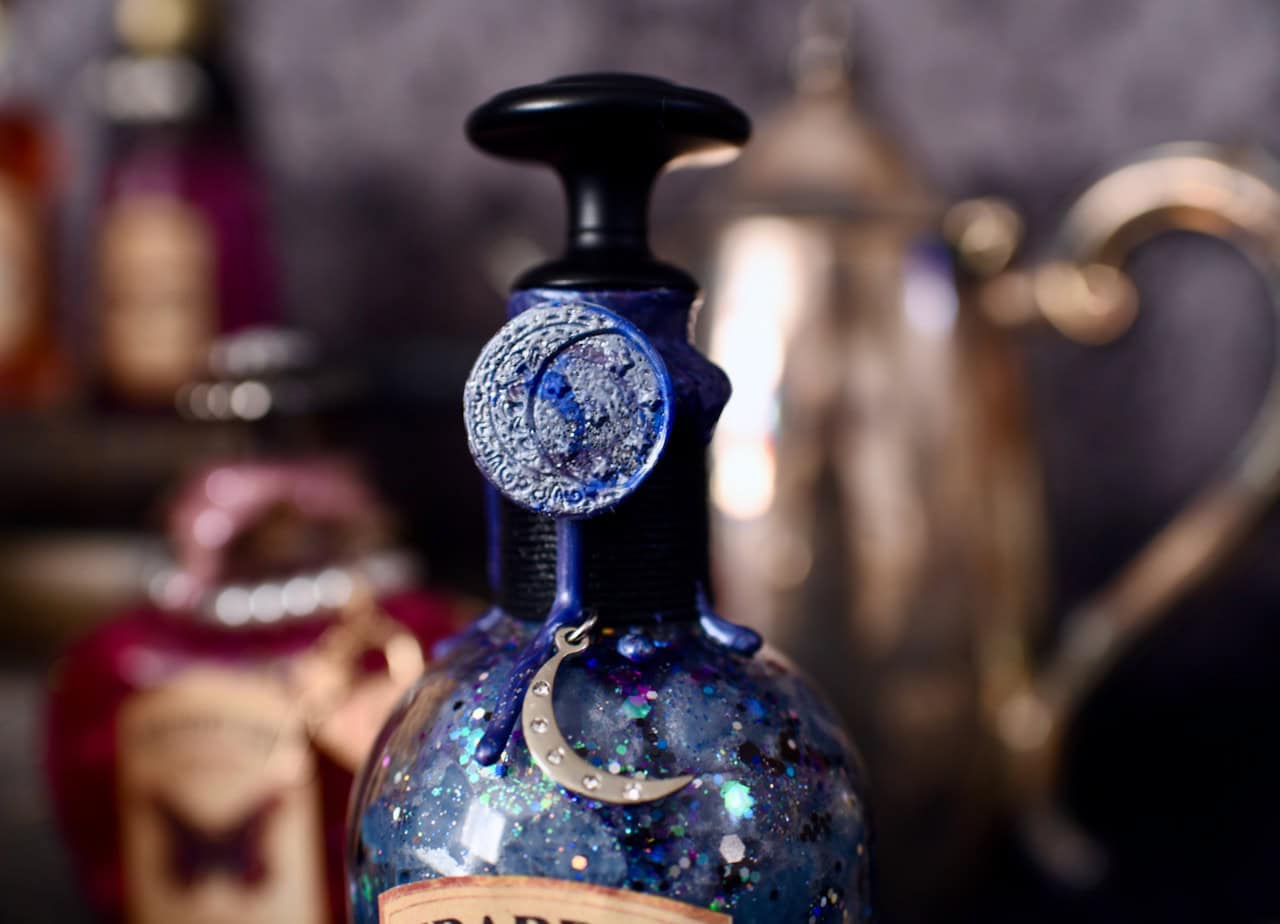
Use hot glue to glue the moon seal onto the top front of the bottle over the wax at the top.
Isn’t she a beauty?!
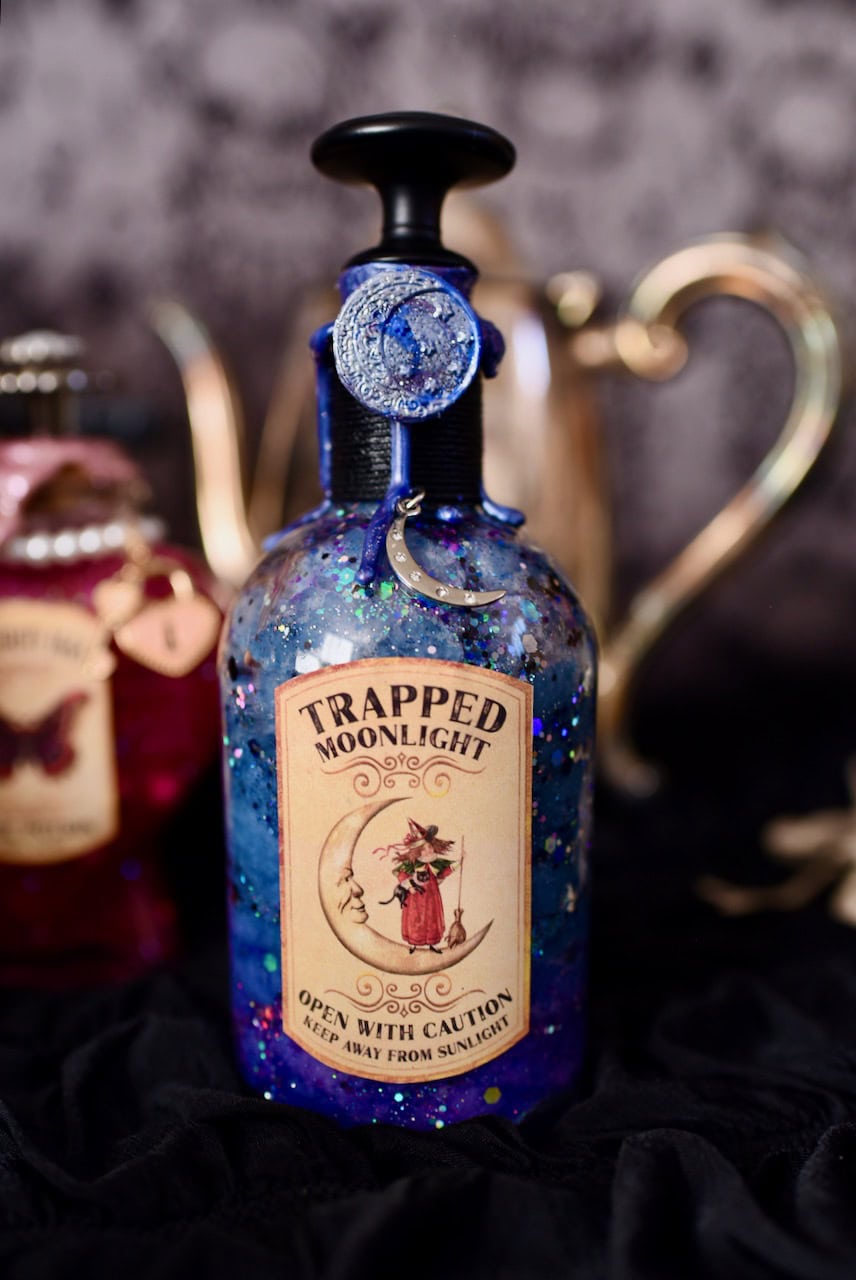
This is another favorite that looks so magical and mysterious, like a mystical dark night sky filled with stars!
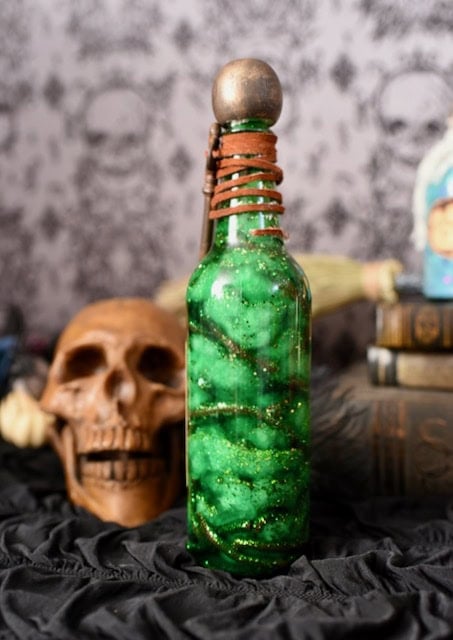
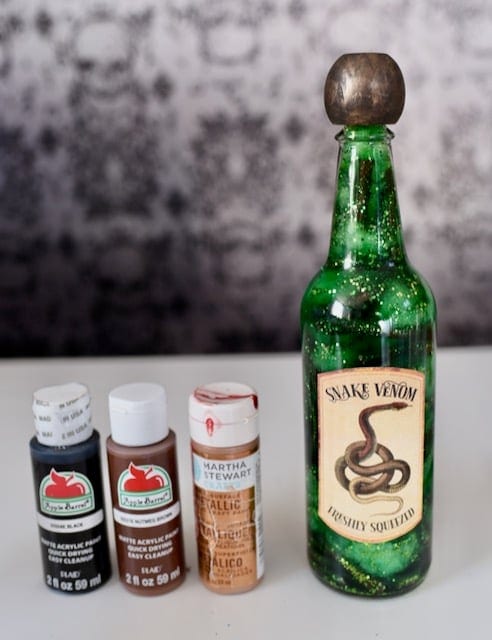
Snake Venom Potion Bottle
A deadly concoction of freshly squeezed green snake venom with toxic green glitter and small snakes floating inside. Cording wrapped around the top mimics the long snake on the front of the bottle and the poisonous snakes in the bottle.

Another fun one to make, filled with snakes inside that add color, texture, and depth.
This snake venom potion would look amazing styled next to our Snow White poison apple!
Supplies:
- glass bottle (I used a Cholula hot sauce bottle that comes with a cool wood lid)
- fake worms or small fake snakes (I used fake worms from Oriental Trading that have lasted me years!)
- two plastic cups
- rubbing alcohol
- green coloring
- glitter– light green and dark green
- funnel
- wood skewer stick
- cotton balls
- hot glue
- paint for the wood lid (I used black, brown, and copper)
- suede cording, twine, jute, or ribbon
- snake venom potion bottle label
- vintage key
- optional- luster dust
How to Make the Snake Venom Potion
Fill two plastic cups up with rubbing alcohol, then add a little green coloring to one cup and more green coloring to the other.
Stir so that one cup is light green and the other is dark green.
I added some luster dust to the light green color to add a little variety, but this is totally optional.
Stretch out some cotton balls then set aside.
Add some realistic looking fake earth worms or small fake snakes to the bottom of the bottle.
The opening of my bottle was so small that I had to cut the fat part off my worms to get them into the bottle.
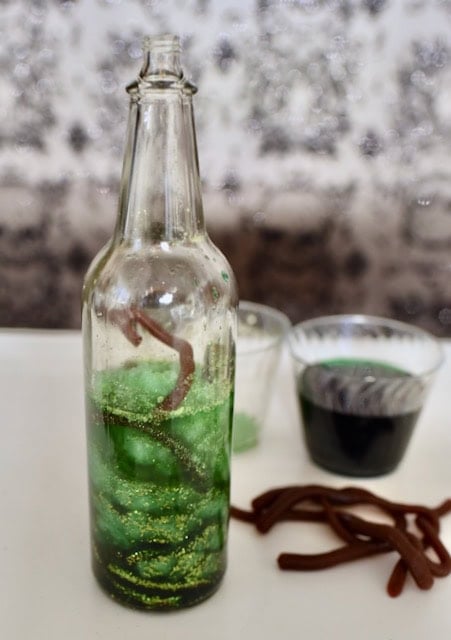
Add some cotton balls over the worms, then add some dark green liquid to the bottom of the bottle with a funnel.
Pour some green glitter over that, then use the wood skewer to move the glitter to the sides of the bottle so you can see it.
Keep layering the worms, cotton balls, green liquid (alternating between light and dark), and glitter, until the bottle is full.
Helpful Tip: You are using the same concept and process as we did to make the dragon and moonlight potion bottles.
Wipe the top of the bottle with a paper towel where the cork will go.
Next, wipe it with a cotton ball with some rubbing alcohol on it to remove residue .
Let the rubbing alcohol dry (this will help the glue to stick to the glass), then add a line of hot glue along the top of the bottle.
Quickly place the lid down onto the bottle to seal it to help prevent evaporation (and little hands from trying to open the bottles).
Decorating the Snake Venom Potion Bottle
Mix together some black and brown paint so they are not completely blended.
Use a paintbrush to paint the wood lid.
Brush some metallic copper onto the lid to add a nice finish to it.
Add a drop of hot glue to the back top neck of the bottle, then press a piece of side cord, twine, jute, or ribbon onto the glue.
Tightly wrap the cord around the top of the bottle, leaving space in between the wraps.
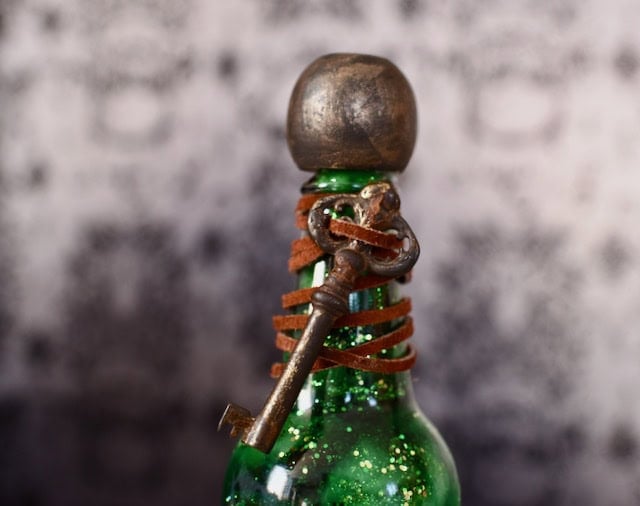
Add an old key or faux vintage key through the cord so that it hangs down the front of the bottle.
Use hot glue to attach the last piece of cord to the back of the glass.
Add the freshly squeezed snake venom label to the front of the bottle.
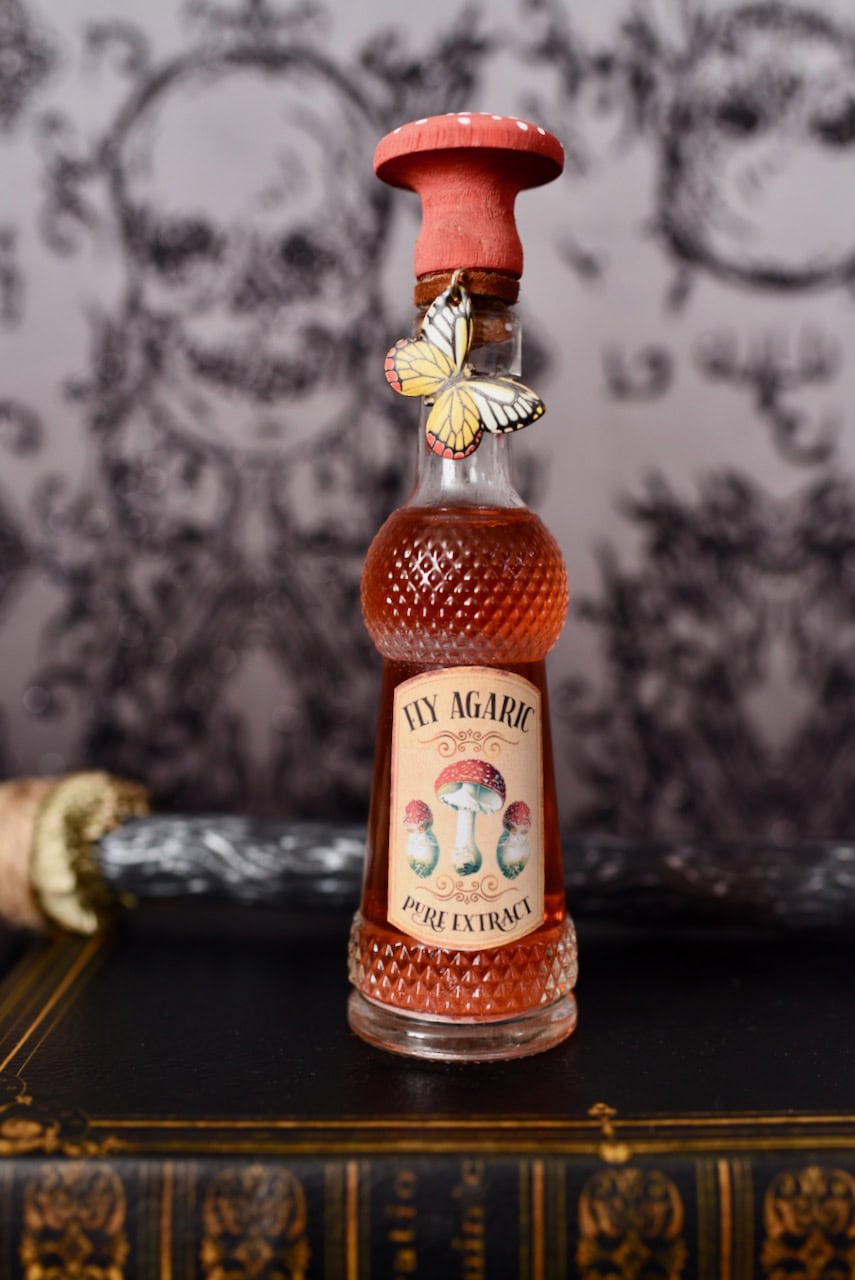
Color Changing Potion
A beautiful blood red fly agaric mushroom potion that is both enchanting and toxic. This pretty potion turns a pearly swirly pink when shaken. This bottle top features a fly agaric mushroom top and a pretty butterfly charm.
I have to admit, I had never heard of fly agaric, so of course I googled it.
It is a very toxic red mushroom with little white spots that lives in the forest and is the home of fairies and magical creatures.
In other words, it was the perfect addition to my witch potion bottles!
I can’t decide what I like best- the fact that this potion changes colors, or the adorable fly agaric mushroom top I made….
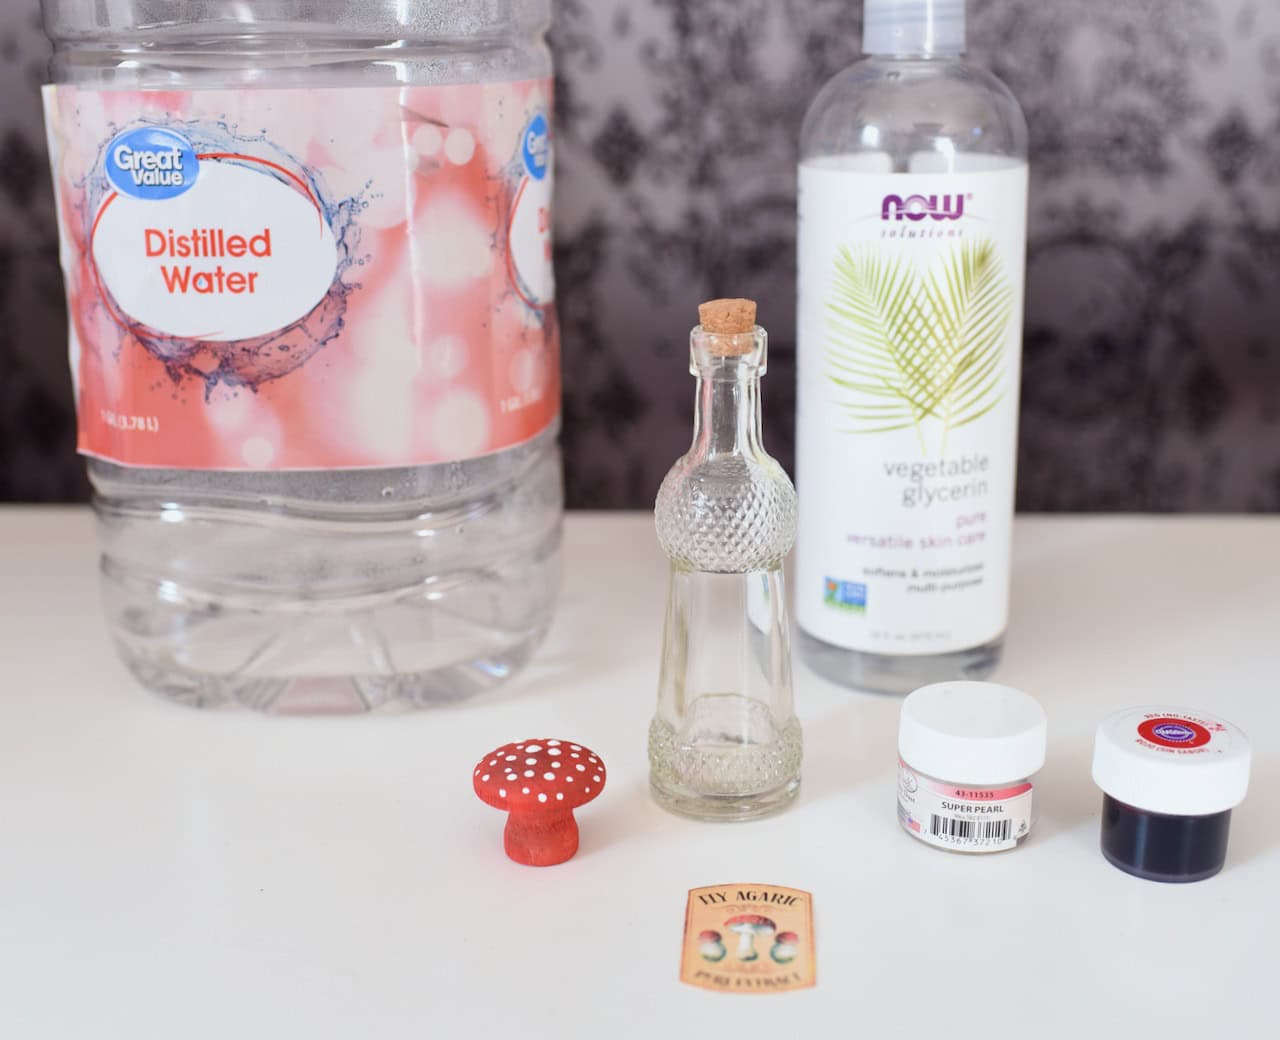
Supplies:
- small glass bottle (I used these glass bottles from Amazon)
- distilled water
- glycerin
- plastic cup
- red gel coloring (regular food coloring works too)
- pearl luster dust
- small wood knob (Home Depot)
- red and white craft paint
- small funnel
- fly agaric potion bottle label
- optional- butterfly charm (mine is from Michaels)
- optional- cord, ribbon, twine, string
How to Make Fly Agaric Potion
Fill a plastic cup halfway with distilled water (if you’re using a small bottle like mine).
Add some red coloring and pearl luster dust, then stir until combined.
Use a tiny funnel (I used one I use with my essential oils) to add the mixture to the glass bottle.
Wipe the top inside of the bottle with a cotton ball with rubbing alcohol to clean it.
Add a thin line of hot glue at the inside top of the bottle, then quickly press the cork down inside to seal the bottle.
Decorating the Fly Agaric Potion Bottle
Add the fly agaric pure extract label to the front of the bottle.
Paint a small wood mushroom-shaped knob (mine was $1 at Home Depot) red to look like a mushroom.
Create the tiny dots on the mushroom by dipping a skewer stick into the white paint and tapping it on the top of the mushroom.
Use hot glue to attach the wood mushroom top to the top of the cork.
Place cord, ribbon, twin, or string through the butterfly charm jump ring.
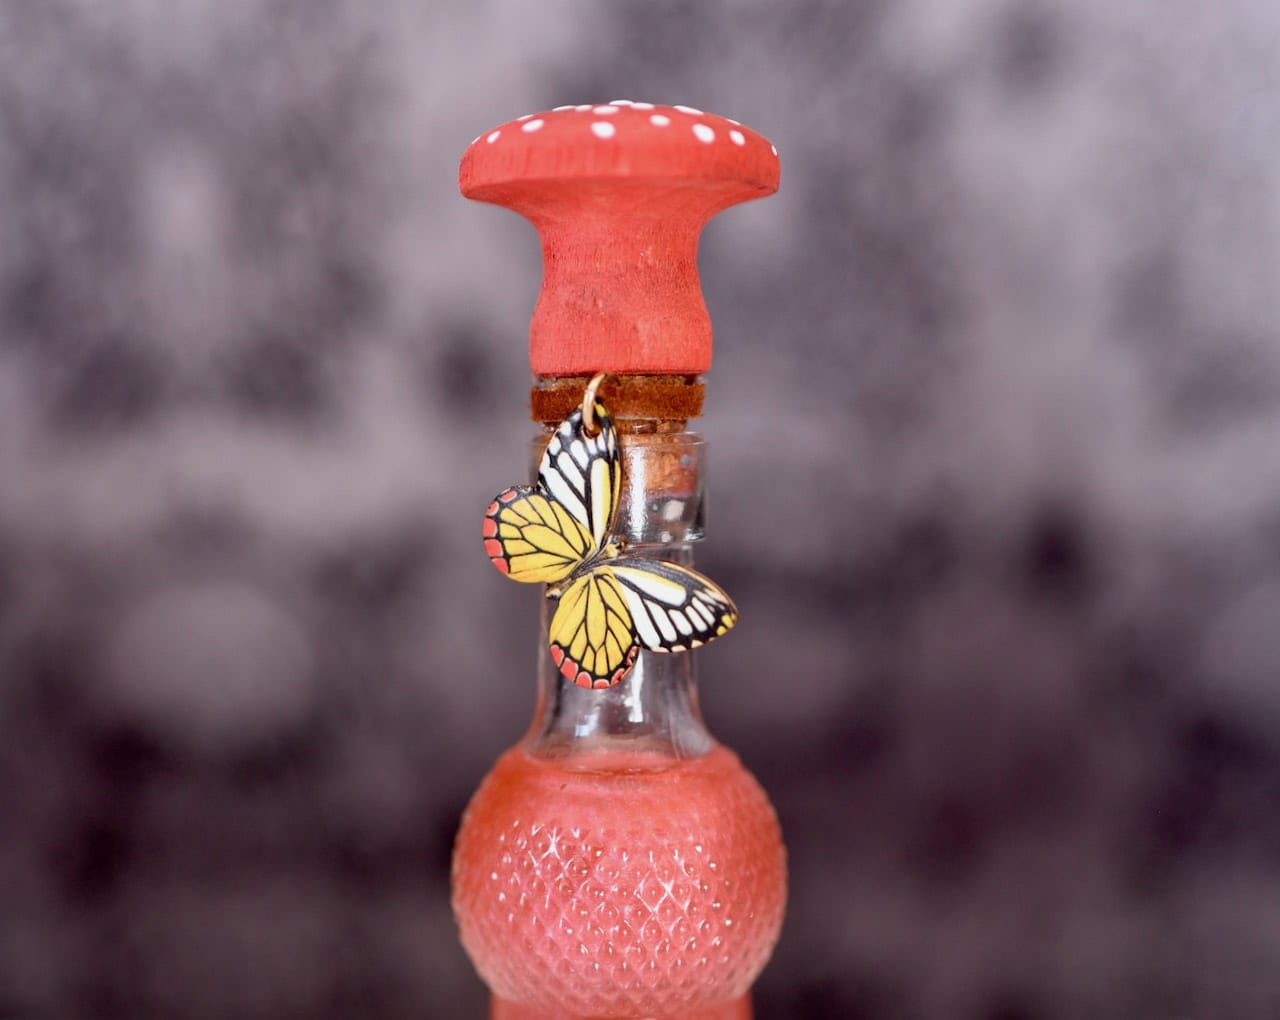
Wrap the string underneath the mushroom on the cork and glue or tie in place.
As the potion sits in the bottle, it will be a blood red color, like the top of a real fly agaric mushroom.
But when you shake it, it will become a magical pearly pink that swirls and moves perfectly inside the tiny bottle!
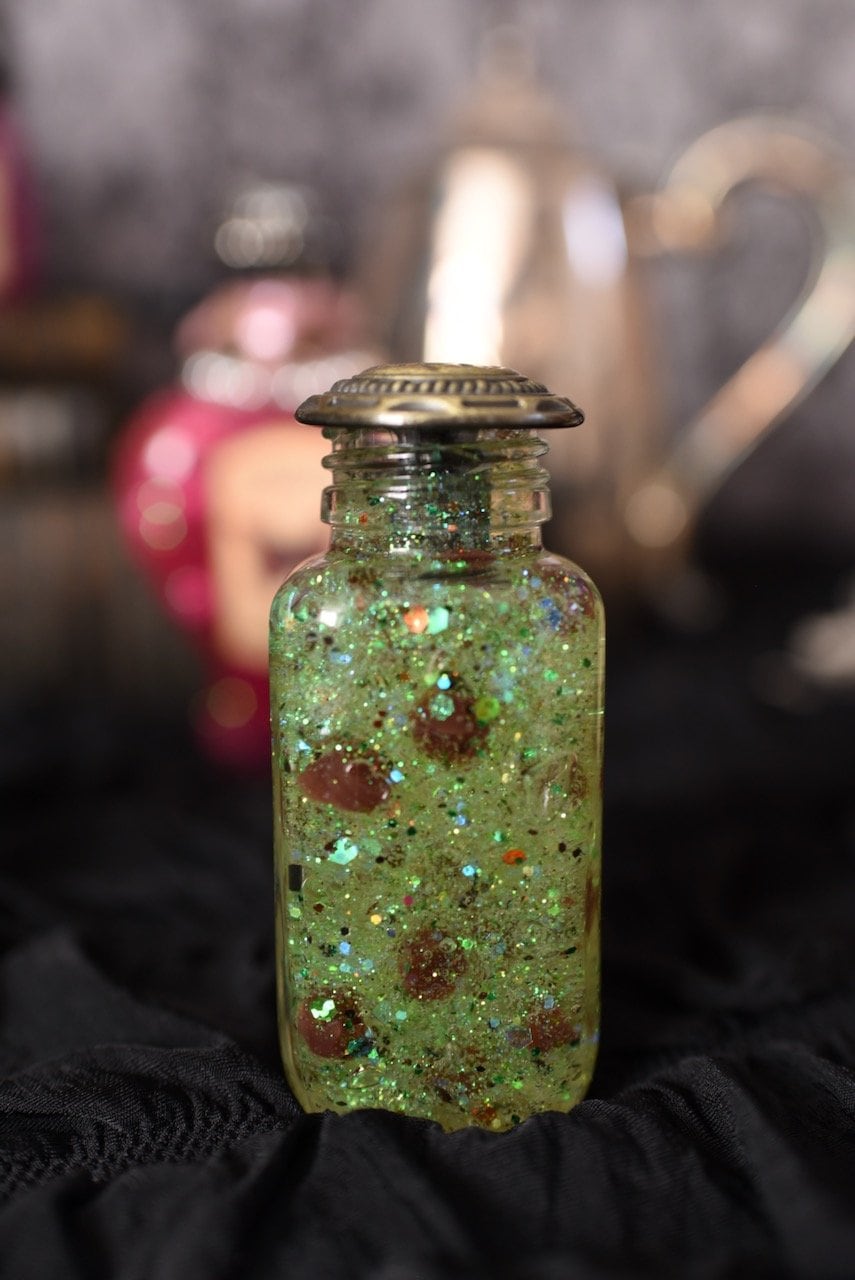
Toad Warts Magic Potion Bottle
A enchanting green potion filled with bumpy brown toad warts and shimmery flecks of toad skin.
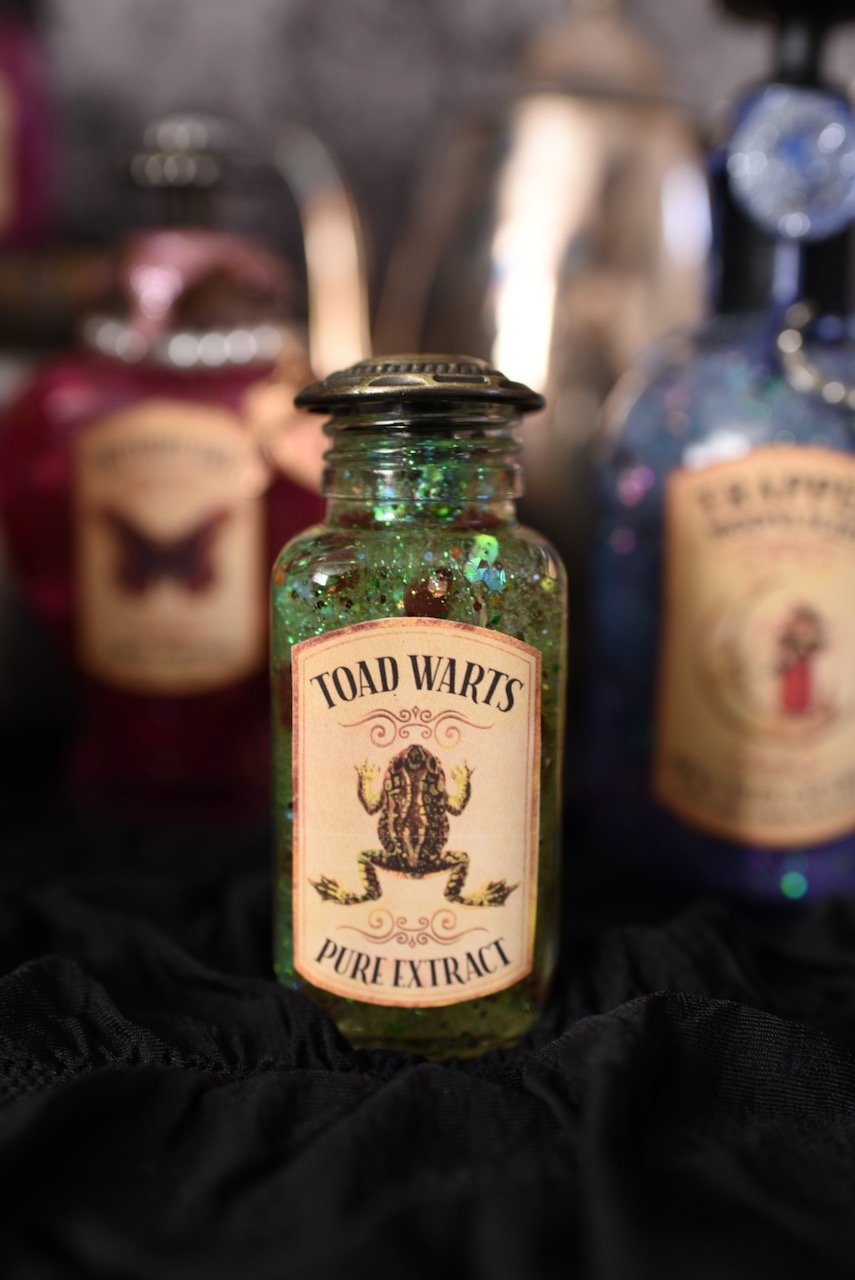
This fun toad warts potion looks like it was plucked straight from a witch’s dusty potions cupboard and is a pretty glittery green color with realistic-looking brown toad warts suspended inside.
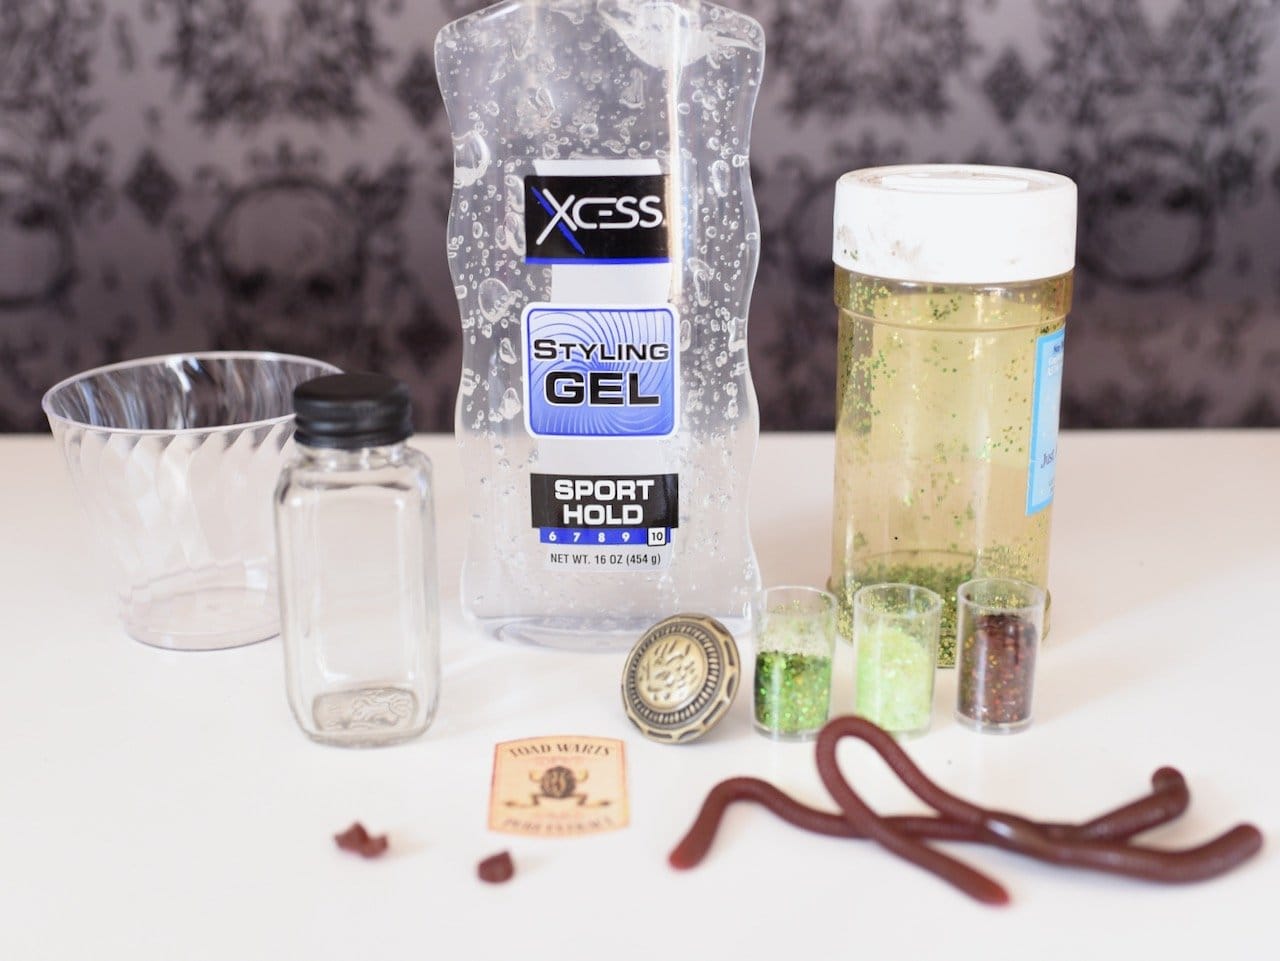
Supplies:
- small glass bottle (I reused a healthy drink shot bottle)
- clear hair gel
- glitter– light green, green, and brown
- metal knob ($1.50 at Home Depot)
- plastic cup and plastic spoon
- fake worms (or anything else that looks like a toad wart)
- toad warts potion bottle label
- hot glue
How to Make Toad Warts Potion
Squirt some clear hair gel in a plastic cup.
Pour in some light green, green, and brown glitter, then stir.
Helpful Tip: You don’t even need any coloring for this one- the glitter turns the mixture green itself!
Spoon some of the glittery green green potion into the glass jar until it’s about halfway full.
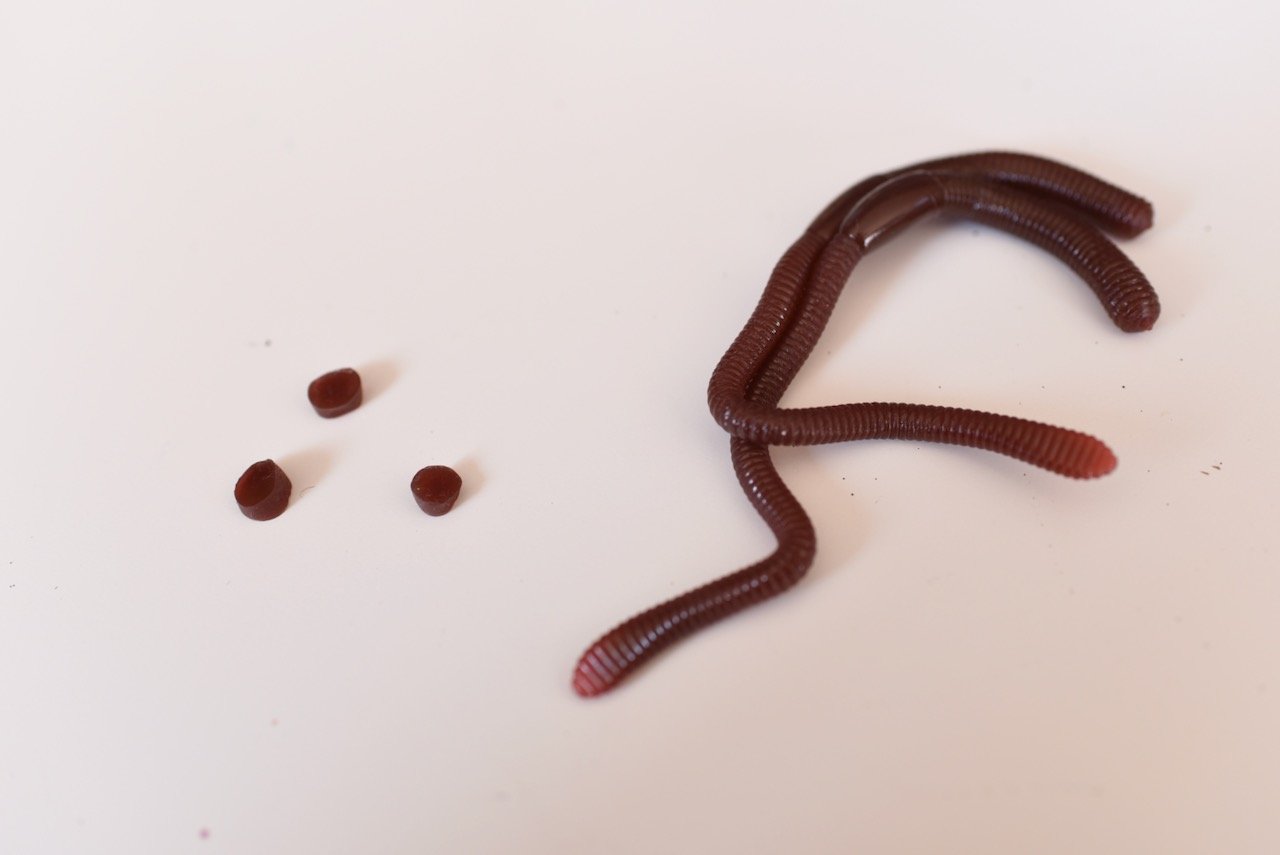
Cut some fake worms into little pieces to look like round brown toad warts. Yuck!
Add some toad warts into the bottle, then use a wood skewer to push them down into the potion.
Be sure to distribute the warts so that you can see them from all sides of the jar.
Spoon in more mixture, then add more warts and move them around with the skewer stick.
Add more warts and/or potion as needed so that it is even and looks great on all four sides.
Wipe the top of the glass jar with a paper towel.
Clean the top with a cotton ball with rubbing alcohol, then let dry.
Decorating the Toad Warts Bottle
Add the toad warts pure extract label to the front of the jar.
Glue a thin layer of hot glue all around the top of the jar, then press a metal knob down on top.
Keep pressing hard to hold the knob in place until the glue completely dries.
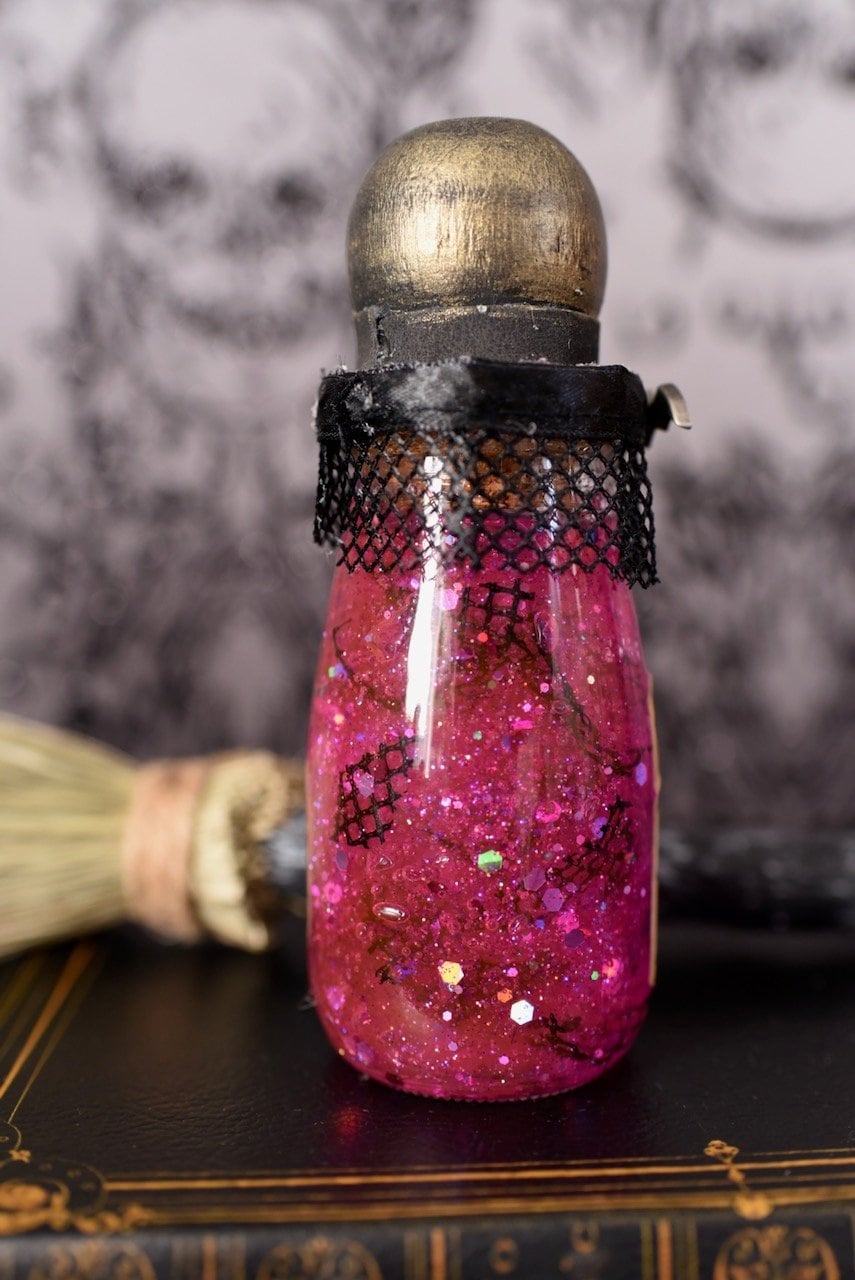
Bat Wings Bottle
A bright sparkling pink potion infused with premium chopped bat wings and a bat charm detail at the top.
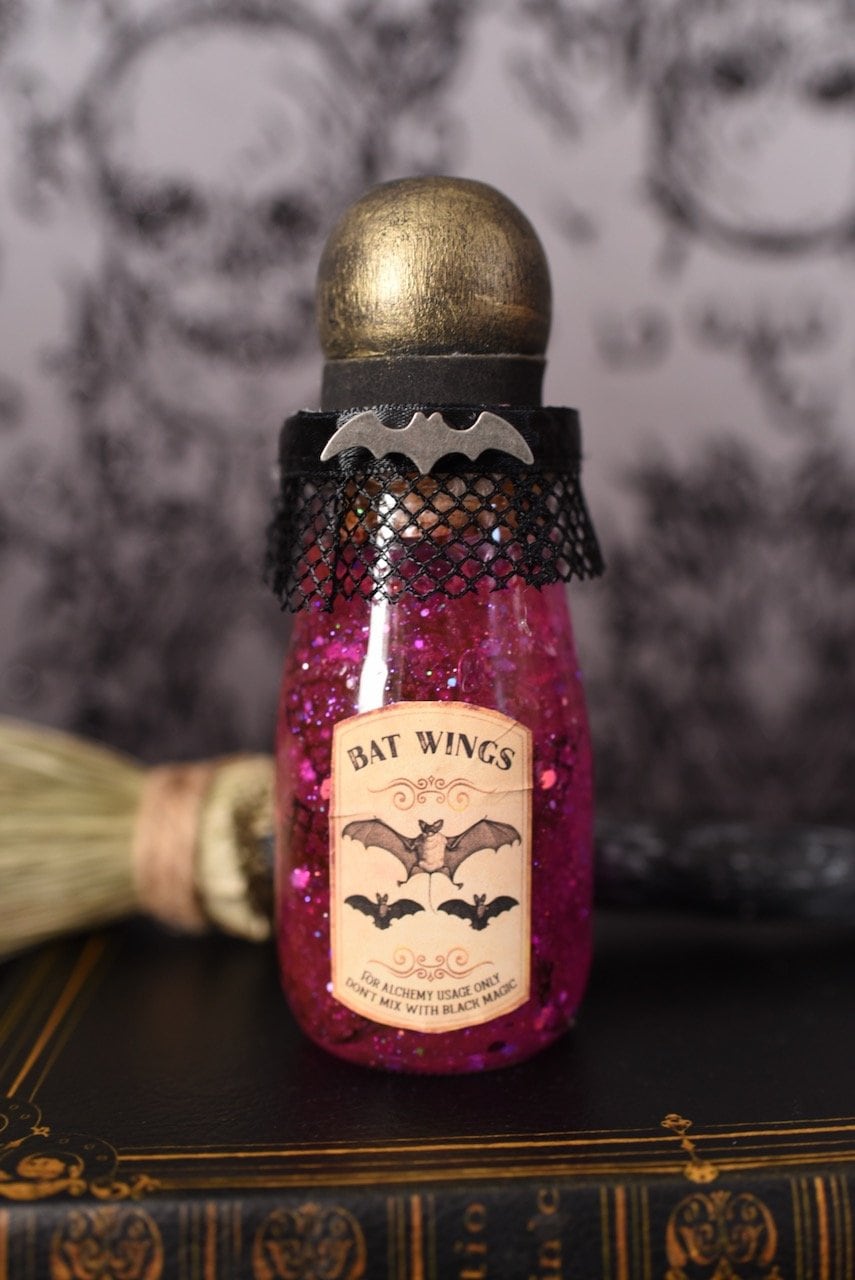
I just love the suspended “bat wings” in this pretty pink magic potion bottle!
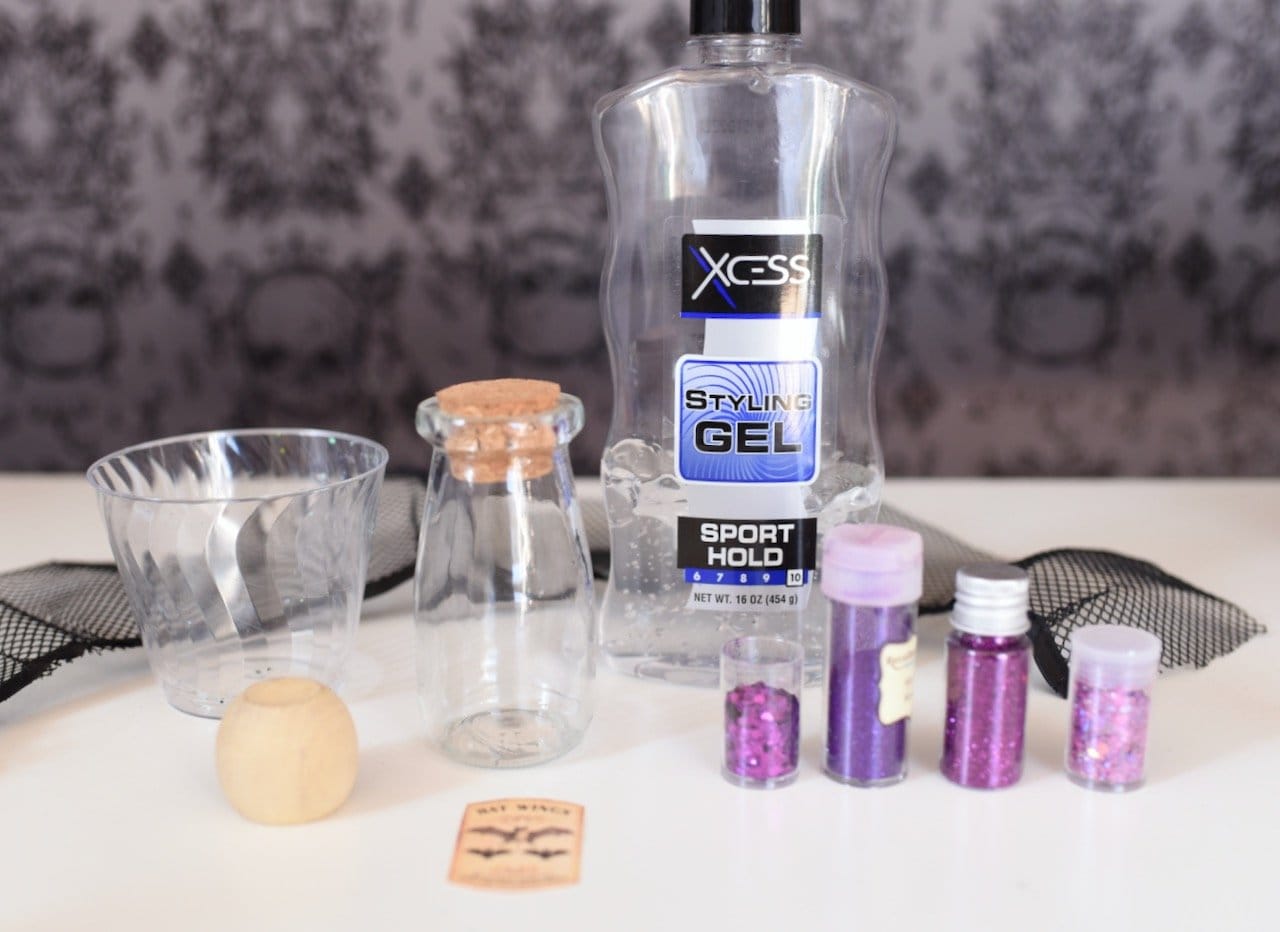
Supplies:
- glass bottle with cork
- clear hair gel
- plastic cup
- glitter-different shades of purple
- round wood Cholula (hot sauce) bottle lid (or another lid you like)
- black mesh, tulle, or net fabric
- wood skewer stick
- scissors
- bat charm
- black and gold paint
- hot glue
- black ribbon
- bat wings potion label
How to Make Bat Wings Potion
Squirt some clear gel into a plastic cup.
Add some purple glitter in different shades to the cup and stir.
Helpful Tip: No coloring required for this one- the glitter will color the gel a perfect pretty purple color!
Use a plastic spoon to add some gel to the bottle until it’s about halfway full.
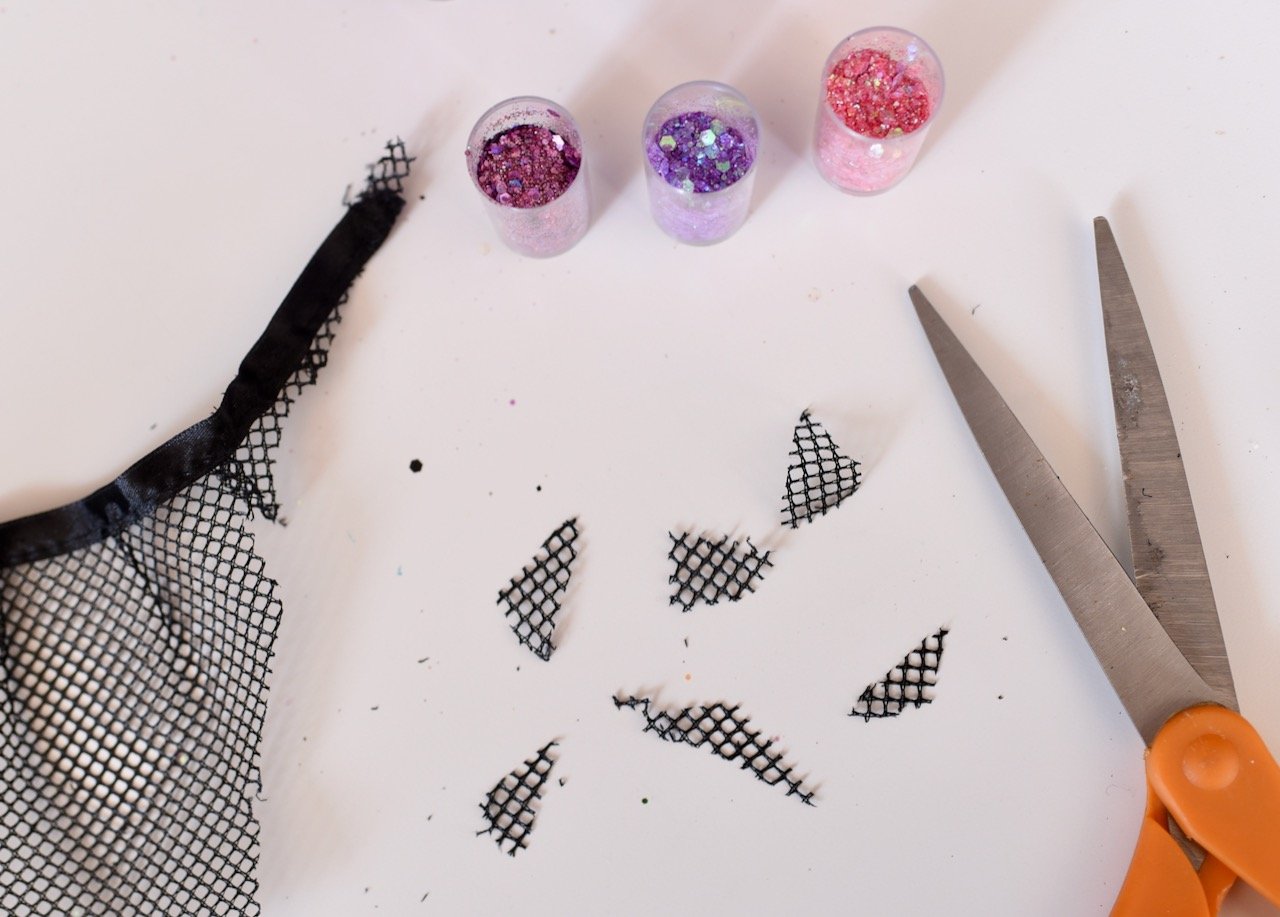
Cut some black mesh or tulle fabric into little triangles with scissors (aka bat wings!).
Drop some of the bat wings into the bottle, then use a wood skewer stick to push the pieces down into the potion.
Helpful Tip: Be sure to move the bat wings so they are at all different levels and can be seen from all sides of the bottle.
Fill up the rest of the bottle with bat the purple potion.
Add more bat wings and move them with the skewer stick until it looks how you would like it.
Wipe the top of the glass jar with a paper towel.
Clean the top and inside top with a paper towel.
Repeat with cotton ball with rubbing alcohol on it, then let dry.
Add some hot glue to the top inside of the bottle, then quickly press the cork down inside to seal.
Decorating the Bat Wings Bottle
Add the bat wings potion label to the front of the bottle.
Cut a piece of black mesh or tulle that will fit around the top of the bottle.
Glue the mesh to the bottle with hot glue, then glue a bat charm over the top center.
Paint a wood Cholula hot sauce bottle lid (or any other wood lid or knob) black.
Once the black is dry, paint a thin layer of gold over the top.
Let dry, then hot glue the wood lid to the top of the cork.
Glue a piece of black ribbon over the side of the cork.
Foxglove Potion
A sparkly shimmery poisonous potion made from foxglove flowers and a little magic.
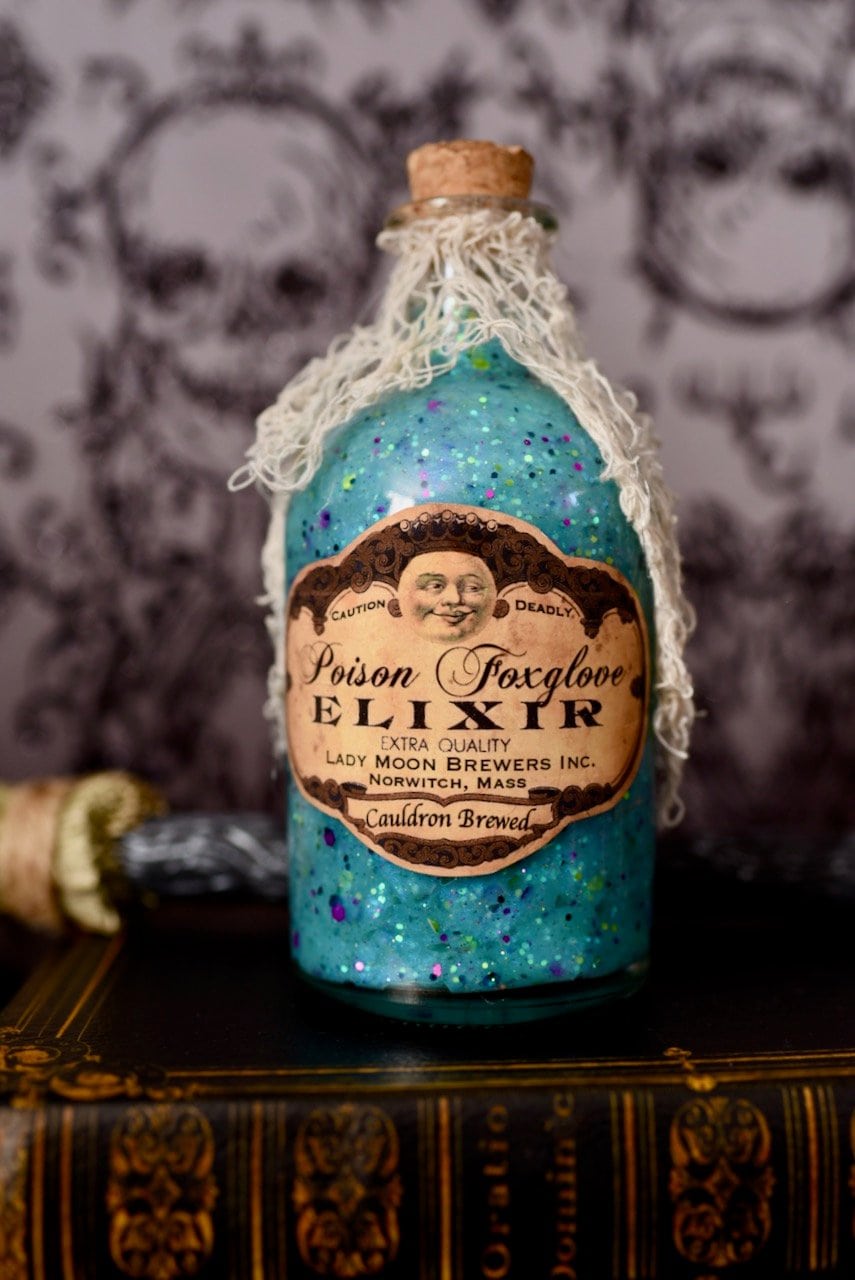
This potion bottle is one of the simplest ones to make!
Supplies:
- glass bottle with cork
- hair gel
- turquoise paint (or any other color)
- glitter– purple, black, light green, and dark green
- plastic cup and plastic spoon
- thin net-like fabric (I cut a piece off some Halloween draping fabric I had)
- funnel
- hot glue
- potion bottle label
How to Make the Foxglove Potion
Fill a plastic cup with clear hair gel, then add some turquoise paint and stir.
Add purple, black, light green, and green glitter, then stir.
Add the mixture into the glass bottle with a funnel until is filled close to the top.
Clean the top and top inside of the bottle with a paper towel.
Add some rubbing alcohol onto a cotton ball, then wipe the top and inside top of the bottle.
Let dry completely, then add hot glue in the top of the bottle.
Quickly press the cork down into the glue and bottle to seal it closed.
Decorating the Foxglove Bottle
Add the vision foxglove elixir potion bottle label to the front of the bottle.
Cut a piece of white net-like fabric, then hot glue it to the top of the bottle.
Gryphon Feather Potion
A glass jar filled with a dark mysterious potion with real black feathers inside.
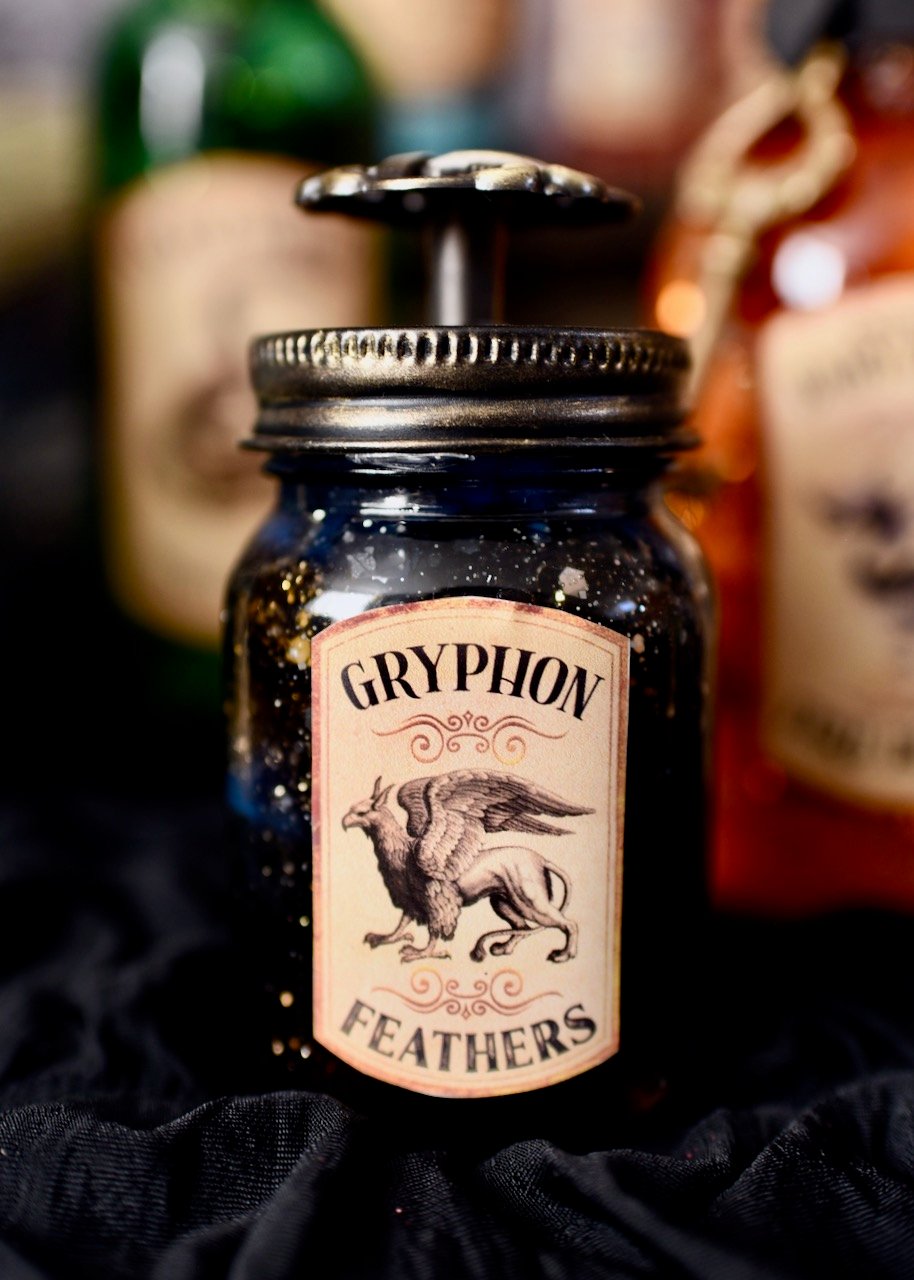
The real feathers look so cool inside this gryphon feathers glass potion bottle!
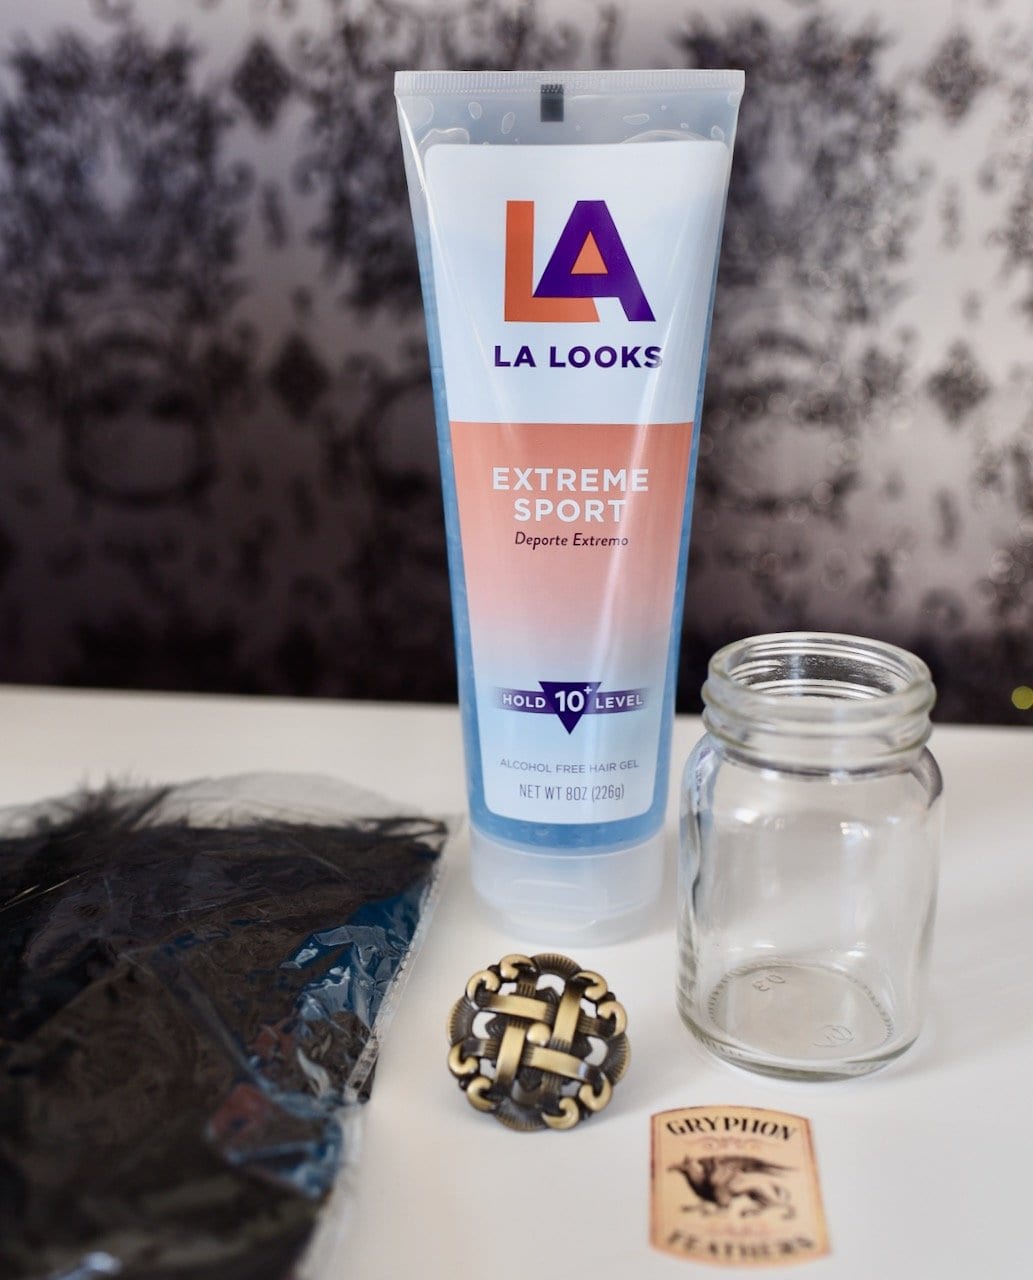
Supplies:
- small glass jar
- two plastic cups
- blue hair gel (Dollar Tree)
- blue paint
- black feathers
- silver glitter
- wood skewer stick
- black spray paint
- metal knob (Home Depot)
- black spray paint
- gold craft paint
- gryphon feathers label
How to Make the Gryphon Feathers Potion
Squirt some blue hair gel into both plastic cups.
Add silver glitter into one cup and stir until it’s all combined, then add more glitter if needed.
Put some blue paint to the other plastic cup and stir until it’s combined.
Use a plastic spoon to fill the jar about halfway with the glittery potion.
Add little bits of the blue-colored gel and to swirl it in the bottle with a skewer stick.
Add more of the glitter blue potion until the bottle is almost full, then add some black craft feathers to the potion with a wood skewer stick.
Use the skewer to move the feathers where you would like them.
Make sure that you can see the feathers from all the sides of the bottle.
Cut your feathers down if they are too big or long for your jar, so they fit nicely.
Fill the very top of the jar if needed with the blue paint gel mixture.
Clean the rim and top of the jar with a paper towel, then with a rubbing alcohol-soaked cotton ball.
Decorating the Gryphon Feathers Bottle
Spray paint the lid of the jar with black spray paint and let dry completely.
Once dry, use a dry paintbrush or a paper towel to add some gold to the lid to match the knob.
Let the lid dry completely.
Add a layer of hot glue around the rim of the bottle, then quickly screw the lid on as tight as you can.
Use Super Glue or E6000 to glue the metal knob onto the top center of the lid.
Place the gryphon feathers label onto the front of the jar, then you are done!
Halloween Potion Bottles
Phew! I told you I would tell you everything you need to know about making stunning potion bottles at home.

These magic potion bottles took a little time to make, but now I have gorgeous Halloween decorations that are gorgeous, unique, and will last me years.
They are also a fun conversation piece when guests come to visit- everyone loves them!
Try our black Halloween spaghetti with eyeballs, creepy witches fingers, and Halloween dirt cups for the perfect Halloween night meal before trick or treating!
So which of these pretties is your favorite?
Leave me a comment and let me know!
My top favorites are the mermaid potion, the enchanted baby dragon breath, and the trapped moonlight.
I just love them all so much!
Happy haunting!
![]()
Leave a Reply