

Today I’m sharing with you the cutest little clay snowman that is SO easy to make and is so darn cute!

This cute homemade snowman makes a sweet Christmas decoration and looks great sitting on a table, shelf, or even hanging on the tree, like our cute 5-minute DIY Snowman Ornament made from a baby sock!
I used Model Magic as a base for a little DIY snowman decoration.
It’s so easy to use and is very soft and forgiving.
Just follow the easy directions below to create your own!
This post contains affiliate links, which means I receive a small percentage of any purchase made at no extra cost to you.
How to Make a Clay Snowman
Supplies:
- Crayola Model Magic
- Carrot noses (I used these from Amazon)
- Small buttons
- Red felt
- Aleene’s Glitter Snow
- Thin twigs
- Scissors
- Paintbrush
- Glue gun

Clay Snowman Tutorial
Step 1. Roll a small, medium, and large ball out of the Model Magic Clay.
This modeling clay is very easy to work with and to get smooth.
You don’t have to cook it, but it will take a few days to air dry on its’ own.

Step 2. Poke a thin stick or skewer slowly into the middle of the big ball.
Place the ball on a flat surface with the stick pointing straight up.

Step 3. Poke the medium ball on top of the large ball, so they are stacked like a snowman.
Add the third ball, making sure that the stick is smaller than the height of the head before you place it on top.
If the stick is too long, just trim it with some scissors.


Step 4. Gently press in two small buttons for eyes and the carrot nose into the snowman head.
Slowly press two sticks into the middle ball, one on each side.
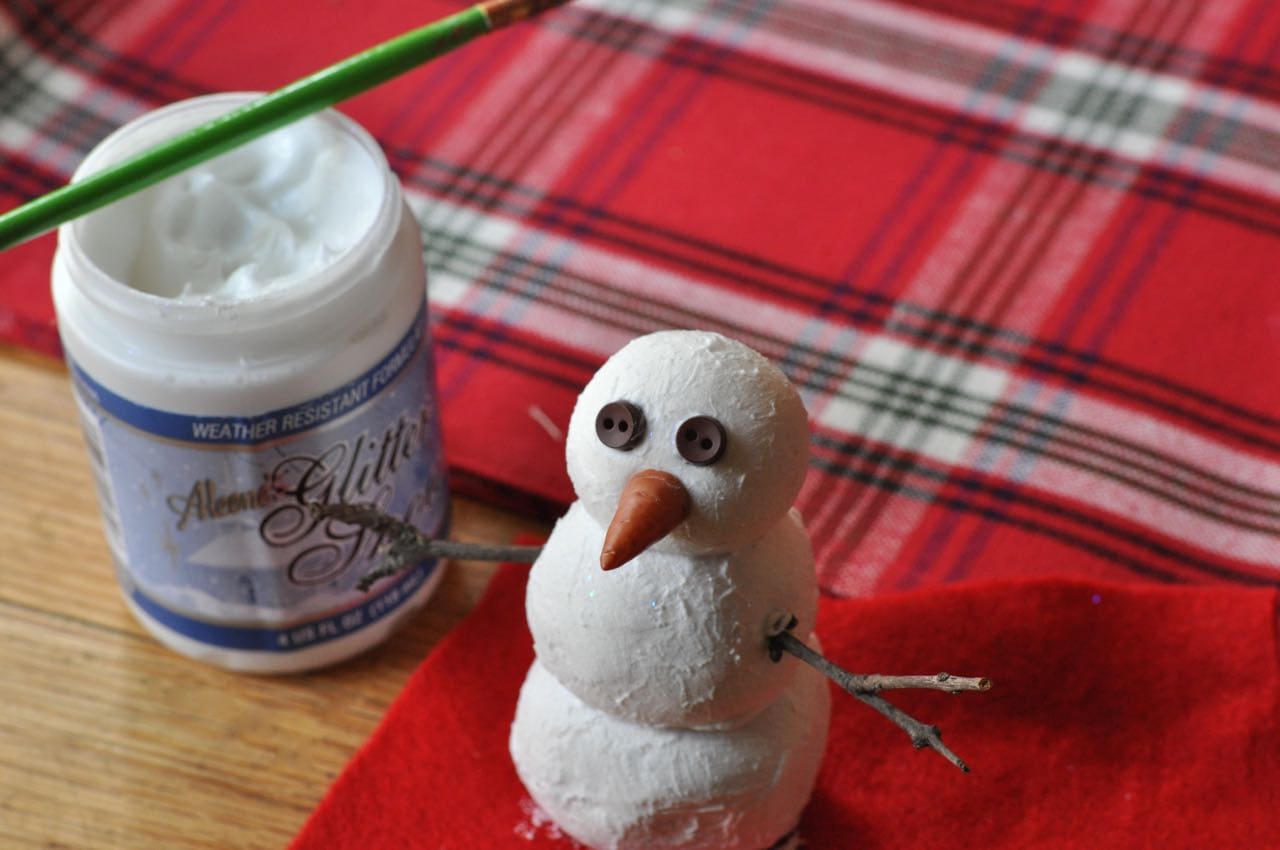
Step 5. To make the DIY snowman look more realistic and to add a bit of shimmer, I used a small paintbrush and “painted” some glitter snow onto the snowman.
Glitter Snow is SO much fun to use, and adds a bit of texture too.
This is great because it will also hide any fingerprints or small dents and imperfections that you might accidentally make in your snowman.
I applied it so that you couldn’t see brush strokes, it just added some nice texture.

You can also add glitter snow to the top of the stick arms, too, to look like the snow has been piling up on our snowman.
The glitter snow takes 24 hours to fully dry, so try not to touch it once the snowman is painted.
 Step 6. A proper clay snowman needs a warm scarf, so I cut out a long thin piece of red felt. I measured around Frosty’s head the length that I would like, then cut little fringes into each end.
A dab of hot glue where the two scarf ends meet is the perfect way to keep the scarf in place.

Now for the hardest part- waiting for the Model Magic clay and the glitter snow to harden!
If you are impatient (like me), or have kids who like touching (also like me), then you might want to put this little guy up somewhere where he won’t be disturbed for a few days.
Once your DIY clay snowman nice and hardened, he will be the perfect little homemade snowman decoration!
How to Create a Winter Wonderland Snowman Scene
You can display your new snowman decoration on a table, or create a snowy winter scene.
I decorated with mini bottle brush trees and Diamond Dust (which is made from finely ground glass and is not to be used where children could touch).
The kids can also have him as a decoration for their bedroom.
You could even turn this cute little guy into an ornament by adding an eye hook to the top while the clay is still soft.

If you like this cute clay snowman, be sure to pin it to make later!
Did you know that you can make a pumpkin snowman out of your plastic pumpkin pails?
More Fun Christmas Crafts:
- How to Make Fake Snow
- Magical Harry Potter Christmas Tree
- 5-Minute Christmas Play Dough
- How to Make Wood Slice Ornaments
Favorite Christmas Treats:
- BEST English Toffee Recipe
- 10-Minute Chocolate No Bake Cookies
- Edible Marshmallow Snowmen
- Andes Mint Chocolate Cookies
Happy crafting!
![]()
This DIY snowman craft was updated in December 2020 and was originally posted in 2015.
Leave a Reply