
Make a darling pumpkin snowman from two plastic $1 Halloween pumpkin pails! This cheap Christmas craft is a great way to reuse and recycle old fall decor into a new decoration.
I love when a simple craft comes together perfectly, like this adorable pumpkin snowman.

My plastic Halloween pumpkin pail collection was growing too quickly, so I got creative and made a darling snowman pumpkin!
This adorable winter snowman decoration is so simple to make- practically anyone can do this, even kids (as long as they have help gluing).
It makes a fun winter or Christmas decoration for the holiday season for your front porch, entryway, fireplace, living room, and more.
If you love snowmen, check out these 5-minute DIY snowman ornaments that have been pinned over 35,000 times!
How Many Pumpkins Should You Use?
You can make your pumpkin snowman with two or three pumpkin pails- the choice is yours!
I originally wanted to use three pumpkins, but I though it looked a little too tall and unsteady, so I switched to two pumpkins instead.
This post contains Amazon affiliate links, which means I make a small commission of any purchase made at no extra cost to you.

Pumpkin Snowman Supplies:
- 2 or 3 plastic pumpkin pails (buy these before Halloween if possible when they are easy to find)
- White matte spray paint
- E6000 glue (or other strong glue)
- Black and red buttons
- Ribbon (for the scarf)
- Black hat
- Hot glue
Helpful Tip: You can also use foam pumpkins (the decorative ones found in craft stores) instead of plastic pumpkin pails if you’d like.
If using foam pumpkins, you will first need to cut off the pumpkin stem.
Next, it’s time to paint with spray paint or acrylic paint and a paint brush, then proceed with the following steps.
Painting the Pumpkins
First, you will need to pull off the handle from the pails.
Next, it’s time to spray paint the pumpkins white.
The snowman pumpkin will look best when it’s matte, so be sure to paint with a matte or flat finish paint.

When spray painting, it’s best to use a light hand and paint a few light coats of paint.
This way you will prevent drips and lines and the spray paint won’t run if you use light coats.
Let the paint dry completely between coats.
There’s no need to paint the inside of the Halloween pumpkin pails- we will just be seeing the outside!
Once the pumpkins look completely white with no orange paint showing through (after a few coats of white spray paint), let the paint dry completely.
Creating the Pumpkin Snowman Base
Once your paint is dry, it’s time to put together the pumpkin snowman base.
It’s up to you whether you stack two or three fall pumpkins to create your decoration.

Assembling the Pieces
Keep in mind how tall you would like it and how you are going to store it.
Assembling the I mentioned earlier that I originally wanted three stacked pumpkins, but ended up changing my mind and only using two.
My snowman pumpkin was going in the house so I wasn’t too worried about it blowing over on the porch.
If you want to, you can weigh your bottom pumpkin down by putting something heavy inside to hold it in place.
Gluing the Pieces Together
I used some E6000 glue to hold my pumpkins together.
E6000 is awesome and creates a very strong hold on multiple surfaces.
Be sure to use the glue in a ventilated area.
Place your pumpkin snowman somewhere where he won’t be disturbed while the glue sets completely (about 24 hours).
Decorating the Pumpkin Snowman
Now comes the fun part- giving your snowman a personality and watching him come alive!
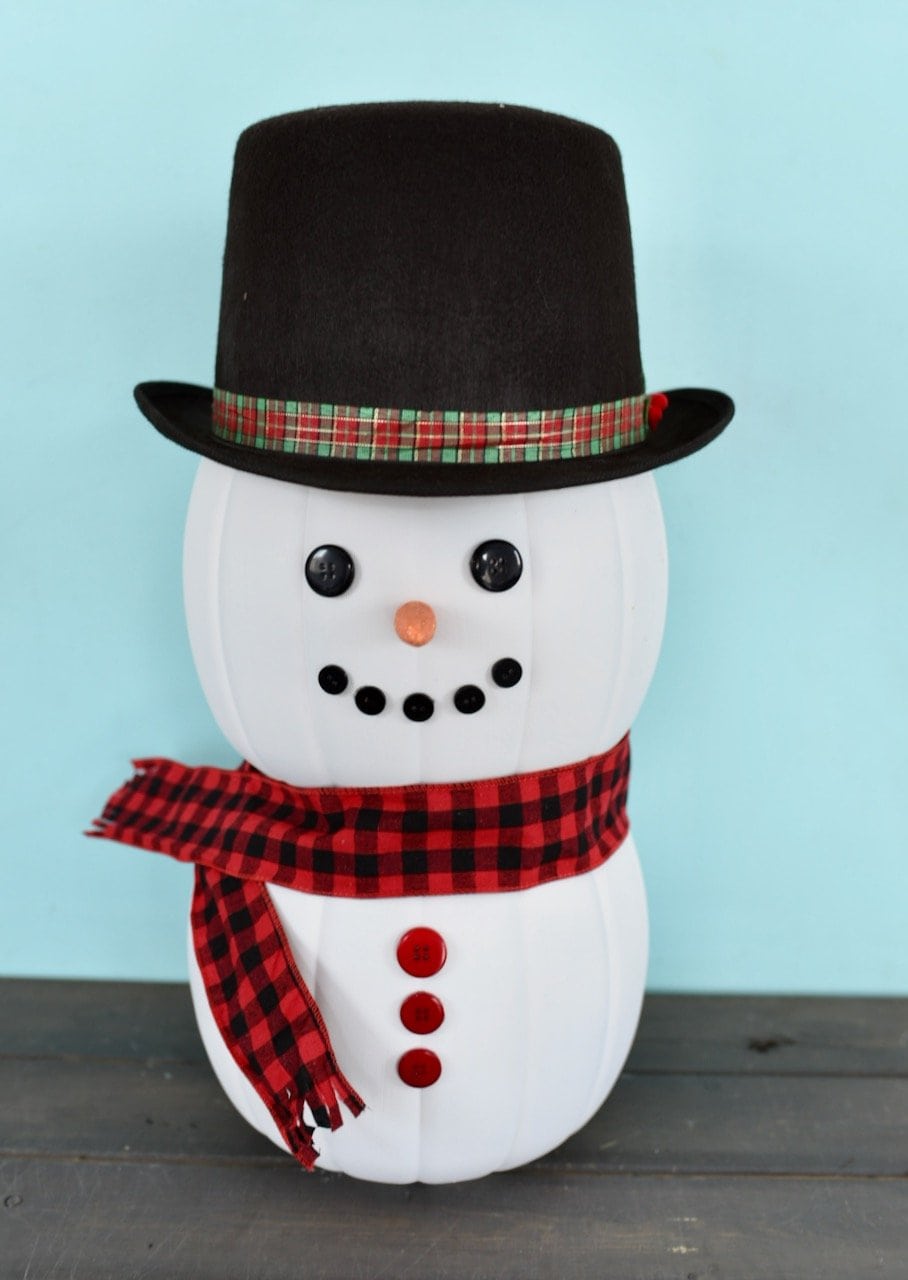
Adding a Hat
A snowman needs a hat, and I hot glued a black hat decoration on top of mine.

If your hat doesn’t come with ribbon on it, you can always add some.
Feel free to accessorize as much as you’d like with decorative Christmas picks, leaves, berries, pinecones, bells, or anything else.
If you can’t find a hat that’s the right size, you can also try using a beanie or other old hat you might already have.
You don’t even have to glue the hat if you’d like to use it again- just place it on top!
Making the Face
Now it’s time to make your snowman’s cute face!
I used two larger black buttons to make his two “coal” eyes, then five smaller buttons to create the snowman’s smile.

You can mark the spots where you would like the facial features with a pencil or a Sharpie, or you can just go for it and start gluing like I did.
For the nose, I used small decorative carrots I found at Oriental Trading Company.
The size was perfect!
Hot glue worked perfectly to add adhere all of the snowman’s facial features.
Making the Scarf
Every snowman needs a scarf, so I cut a piece of red and black buffalo plaid ribbon I already hat to create the scarf.
I hot glued the ribbon around the space where the two pumpkins came together.

Cutting the ends of the scarf with scissors made the perfect scarf fringes!
Adding the Buttons
Three large red buttons were glued down the snowman’s middle on the second pumpkin.
I just love the way he turned out!
You can also add pink rosy cheeks with paint, or even blush, to add more character to your pumpkin snowman.
Now display your sweet new pumpkin snowman on your front porch, entryway, fireplace, and more.
Favorite Snowman Crafts
You’ll love these other creative ideas for decorating this December!
- Cutest Sock Snowman Craft
- Easy DIY Clay Snowman
- Marshmallow Edible Snowman
- How to Make Fake Snow in Minutes {Just 2 Ingredients!}
- Easy 5 Minute Candy Sleigh
Happy crafting!
![]()
This post was updated in November 2024, and was originally posted in November 2022.
Leave a Reply