
Learn how to make a Halloween wreath with just a few supplies! My Halloween wreath was inspired by a Grandin Road Halloween version that costs $199, while this version costs around $25 to make yourself. It’s a no-brainer!

What Inspired This Grandin Road Wreath
With the changing of every season, I eagerly await the release of the new holiday and seasonal products from some of my favorite companies.
I love getting inspired by the new products, and often challenge myself to create some of their looks for much less for my home.
I spied the sweetest candy wreath on Pinterest from Grandin Road.
It featured many faux pieces of candy that were rolled up in coordinating fabric and tied with an orange ribbon on each end.
SO cute and creative!
Imagine my shell-shock when I clicked over to their site to get a closer look at the Halloween wreath and saw the ginormous price tag.
$199?!
I decided right then that I would create my own candy Halloween wreath DIY version for much less, and I’m so happy that I did!
Although this Halloween wreath DIY took a few hours to make, I think it turned out just as cute as the original Grandin Road candy wreath.
I’m so proud to display it in my home!
How to Make a Halloween Wreath
Keep reading to learn how to make a Halloween wreath for under $25 that looks just like the high-end designer version.
This post contains affiliate links, which means I make a very small percentage of any purchase made at no extra cost to you. Thanks for your support!
DIY Halloween Wreath Supplies:
- 3/4″ Closed cell backer rod– 1 bag
- 16″ Wire wreath form (or any other size you’d like to use)
- 1/8 yard each of 8 different Halloween fabrics (for a total of 1 yard of material)
- Hot glue
- 3/8″ Light orange ribbon (I used 5 rolls of ribbon that were 21 ft long, so 100 feet total)
- Fabric scissors
- Pinking shears

What is Closed Cell Backer Rod and Where Can I Find It?
I brainstormed for a while trying to figure out what to use for the inside of each candy roll.
It needed to be light weight so I knew that I wanted to use foam.
I found exactly what I needed at Home Depot, but it’s also on Amazon too.
Closed cell backer rod is basically one big long foam snake.
The 3/4″ size is the perfect thickness for the inside of the candy rolls for our Halloween wreath!
I found the backs of these hanging vertically on hooks by the concrete, since they are used to fill in cracks that will be repaired with concrete.

Cutting the foam pieces to create the candy
First, you’ll need to cut the backer rod (foam snake) into 1 1/2″ pieces.
I cut one piece, then used that piece to cut all the rest to the same size.
Cut the entire bag, and you’ll have enough for the candy wreath and another project I’ll be sharing soon.
Next, wrap each piece of foam in Halloween fabric.
Even though you’re getting 8 different Halloween fabrics, you will only need 1/8 yard of each different design, so you’ll only be using a total of one yard.
I found all my fabric at Joann and bought it on sale.
* Helpful Tip: Don’t forget to use coupons in the app or online!
Here’s the Fabric I Used:
- solid black
- solid orange
- gray with black dots
- orange with black dots
- black and white striped (my favorite)
- black and gray striped
- pumpkins
- ghosts
Wrapping Each Piece of Candy for the DIY Halloween Wreath
Turn one of the 1/8 yard fabric pieces so that it runs across horizontally.
Make one long cut horizontally so that you now have two long pieces.

Now you will cut each long piece into individual pieces to wrap around the foam “candy” so that there is some excess fabric on each end.
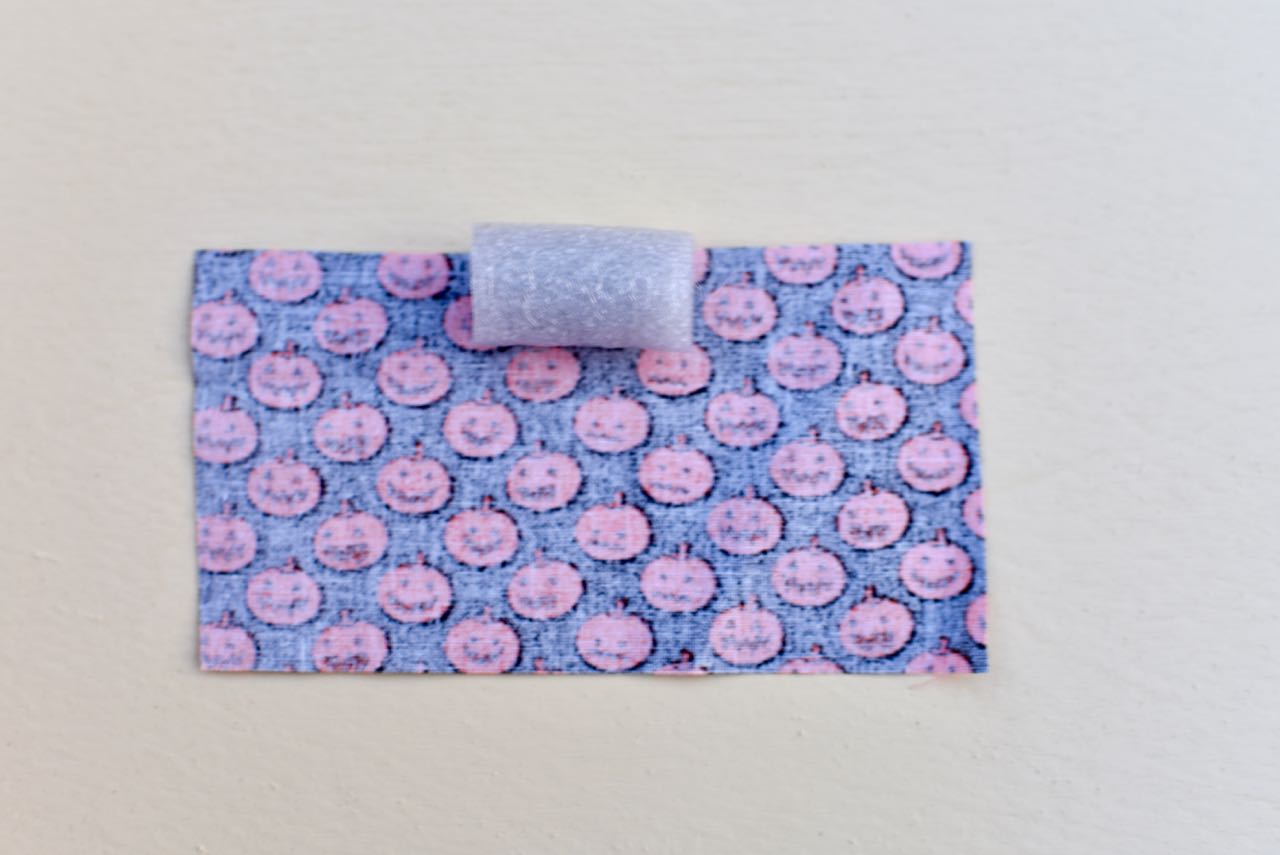
Place a foam piece across the top center of the fabric piece and attach it with hot glue.
Roll each piece down, then placed a strip of hot glue along the bottom of the backside of the fabric.

Push the foam down to hold in place for a few seconds while the glue cools.
Be careful, it will be hot where you put the glue.

Finishing Each Candy Piece for the Halloween Wreath
To make this little tube look like a piece of wrapped candy, you will need to tie a piece of orange ribbon to the end of each one.
I cut mass amounts of ribbon in the beginning because it was faster to do it that way.

Tie a piece of ribbon to each end of the tube, then trim the ends of the ribbon.
How to Seal the Ends of the Ribbon Bows
I didn’t want the ends of my bows to start fraying, so I used a lighter to seal the ends.
Be very careful doing this next part!
To seal the ends, hold the lighter near (but not too close) to a ribbon end.
The heat starts to seal the ribbon so that it won’t fray.
This just takes a second.
Make sure to seal the whole end, then repeat for the other ribbon end.
I know this takes a bit more work, but trust me, it is totally worth it!
If you’re going to all this effort to make an amazing Halloween wreath, then you definitely want to do it right so that it will last for years and years.
How to Finish the Candy Pieces
Finish off the candy by trimming off the fabric ends with pinking shears.
If you don’t do this, the ends will start to unravel and you’ll have strings that won’t look very good on your wreath.
It’s a simple step, but a very important one!
Finishing the DIY Halloween Wreath
To put the candy wreath together, you will be hot gluing each candy piece onto the metal wreath frame.
I used a 16″ wreath and had a few extra candy pieces.
I’ll be sharing what I did with the leftover candies soon!
You can make this wreath any size that you would like.
Keep in mind that if you go bigger than I did, you will need more fabric, more than one bag of the closed cell backer rod, and more ribbon.

To assemble, apply a good amount of hot glue to the back of a foam candy.
Press candy firmly onto the inside ring of the metal wire frame.
Hold in place for a minute with pressure while the glue dries slightly.
Make sure that the ribbon pieces are facing up and the fabric seam is facing the back.
Glue down another piece and repeat, a section at a time.
Make sure to vary the patterns and colors so you don’t have the same patterns or colors right next to each other.

After finishing a section of the inside ring, I did the section directly behind it on the outer ring.
With the back ring, tuck the bottom end of the candy fabric wrapper down under the first row of candies.
This helps to fill in the little hole and makes the wreath look fuller.

Here’s a picture of the back of the wreath.
Yes, there’s lots of glue back there, but no one will be seeing this part so it’s totally okay.

Repeat until the entire Halloween candy wreath is all filled up with sweet little treats.
Isn’t it adorable?!
I’m so happy with how this DIY Halloween wreath turned out!
It was so inexpensive to make too!
Definitely was better than paying $200 for a wreath. 😉
I hope you enjoyed this Halloween wreath DIY as much as I did.
I love that this festive Halloween wreath looks almost identical to the expensive designer version and cost just a small fraction of the cost!
More Halloween + Fall Favorites
- Fall Stovetop Potpourri Recipe
- No-Sew Hedwig Baby Owl Costume
- Halloween Ghostbusters Party
- How to Make DIY Wood Signs with Cricut
- Starbucks Caramel Apple Spice Recipe
- Free Printable Halloween Invitations
- Nightmare Before Christmas Party
- Witch Halloween Party
Happy fall!
![]()
This Halloween wreath tutorial was updated in July 2021 and was originally posted in October 2019.
Leave a Reply