
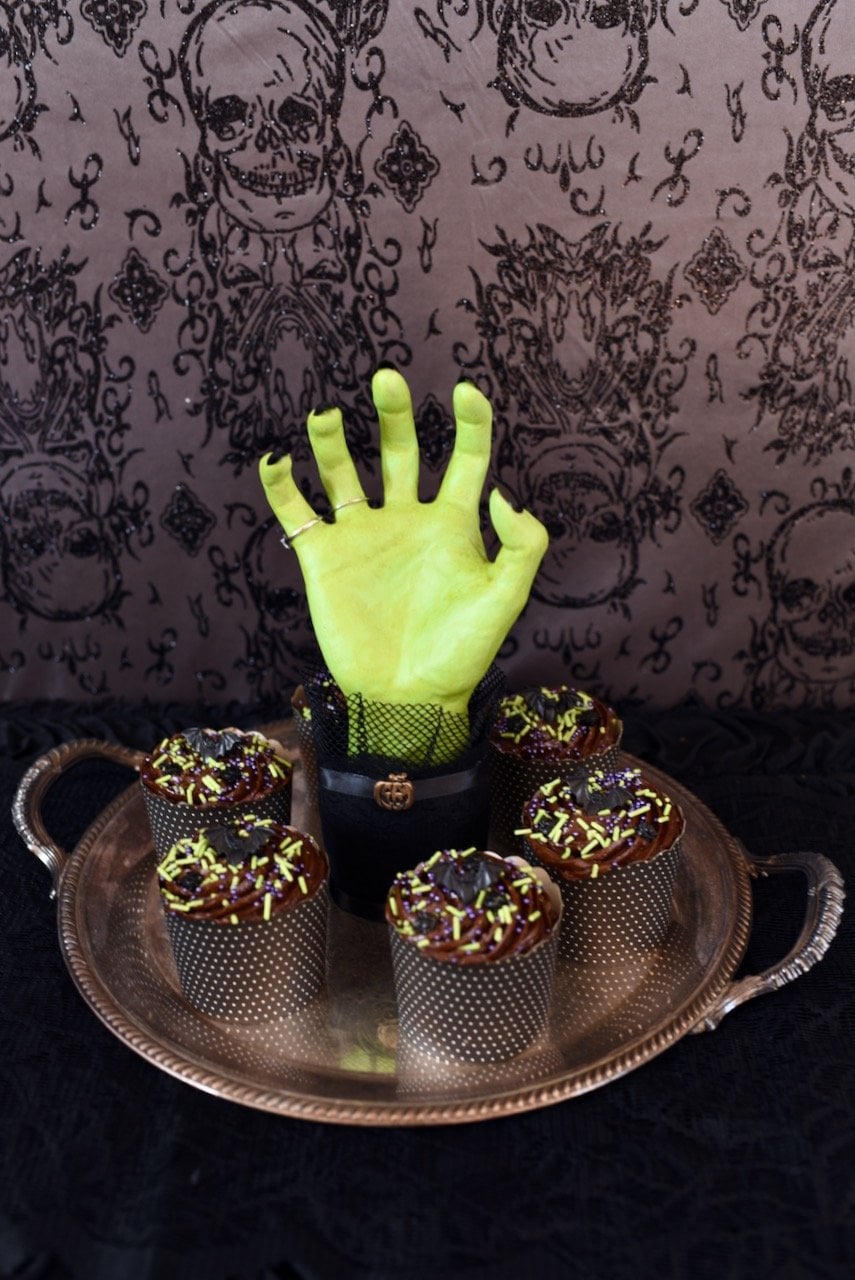
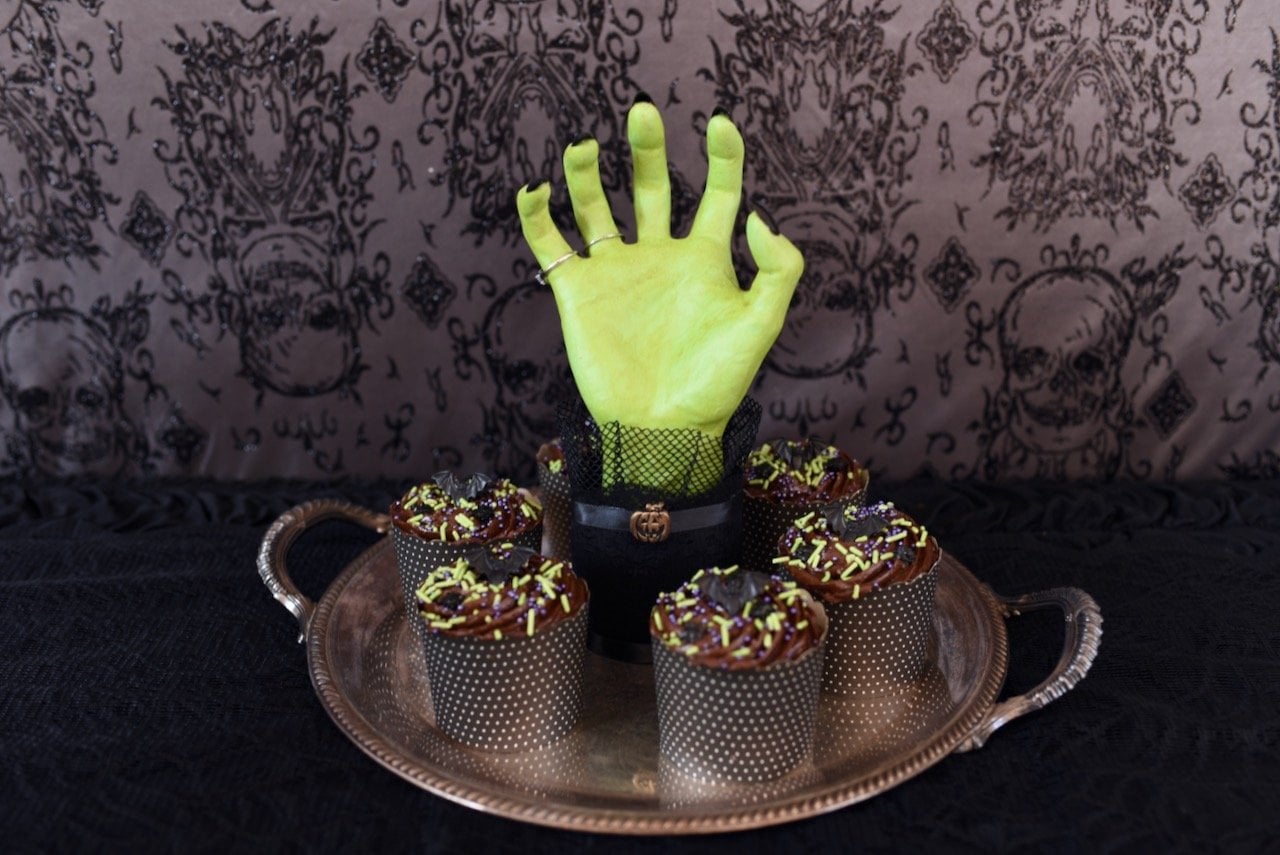
Make a creepy fun witch hand Halloween tray for under $15 that’s perfect for Halloween and costs MUCH less than the $500 Grandin Road version!
Have you ever seen a holiday decoration for sale and thought to yourself- I can totally make that for way less?
Pretty much me on a daily basis, ha! I even did it last week with my sweet light up ghost DIY Pottery Barn dupe. 😉
That’s exactly what happened with my witch hand Halloween tray I’m so excited to share with you today.
This fun Halloween decoration is elegant, eerie, spooky, and not too scary- all at the same time!
I LOVE scrolling through Pottery Barn, Pottery Barn Kids, Grandin Road, Anthropologie, and other faves.
It’s fun to get inspired by their Halloween and Christmas decorations!
My home is mostly Pottery Barn furniture and decorations, but there are just some things that make much more sense to DIY myself, like my Halloween potion bottles and witch boots decoration.

Grandin Road Halloween Inspiration
Here’s the Grandin Road Katherine Collection Mirror Mirror Cupcake Server. Isn’t it fun?!
The green hand witch hand looks like it’s reaching right out from the Halloween tray to grab you! Or to grab a sweet snack…
The price tag is outrageous- $549! It’s on sale for almost $400, which just isn’t very practical for most people.
Witch Hand Halloween Tray
Let’s make our own hand Halloween tray for under $15!
I’ll show you step-by-step how to make your own decoration, give you shoppable links to products used, and share a video tutorial.
Halloween Hand Decoration VIDEO
I highly recommend you watch the video below to see EXACTLY how I made this DIY Halloween tray decoration.
Then read below to get all the details and links to everything I used!
You can also watch the video with spoken instructions and music on my YouTube channel. I’d love for you to follow along and join me there!
This post contains Amazon affiliate links, which means I make a small percentage of any purchase made at no extra cost to you. Thank you!
DIY Halloween Tray Supplies
Here are the exact supplies I used to make this fun Halloween decor…
Serving tray
I found a silver tray at Goodwill for only $5.99! Shop your local thrift stores and you can easily find something like this that will work.
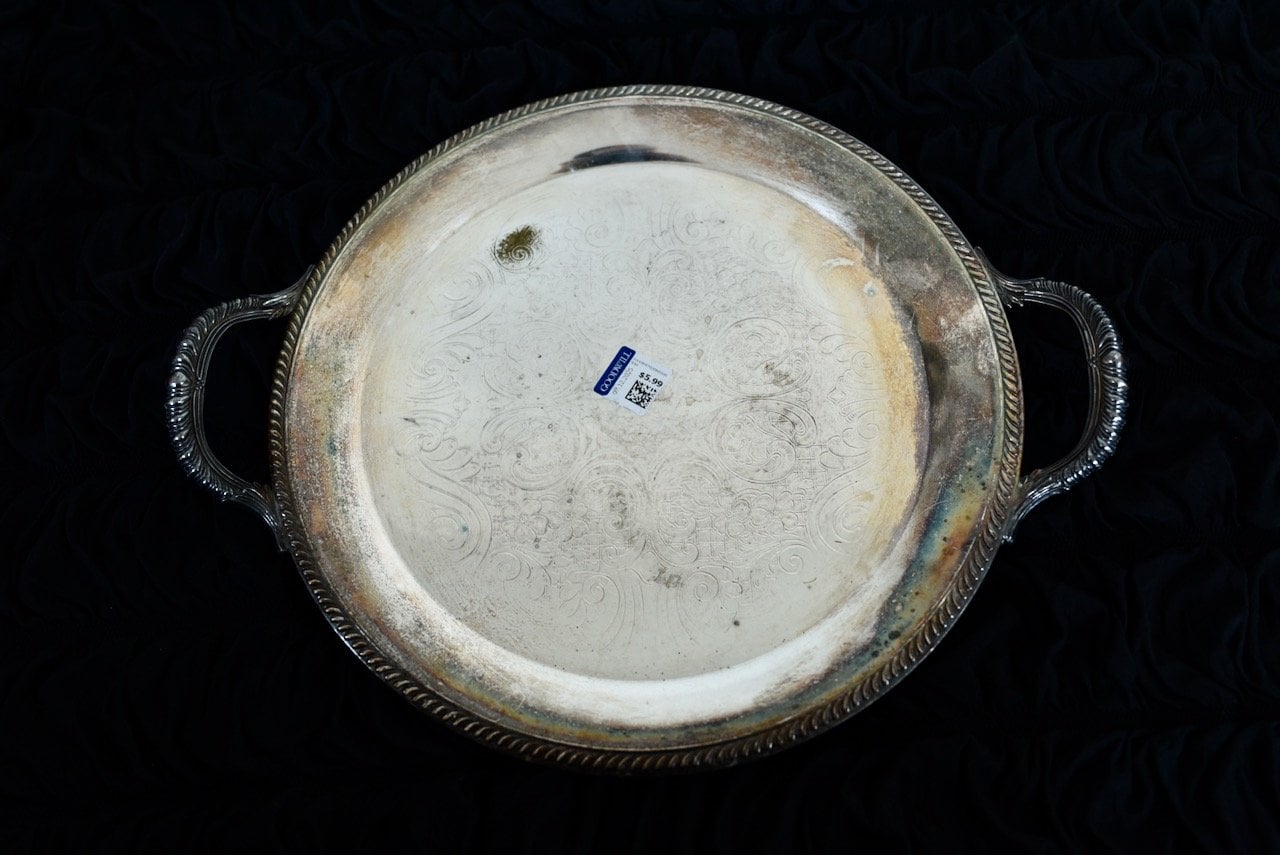
BONUS: Since I bought used, my future Halloween tray already came worn and aged naturally without any work on my part.
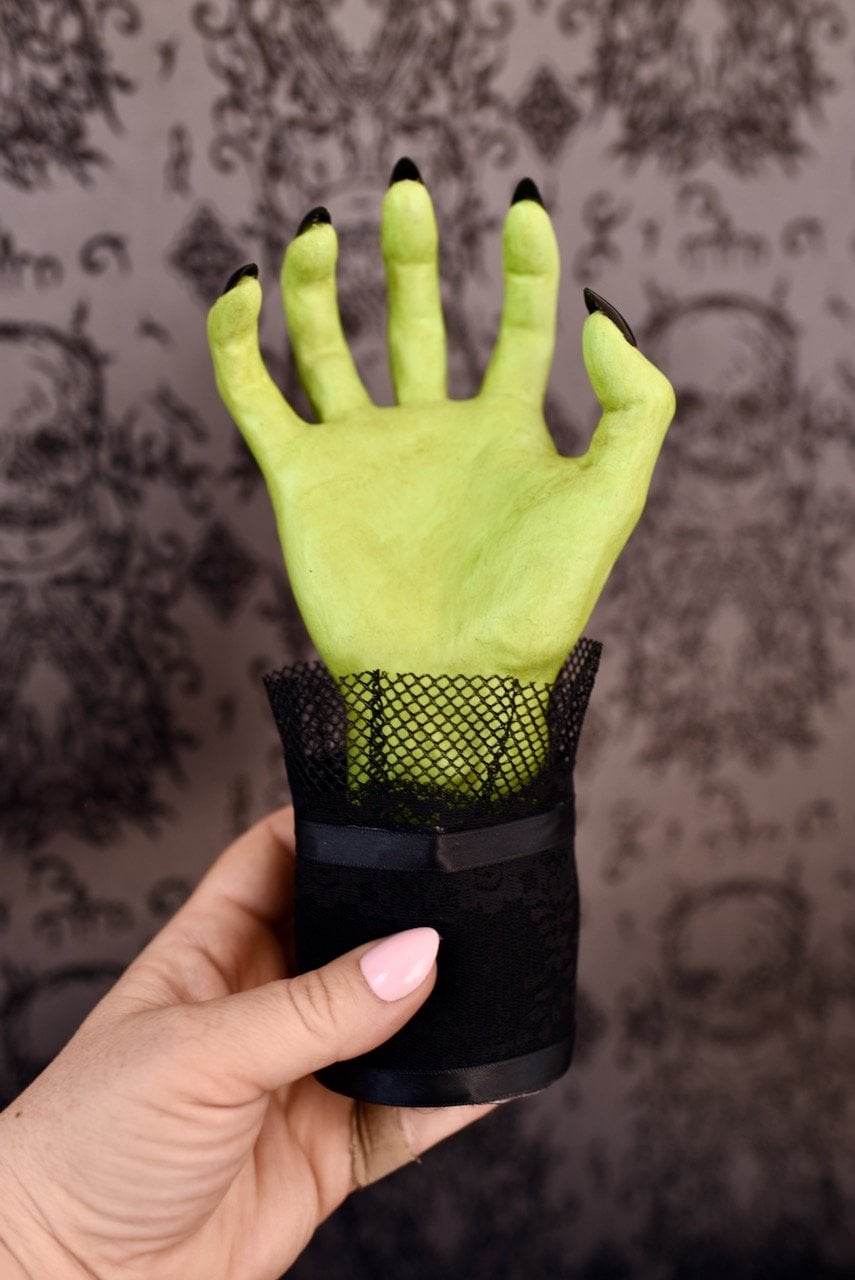
Hallowen hand
My Halloween hand came in a set of 3 from Amazon, and it worked perfectly (I bought set 1, not set two)!
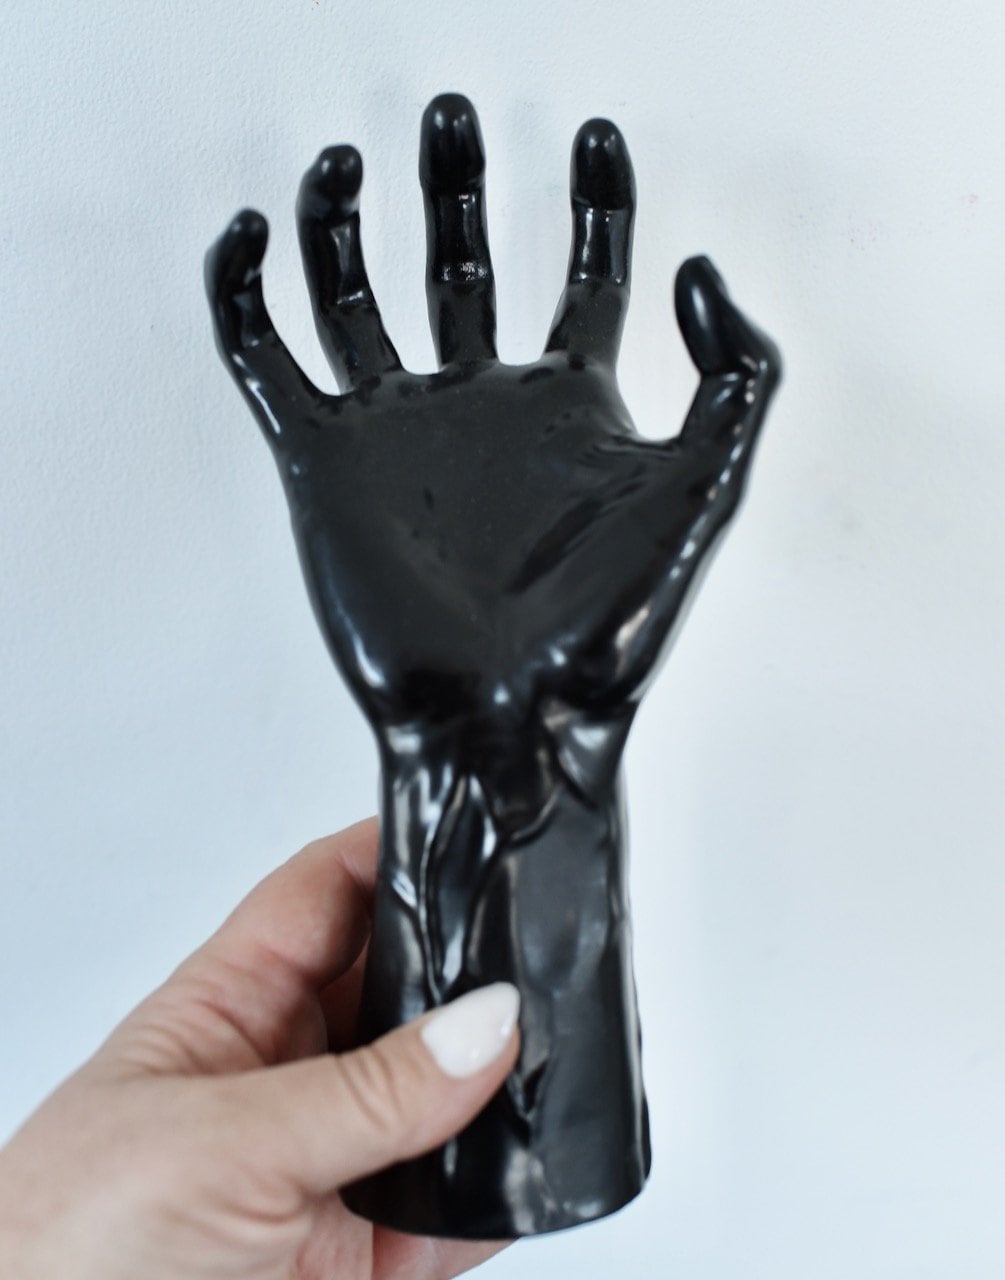
I scoured the interned to find an arm that was long enough, that was solid and strong with a flat base, and that had veins and good details. This hand worked just perfectly, and I’m using the other two hands for two different projects I’ll be sharing soon.
Strong adhesive
I used as combination of e-6000 (a super strong adhesive that take about 24 hours to cure) and my favorite light pink hot glue gun to adhere my witch hand. The combo worked great!
Paint
You’ll need some white chalk paint and green acrylic paint.
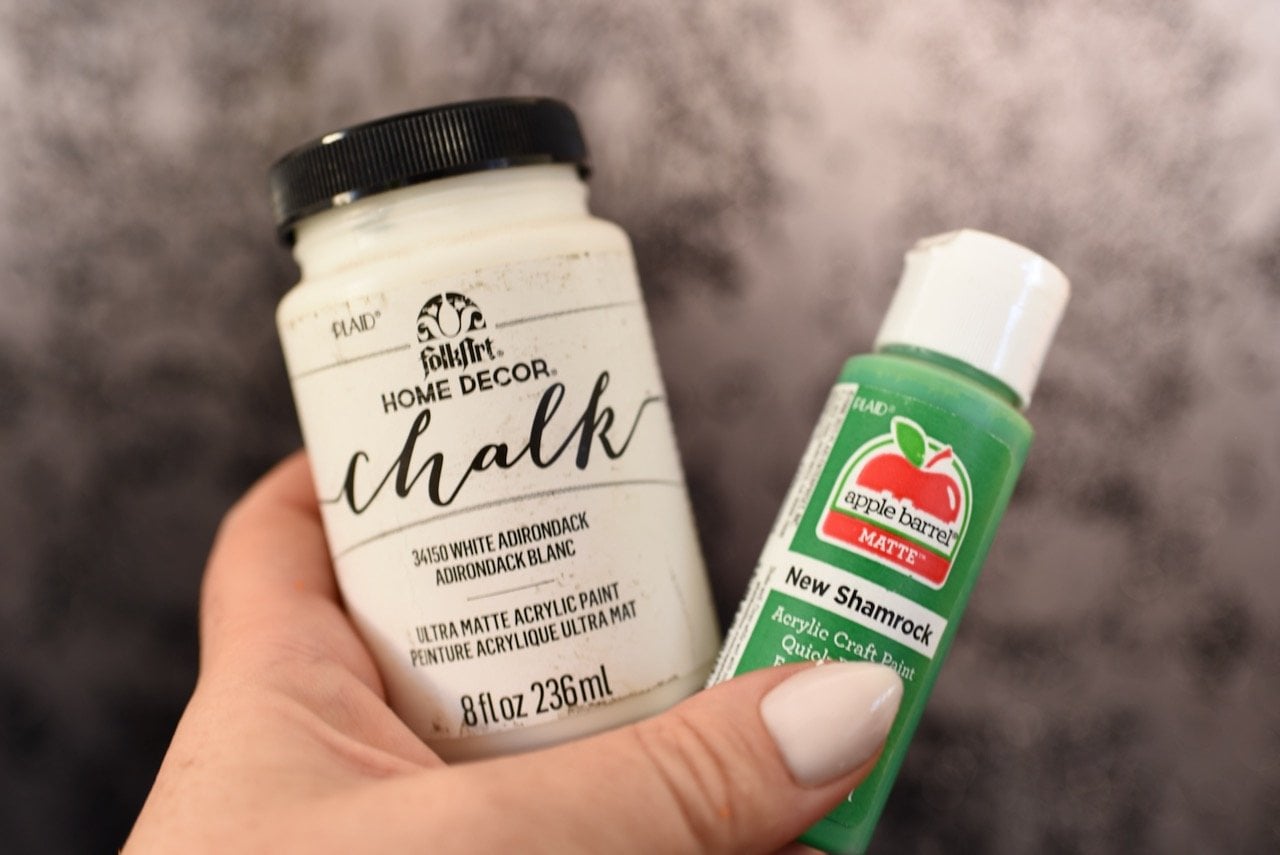
I used a green wood tint I had on hand over the top layer as well, but this step is totally optional. You can accomplish the same look with paint.
I also used a Rustoleum matte clear enamel spray over the top of the hand to protect the paint.
Black Press On Nails
Black press on nails are optional, but add such a nice, bougie vibe to your witches hand. You can use short black nails or longer black nails for a different look!
Misc. black fabric and trim
I raided my craft stash and found some black felt, ruffle tulle (this one is similar to what I used), thick black lace ,and black satin ribbon to make the witch’s sleeve. Use anything you have on hand or use the links to shop what I used.
Okay, now that we’ve got all our supplies, let’s get crafting!
Paint the Halloween Hand
The first step is to paint the hand.
Prep the hand
I used some rubbing alcohol to quickly wipe down the hand and remove any oils or dust from it.
I wanted my paint to adhere really well.
Mix the paint
Chalk paint is perfect for the job because it does adhere to surfaces very well and has a nice matte finish to it.
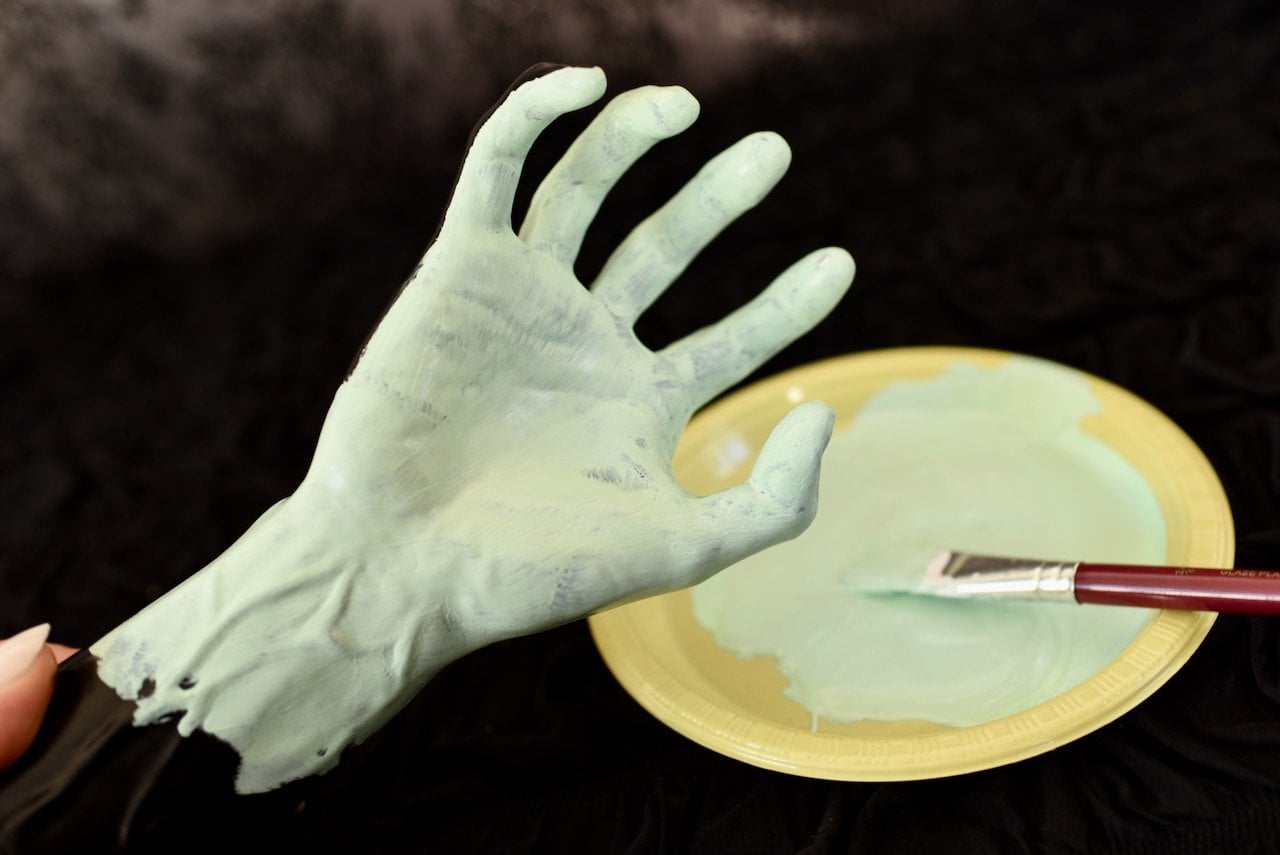
I mixed up some of my white chalk paint with a little green acrylic paint to get a light green color.
The first coat will look uneven and not very good.
That’s normal, don’t stress!
I painted three coats of paint to get full coverage.
Make sure to let each coat dry before painting on the next coat!
Finish off the paint
Next, I added a green wood tint that I already had on hand over the top of my light green paint.

This gave my hand some nice depth and dimension and made it look really great!
I couldn’t find the tint I used on Amazon, but you can also get the same effect with paint.
Add a clear coat
After all this work, I wanted to make sure that my paint job was protected.
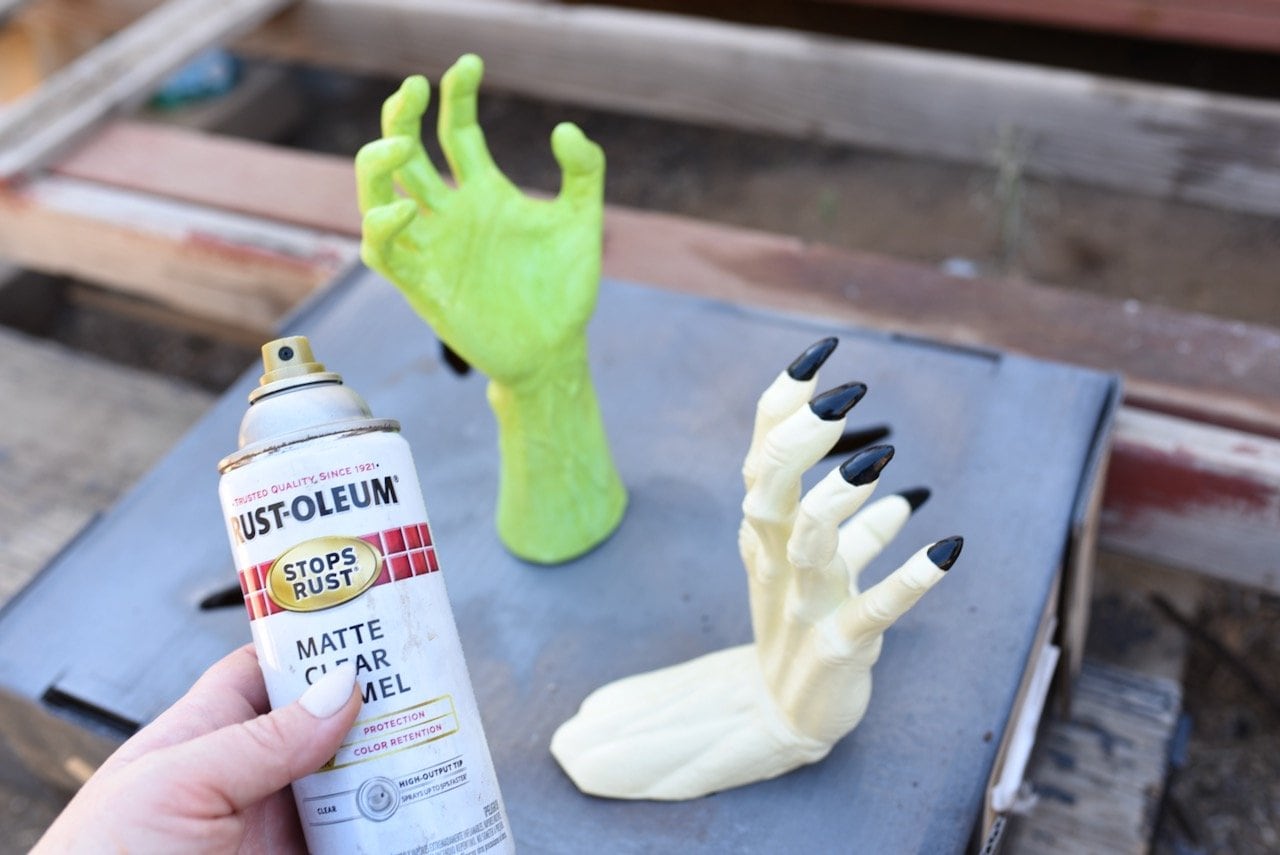
I sprayed two coats of a matte clear coat all over the hand to keep the paint safe and looking its’ best.
Manicure Time
Now it’s time to give our witch some pretty black nails to make her extra witchy!
I used e-6000 glue and a Q-tip to add a dab of glue to the back of each press-on nail.
Next, I pressed each nail, one at a time, on the finger that they fit the best.

I held each fingernail in place for minute or two to make sure it would hold.
E-6000 is VERY strong glue, but it takes about 24 hours to cure, so be sure to hold it in place.
I wrapped masking tape around each finger to hold the nails in place while the glue dried.
Make the Witch Sleeve
My witch is a little bougie, so I wanted to add a lacy, feminine sleeve to her arm.
I went through my craft supplies and found some black felt, ruffle tulle, thick black lace, and black satin ribbon.
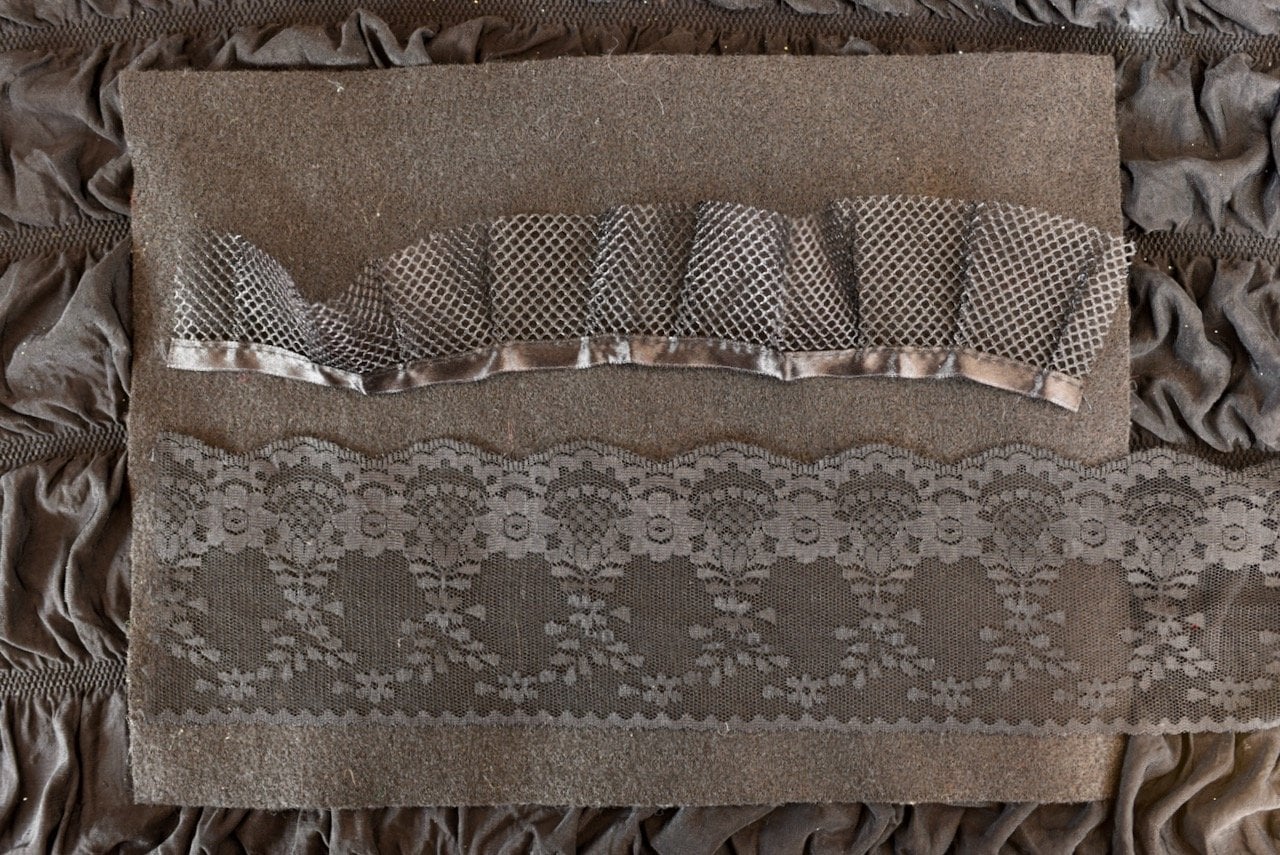
I hot glued the ruffle tulle over the top of the piece of felt.
Next, I glued the wide black lace over the bottom of the tulle so it overlapped and covered up any hot glue that was showing.
I covered up the hot glue from that step with a piece of black ribbon.
I wrapped the finished sleeve around my witch hand to see how tall I wanted the sleeve, then I trimmed the bottom to fit.
Next, I wrapped the sleeve around my with hand again, to measure where to cut the side.
I trimmed the sleeve so there was a little overlap, but not too much, since I didn’t want her sleeve to be bulky.
I hot glued her sleeve in place, then added some more black ribbon along the base of the arm (where it will sit on the Halloween tray) and the side edge to finish them off.
Her pretty witchy sleeve turned out great!
Add the final detail
My witch hand was looking really good so far, but I felt like it needed just one more thing to finish it off.
I went through my Halloween craft stash and found a small metal pumpkin.
It was perfect, minus that bright shiny silver color!
So I turned to two of my favorites- black chalk paint and gold Rub n Buff (I used the color European Gold)!
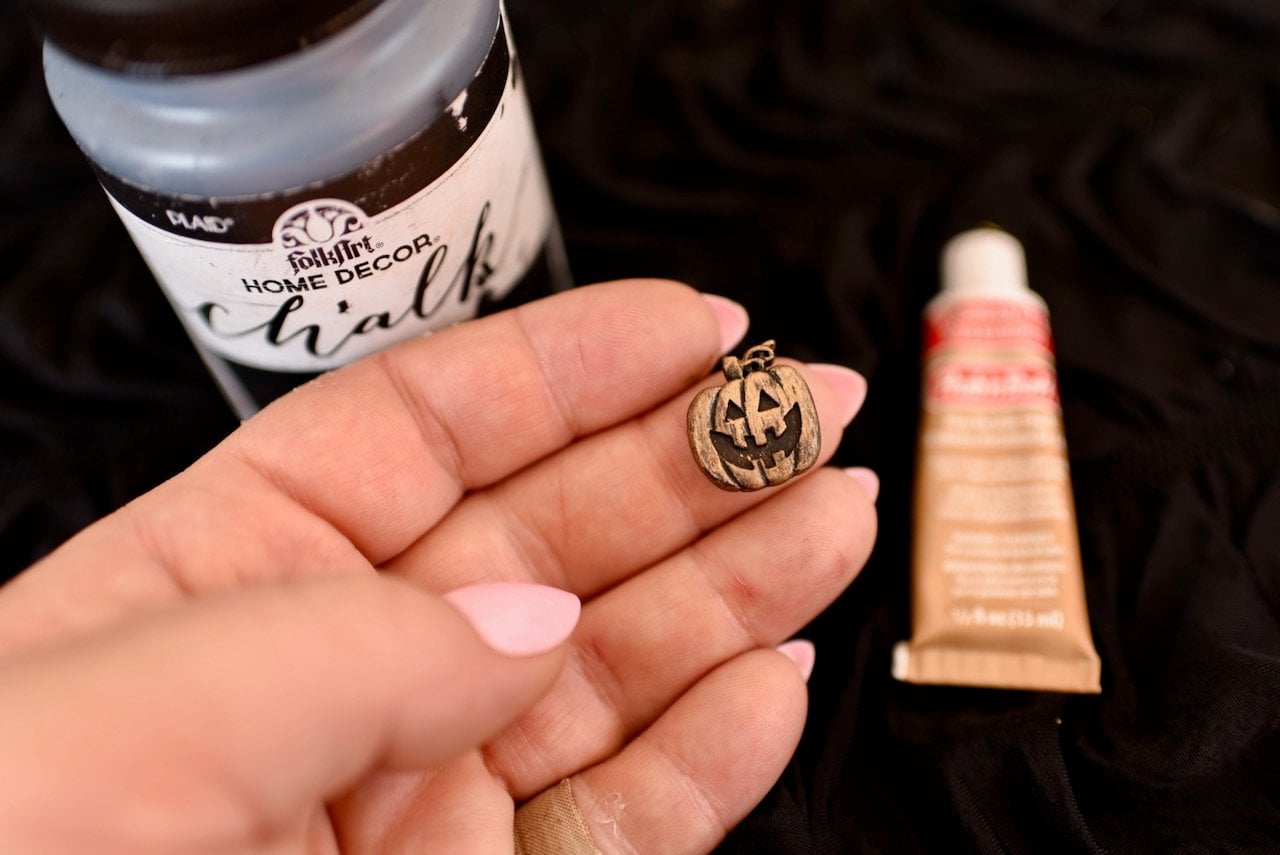
This part is totally optional, but I really feel like it was the final finishing touch this witch needed to be her bougie best!
First, I painted on two coats of the black chalk paint.
Once those were dry I used my finger to rub some of the Rub n Buff over the top.
I made sure that a little black was showing through to give it an old, worn, vintage look.
Rub n Buff is seriously one of the coolest crafting supplies ever.
It’s a metallic wax that comes in tons of colors, and the teeniest bit goes a long way.
It’s a wonderful way to change the look of just about anything!
That bright silver pumpkin looks soooo much better now.
I hot glued the pumpkin onto the black sleeve, front and center.
Then I added one of my rings and one of my daughter’s rings to her hands to give her a little more bling!
Glue the Hand Down to the Tray
Now it’s time for the final step of our hand Halloween tray!
We need to glue down the hand onto the middle of the silver tray.
First, figure out exactly where you want your hand to go on the tray.
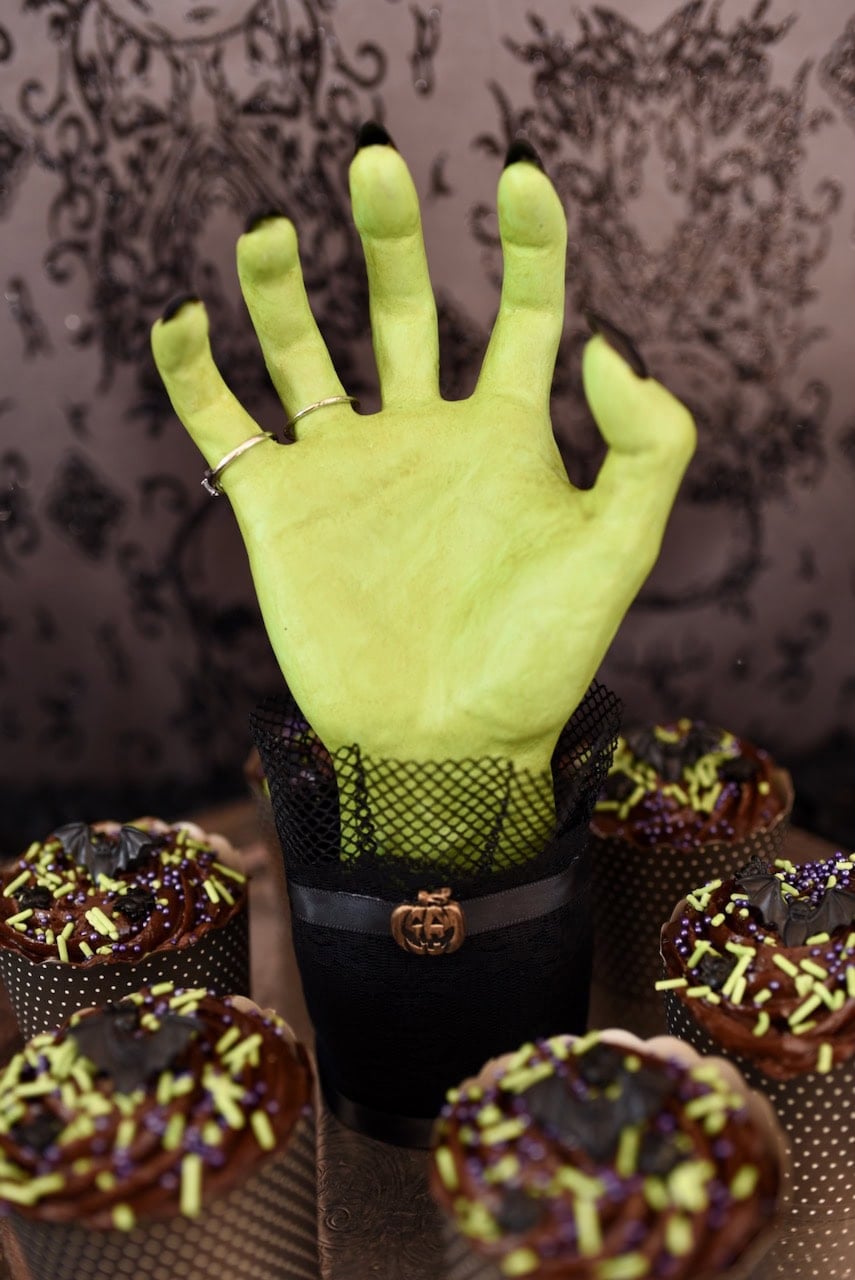
Next, add a good amount of e-6000 to the flat bottom of the hand.
Then add hot glue on the spots where there isn’t any e-6000.
Quickly press the hand down in place on the tray, then hold in place for a couple minutes.
The hot glue provides a quick hold, while the e-6000 will provide a very strong, long-lasting hold (after it cures in a day).
With this glue combo, you get the best of both worlds!
Witchy Halloween Tray
Now it’s time to load up that gorgeous Halloween tray with treats!
Cupcakes are the obvious choice, but you could also serve creepy witches fingers, Halloween dirt cups, cookies, Halloween candy, nuts, and more on this fancy tray.
This Halloween tray is the perfect practical decoration for your next Halloween party, movie night, entertaining, trick or treating, trunk or treating, or just for fun.
Be sure to check out all of our other fun Halloween tutorials- there are some fun ones!
Happy crafting!
![]()
Leave a Reply